How to Build a jQuery PDF Viewer with PDF.js

In this tutorial, we’ll show how to build a jQuery PDF viewer with PDF.js, one of the most popular open source libraries for rendering PDF files in the browser.
While jQuery isn’t used as much as it once was, it’s still one of the most popular libraries for building web applications. According to the Stack Overflow 2021 Developer Survey, it’s the web’s second-most popular framework, after React.
jQuery provides a standardized, simplified way of extracting, manipulating, and creating webpage content. It makes operations like making network requests, rendering dynamic content, manipulating the DOM, and adding rich animations incredibly simple.

A staggering 78% of the top 1 million websites use jQuery in some way, according to BuiltWith.
In the first part of this tutorial, we’ll walk through how to render and view a PDF in the browser with PDF.js. In the second part, we’ll look at how to build a fully featured PDF viewer with the PSPDFKit jQuery PDF library. Our PDF viewer library provides some additional benefits beyond what PDF.js provides, including:
- A prebuilt and polished UI for an improved user experience
- 15+ prebuilt annotation tools to enable document collaboration
- Support for more file types with client-side PDF, MS Office, and image viewing
- Dedicated support from engineers to speed up integration
Requirements
To get started, you’ll need:
-
A package manager for installing the PSPDFKit library. You can use npm or Yarn. If you don’t want to use a package manager, you may choose to manually download the files into your project.

When you install Node.js,
npmis installed by default.
Building a jQuery PDF Viewer with PDF.js
PDF.js is an open source JavaScript library built by Mozilla, and it allows you to create a full-featured PDF viewer in the browser using JavaScript and the HTML5 canvas element.
A Primer on the HTML5 Canvas
PDF.js uses the HTML5 canvas element to render a PDF. The HTML5 canvas element is a 2D drawing surface that’s used to draw graphics and images on the page. The canvas element is declared using the <canvas> tag, and the id attribute is used to access it from the JavaScript code:
<canvas id="canvas"></canvas>To actually draw things onto the canvas, you need to use the getContext method to get the drawing context:
const $ctx = $('#canvas')[0].getContext('2d');
Since we’re using jQuery in this tutorial, to access the actual DOM element, we need to get the first index and then use the getContext method with the 2d context. This will give us two-dimensional drawing APIs.
This method will return an object that implements the CanvasRenderingContext2D interface that contains the various APIs for rendering content onto the canvas.
Now, we can get started with our tutorial. By the end of this tutorial, you’ll be able to:
- View and display a PDF file in the browser.
- Zoom in and out.
- Navigate to a specific page.
- Navigate to the next and previous pages.
You can see the end result here and access the full code on GitHub.
Creating the HTML File
-
Create the
canvaselement to place the PDF:
<!-- Canvas to place the PDF -->
<canvas id="canvas" class="canvas__container"></canvas>
-
Add the PDF.js CDN to your HTML file. You can download PDF.js manually, clone it from GitHub, or just include it via a content delivery network (CDN). We’ll use the CDN from
jsDelivr:
<!-- pdf.js CDN -->
<script src="https://cdn.jsdelivr.net/npm/pdfjs-dist@2.10.377/build/pdf.min.js"></script>
-
Add the jQuery CDN to your HTML file:
You can install the jQuery library locally and use the actual file on your computer, or you can include it via a CDN. We’ll use the Google CDN for jQuery:
<!-- jQuery CDN -->
<script src="https://ajax.googleapis.com/ajax/libs/jquery/3.6.0/jquery.min.js"></script>
We’ll have some icons for the previous (<), next (>), and zoom buttons. For that, we’ll use the Font Awesome library; all we need to do is include the CDN link for it.
You can see the full HTML code here:
<!DOCTYPE html>
<html lang="en">
	<head>
		<meta charset="UTF-8" />
		<meta http-equiv="X-UA-Compatible" content="IE=edge" />
		<meta
			name="viewport"
			content="width=device-width, initial-scale=1.0"
		/>
		<title>PDF Viewer in jQuery</title>
		<!-- Font Awesome CDN -->
		<link
			rel="stylesheet"
			href="https://cdnjs.cloudflare.com/ajax/libs/font-awesome/6.0.0-beta3/css/all.min.css"
			integrity="sha512-Fo3rlrZj/k7ujTnHg4CGR2D7kSs0v4LLanw2qksYuRlEzO+tcaEPQogQ0KaoGN26/zrn20ImR1DfuLWnOo7aBA=="
			crossorigin="anonymous"
			referrerpolicy="no-referrer"
		/>
		<link rel="stylesheet" href="style.css" />
	</head>
	<body>
		<header>
			<ul class="navigation">
				<li class="navigation__item">
					<!-- Navigate to the Previous and Next pages -->
					<a href="#" class="previous round" id="prev-page">
						<i class="fas fa-arrow-left"></i>
					</a>

					<!-- Navigate to a specific page -->
					<input type="number" value="1" id="current_page" />

					<a href="#" class="next round" id="next-page">
						<i class="fas fa-arrow-right"></i>
					</a>

					<!-- Page Info -->
					Page
					<span id="page_num"></span>
					of
					<span id="page_count"></span>
				</li>

				<!-- Zoom In and Out -->
				<li class="navigation__item">
					<button class="zoom" id="zoom_in">
						<i class="fas fa-search-plus"></i>
					</button>

					<button class="zoom" id="zoom_out">
						<i class="fas fa-search-minus"></i>
					</button>
				</li>
			</ul>
		</header>

		<!-- canvas to place the PDF -->
		<canvas id="canvas" class="canvas__container"></canvas>

		<!-- jQuery CDN -->
		<script src="https://ajax.googleapis.com/ajax/libs/jquery/3.6.0/jquery.min.js"></script>
		<!-- pdf.js CDN -->
		<script src="https://cdn.jsdelivr.net/npm/pdfjs-dist@2.10.377/build/pdf.min.js"></script>

		<!-- javascript file -->
		<script src="index.js"></script>
	</body>
</html>
At the bottom of the HTML file, we’ve included the JavaScript script tag for writing our code.
Loading the PDF
-
Now we can work with the
pdf.jslibrary and learn about its methods. Let’s start with declaring the initial state of the PDF and a variable to store the PDF:
const $pdf = 'document.pdf';

const $initialState = {
	pdfDoc: null,
	currentPage: 1,
	pageCount: 0,
	zoom: 1,
};
Before starting the project, include a PDF file in the project folder, and pass the name of the file to the $pdf variable.
PDF.js uses promises under the hood. A Promise is an object that represents the final fulfillment or failure of an asynchronous operation. If you’re not familiar with promises, you can read more about them in the MDN docs.
-
Use the
pdfjsLib.getDocument($pdf)method to load the PDF file, with the parameter$pdfbeing the path to the PDF file. Then, use the.promise.then()method to handle the promise. The.then()method takes a callback function that will be called when the promise is fulfilled. Here, we can access the PDF file and set the$initialState.pdfDocto the PDF:
pdfjsLib
.getDocument($pdf)
.promise.then((doc) => {
$initialState.pdfDoc = doc;
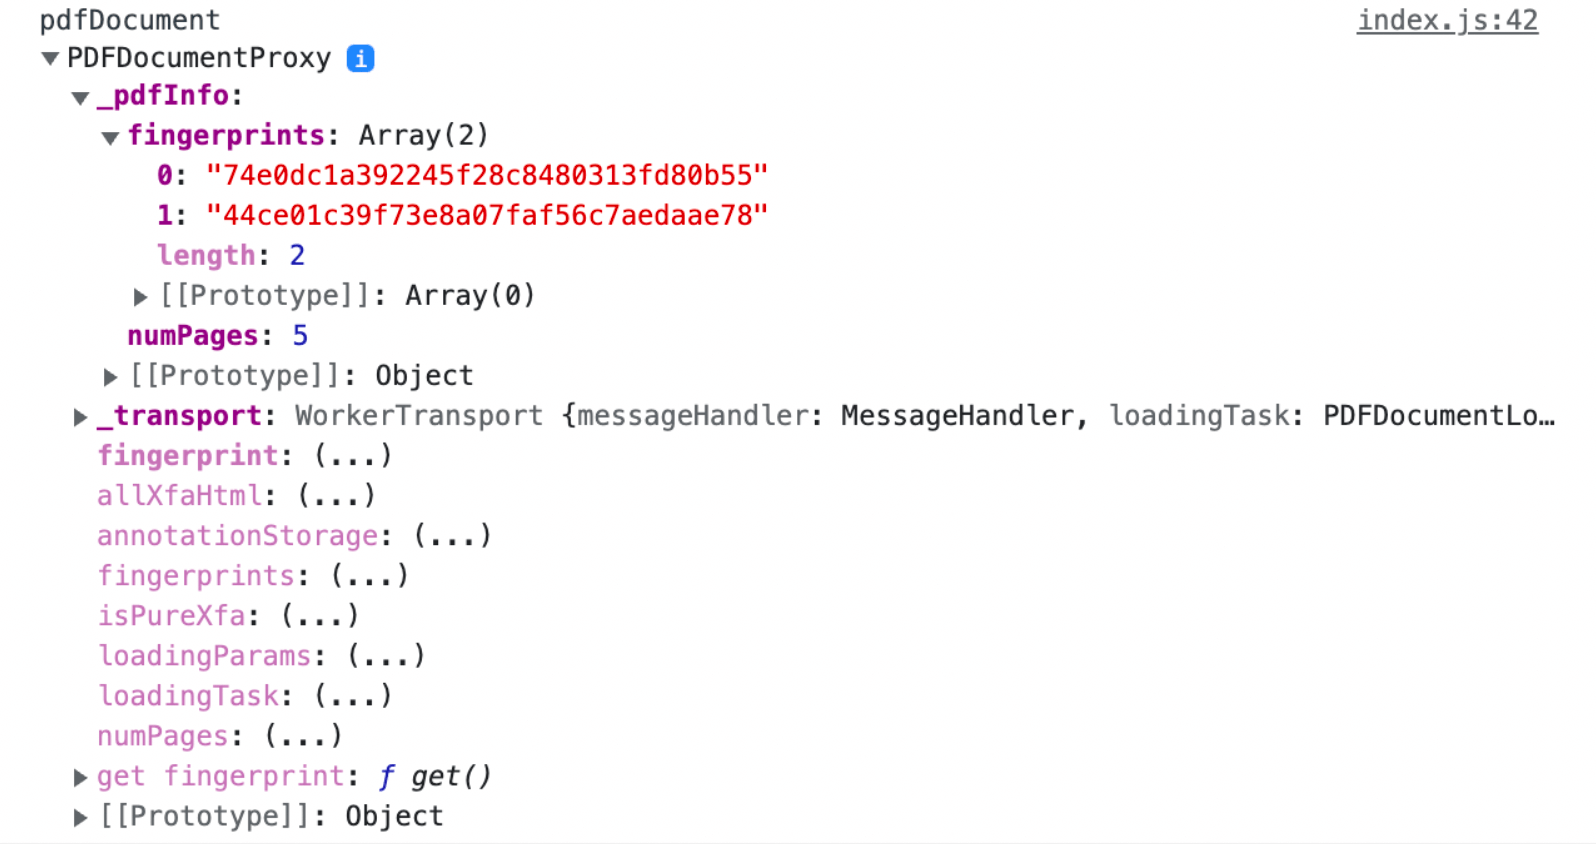
console.log('pdfDocument', $initialState.pdfDoc);
$('#page_count').html($initialState.pdfDoc.numPages);
renderPage();
})
.catch((err) => {
alert(err.message);
});If we console.log the pdfDocument variable, we can see the document’s information and the number of pages.
To access DOM elements in jQuery, use $("#my-element"). We’re using ids to identify the elements, which is why we need to use the # symbol before the DOM element. Also, use the .html() method to set the page_count to the number of pages in the PDF:
$('#page_count').html($initialState.pdfDoc.numPages);-
After getting the PDF file, we need to render it in the browser. We’ll create a function named
renderPage()that will render the current page:
// Render the page.
const renderPage = () => {
	$initialState.pdfDoc
		// Load the first page.
		.getPage($initialState.currentPage)
		.then((page) => {
			const canvas = $('#canvas')[0];
			const $ctx = canvas.getContext('2d');
			const $viewport = page.getViewport({
				scale: $initialState.zoom,
			});

			canvas.height = $viewport.height;
			canvas.width = $viewport.width;

			// Render the PDF page into the canvas context.
			const renderCtx = {
				canvasContext: $ctx,
				viewport: $viewport,
			};

			page.render(renderCtx);

			$('#page_num').html($initialState.currentPage);
		});
};
-
Now that the PDF has been initialized, we can invoke
getPage()on the document instance. The returnedPromiseresolves with apageobject that we can use to render the first page of our document. -
As we mentioned earlier, to draw something on the canvas, we need to use the
canvas.getContext()method. This method returns a context object that we can use to draw on the canvas. ThegetViewport(scale)method returns a viewport object that represents the page at the given scale. Then, we’re setting the width and height of the canvas to the width and height of the viewport. -
To render the page, we’re using the
render()method that takes the rendering context as a parameter. -
At the end, we’re accessing the
#page_numDOM element and setting its value to the current page. This will dynamically update the page number.
Navigating through the PDF Pages
We’re done loading and rendering the PDF file. However, we can only see the first page. Next, we’ll work on the toolbar and add the functionality to the previous and next page buttons.
const showPrevPage = () => {
	if ($initialState.pdfDoc === null || $initialState.currentPage <= 1)
		return;
	$initialState.currentPage--;

	// Render the current page.
	$('#current_page').val($initialState.currentPage);
	renderPage();
};

const showNextPage = () => {
	if (
		$initialState.pdfDoc === null ||
		$initialState.currentPage >=
			$initialState.pdfDoc._pdfInfo.numPages
	)
		return;

	$initialState.currentPage++;
	$('#current_page').val($initialState.currentPage);
	renderPage();
};

// Button events.
$('#prev-page').click(showPrevPage);
$('#next-page').click(showNextPage);
As we can see, the showPrevPage and showNextPage functions are very similar. They both check if the current page is the first or last page, and if so, they do nothing. Otherwise, they decrement or increment the current page and then render the page.
Displaying a Specific Page
$('#current_page').on('keypress', (event) => {
	if ($initialState.pdfDoc === null) return;
	// Get the key code.
	const $keycode = event.keyCode ? event.keyCode : event.which;
	if ($keycode === 13) {
		// Get the new page number and render it.
		let desiredPage = $('#current_page')[0].valueAsNumber;

		$initialState.currentPage = Math.min(
			Math.max(desiredPage, 1),
			$initialState.pdfDoc._pdfInfo.numPages,
		);
		renderPage();

		$('#current_page').val($initialState.currentPage);
	}
});
Here, we can specify which page to render based on a user input. We’re using the keypress event to listen for the enter key. When the user presses the enter key, we’ll get the page number from the current_page input and check if it’s between the ranges of PDF pages. If it is, we’ll set the current_page to the desired page and render the page.
For the cases when a user types a number that’s either negative or greater than the number of pages, we’ll set the currentPage to the first or last page, respectively, and display the page.
Adding the Zoom Feature
We’re done adding the ability to navigate through the PDF pages. Now, we’ll add the zoom feature:
// Zoom functionality.
$('#zoom_in').on('click', () => {
	if ($initialState.pdfDoc === null) return;
	$initialState.zoom *= 4 / 3;

	renderPage();
});

$('#zoom_out').on('click', () => {
	if ($initialState.pdfDoc === null) return;
	$initialState.zoom *= 2 / 3;
	renderPage();
});
Similar to how it works with navigation, when the user clicks on the zoom_in or zoom_out buttons, we’ll increment or decrement the zoom value and then render the page.
You can see the full code below:
const $pdf = 'document.pdf';

const $initialState = {
	pdfDoc: null,
	currentPage: 1,
	pageCount: 0,
	zoom: 1,
};

// Render the page.
const renderPage = () => {
	// Load the first page.
	$initialState.pdfDoc
		.getPage($initialState.currentPage)
		.then((page) => {
			console.log('page', page);

			const canvas = $('#canvas')[0];
			const $ctx = canvas.getContext('2d');
			const $viewport = page.getViewport({
				scale: $initialState.zoom,
			});

			canvas.height = $viewport.height;
			canvas.width = $viewport.width;

			// Render the PDF page into the canvas context.
			const renderCtx = {
				canvasContext: $ctx,
				viewport: $viewport,
			};

			page.render(renderCtx);

			$('#page_num').html($initialState.currentPage);
		});
};

// Load the document.
pdfjsLib
	.getDocument($pdf)
	.promise.then((doc) => {
		$initialState.pdfDoc = doc;
		console.log('pdfDocument', $initialState.pdfDoc);

		$('#page_count').html($initialState.pdfDoc.numPages);

		renderPage();
	})
	.catch((err) => {
		alert(err.message);
	});

function showPrevPage() {
	if ($initialState.pdfDoc === null || $initialState.currentPage <= 1)
		return;
	$initialState.currentPage--;
	// Render the current page
	$('#current_page').val($initialState.currentPage);
	renderPage();
}

function showNextPage() {
	if (
		$initialState.pdfDoc === null ||
		$initialState.currentPage >=
			$initialState.pdfDoc._pdfInfo.numPages
	)
		return;

	$initialState.currentPage++;
	$('#current_page').val($initialState.currentPage);
	renderPage();
}

// Button events.
$('#prev-page').click(showPrevPage);
$('#next-page').click(showNextPage);

// Display a specific page.
$('#current_page').on('keypress', (event) => {
	if ($initialState.pdfDoc === null) return;
	// Get the key code.
	const $keycode = event.keyCode ? event.keyCode : event.which;
	if ($keycode === 13) {
		// Get the new page number and render it.
		let desiredPage = $('#current_page')[0].valueAsNumber;

		$initialState.currentPage = Math.min(
			Math.max(desiredPage, 1),
			$initialState.pdfDoc._pdfInfo.numPages,
		);
		renderPage();

		$('#current_page').val($initialState.currentPage);
	}
});

// Zoom functionality.
$('#zoom_in').on('click', () => {
	if ($initialState.pdfDoc === null) return;
	$initialState.zoom *= 4 / 3;

	renderPage();
});

$('#zoom_out').on('click', () => {
	if ($initialState.pdfDoc === null) return;
	$initialState.zoom *= 2 / 3;
	renderPage();
});
Challenges of Working with PDF.js
PDF.js is an excellent library for simple use cases. For more complex use cases, a commercial viewer might end up having a lower cost. We’ve had customers switch from PDF.js after experiencing some of the following challenges:
- Limited documentation and an unstructured API design that often led to longer development times when customizing the PDF.js viewer.
- Significant time and developer resources to add features like annotations, document editing, and e-signatures to the viewer.
- Fixing and maintaining the viewer when a new version of PDF.js is released.
Building a jQuery PDF Viewer with PSPDFKit
If you require a PDF viewer with a more robust feature set, our jQuery PDF viewer library delivers the following benefits:
- Save time with a well-documented list of APIs when customizing the UI to meet your exact requirements.
- Draw, circle, highlight, comment, and add notes to documents with 15+ prebuilt annotation tools.
- View PNG, JPG, and TIFF files on the client side. With server deployment, users can view MS Office documents.
- Easily add features like PDF editing, digital signatures, form filling, real-time document collaboration, and more.
- Deploy faster by working 1-on-1 with our dedicated support engineers.
- And more...
Getting started with the PSPDFKit jQuery PDF viewer is straightforward. You can choose to install it manually, or use a package manager like Yarn or npm. In this tutorial, we’ll use npm to interact with the library.
-
Install the PSPDFKit library with
npm:
npm install pspdfkit
yarn add pspdfkit
-
For PSPDFKit for Web to work, we have to copy the directory containing all the required library files (artifacts) to the
assetsfolder. We can use the following command to do this:
cp -R ./node_modules/pspdfkit/dist/ ./assets/
Make sure your assets directory contains the pspdfkit.js file and a pspdfkit-lib directory with the library assets.
Integrating PSPDFKit into Your Project
-
Add the PDF document you want to display to your project’s directory. You can use our demo document as an example.
-
Add an empty
<div>element with a definedwidthandheightto where PSPDFKit will be mounted:
<div id="pspdfkit" style="width: 100%; height: 100vh;"></div>
-
Add the Google jQuery CDN to your HTML page:
<script src="https://ajax.googleapis.com/ajax/libs/jquery/3.6.0/jquery.min.js"></script>-
Include
pspdfkit.jsin your HTML page:
<script src="assets/pspdfkit.js"></script>-
Initialize PSPDFKit for Web in jQuery by calling
PSPDFKit.load():
<script>
	PSPDFKit.load({
		container: '#pspdfkit',
		document: 'Document.pdf',
	})
		.then(function (instance) {
			console.log('PSPDFKit loaded', instance);
		})
		.catch(function (error) {
			console.error(error.message);
		});
</script>
Launching the Website Locally
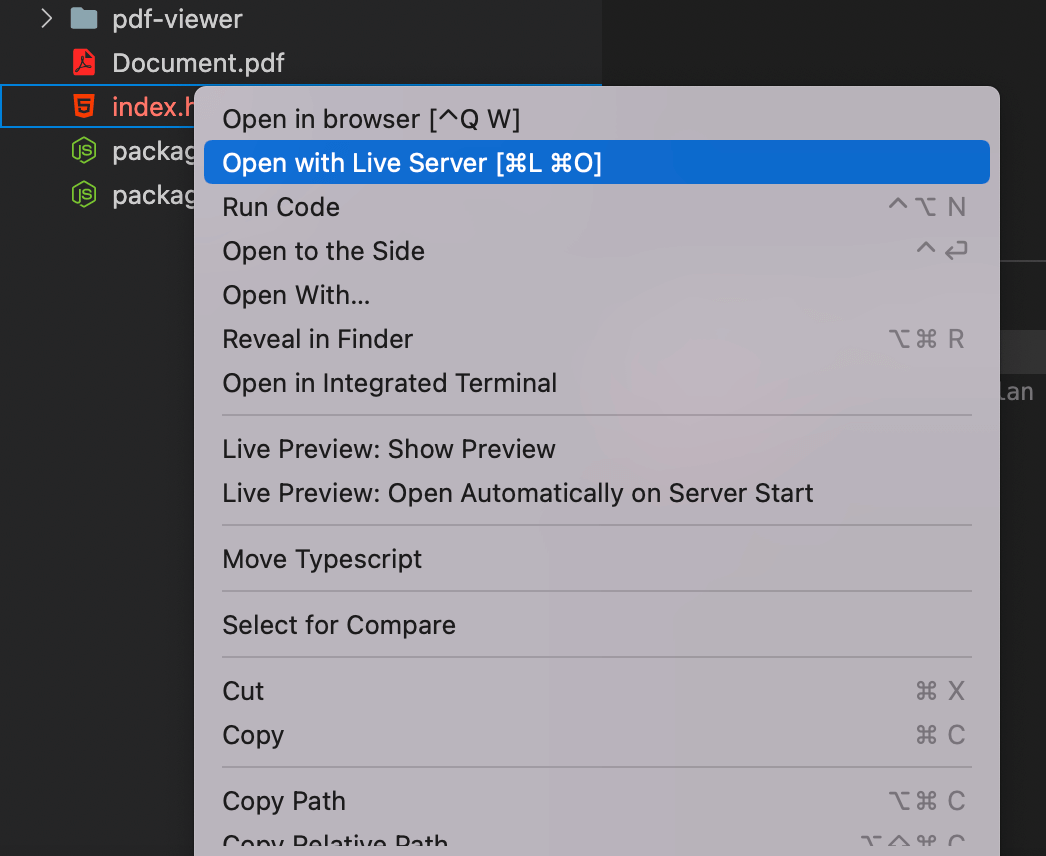
You can use the Visual Studio Code Live Server extension to serve your website. All you need to do is right-click on the HTML file and choose the Open with Live Server option from the context menu.
Serving the Website Locally
Another option is to use the serve package as a simple HTTP server. Follow the steps below if you want to use that option.
-
Install the
servepackage:
npm install --global serve
yarn global add serve
-
Serve the contents of the current directory:
serve -l 8080 .
-
Navigate to http://localhost:8080 to view the website.

If you want to download PSPDFKit manually or integrate it as a module, you can check out our jQuery getting started guide.
Conclusion
In this tutorial, we looked at how to build a jQuery PDF viewer — first with PDF.js, and then with the PSPDFKit jQuery PDF viewer library that allows you to display and render PDF files in your jQuery application.
We created similar how-to blog posts using different web frameworks and libraries:
- How to Build an Angular PDF Viewer with PDF.js
- How to Build a Vue.js PDF Viewer with PDF.js
- How to Build a React PDF Viewer with PDF.js
- How to Build a Bootstrap 5 PDF Viewer with PDF.js
- How to Build an Electron PDF Viewer with PDF.js
- How to Build a TypeScript PDF Viewer with PDF.js
- How to Build a JavaScript PDF Viewer with PDF.js
To get started with our jQuery PDF viewer, try it for free, or launch our web demo.

Hulya is a frontend web developer and technical writer at PSPDFKit who enjoys creating responsive, scalable, and maintainable web experiences. She’s passionate about open source, web accessibility, cybersecurity privacy, and blockchain.


