Generate On-Device PDF Reports on iOS


PSPDFKit allows you to use templates to create PDF reports on a mobile device and without an internet connection. With a combination of features like the Document Editor, Annotations, and Forms, you can create professional reports based on a template and include custom cover and final pages, insert new pages and pages from existing documents, add annotations, fill out forms, and secure your PDF reports.
So let’s get started!
Setting Up the Pages
First, we set up the report’s pages. We do this with a template document from which we only preserve the first and last pages to use as the cover and final pages.
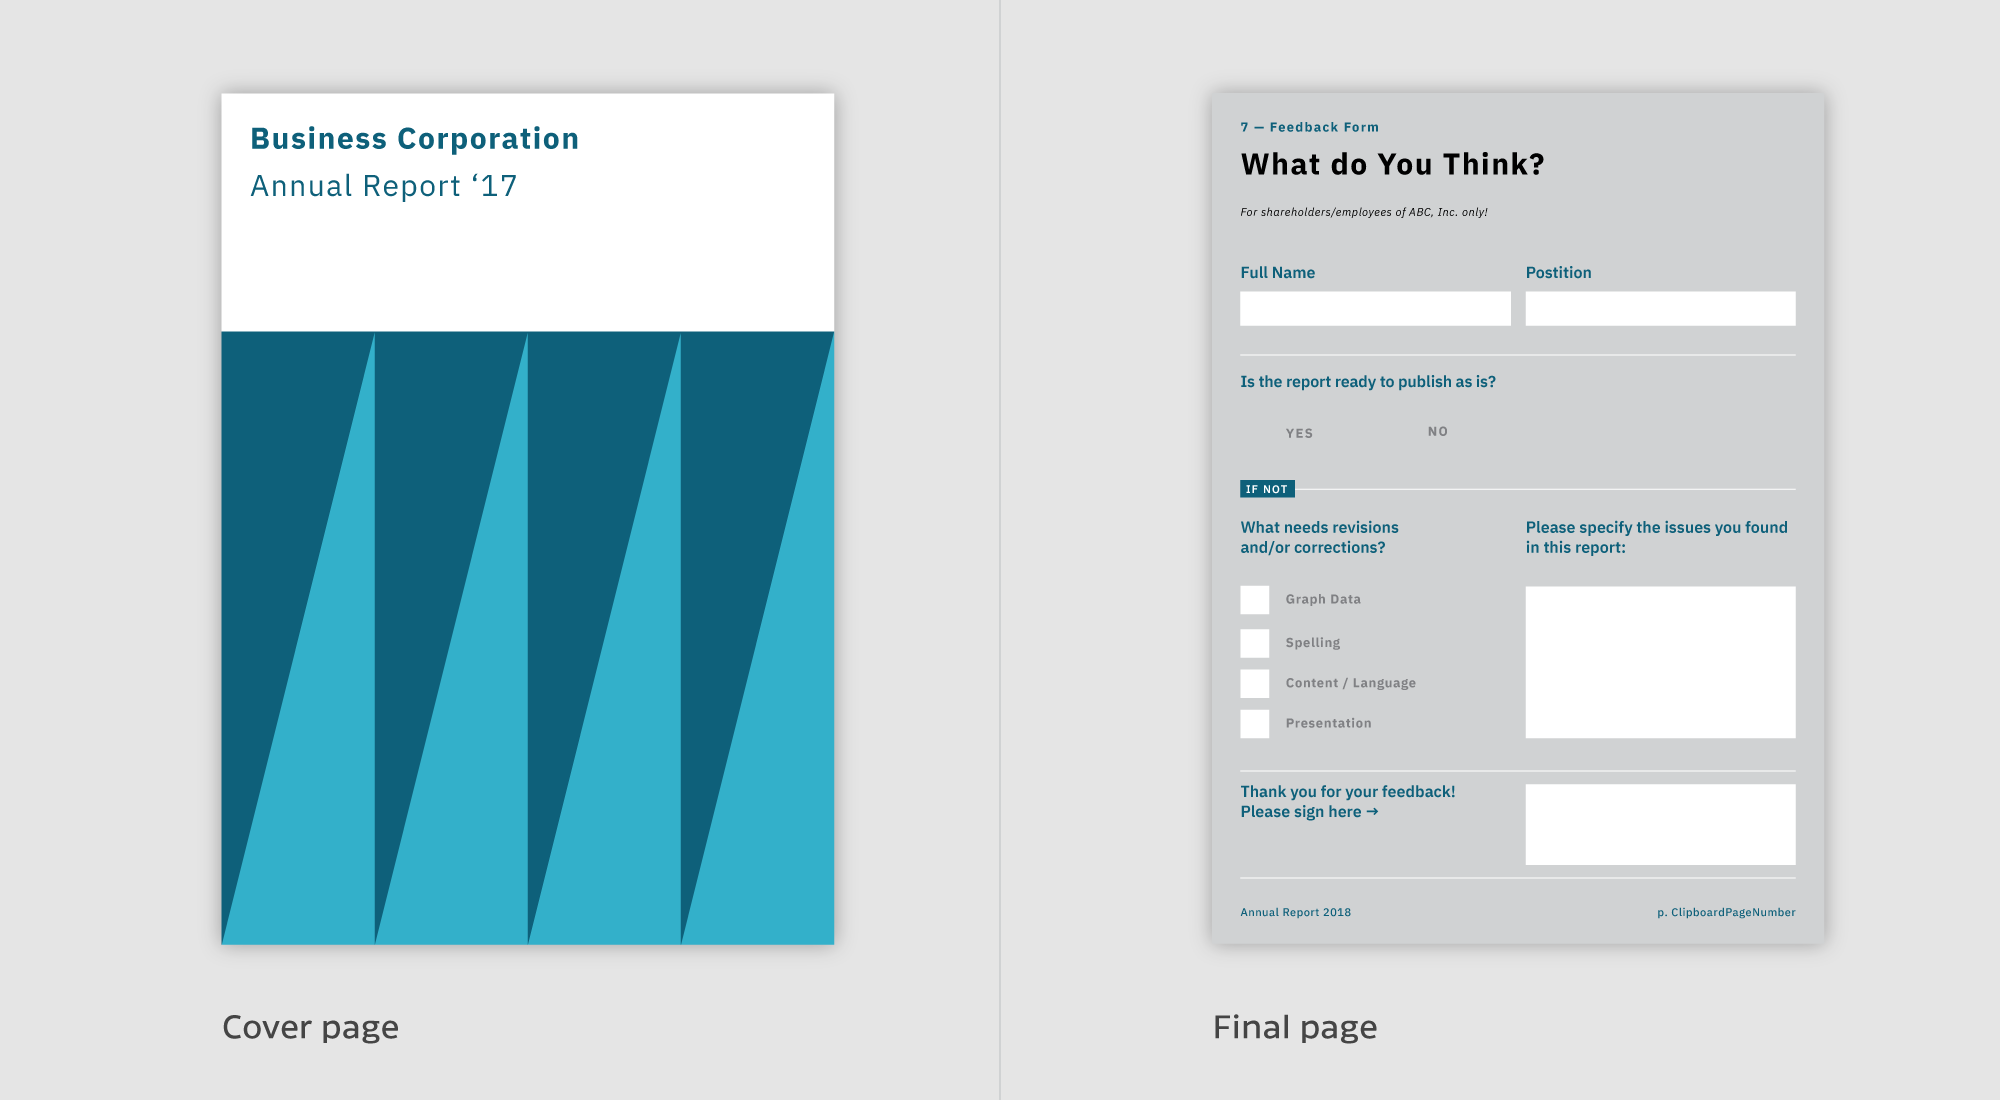
We then add a new empty page with a pattern, and to finish, we insert a page from another document. This is how it looks in code:
let document = ...
guard let configuration = PSPDFProcessorConfiguration(document: document) else {
    print("Processor configuration needs a valid document")
    abort()
}

// Keep only the first and last page of the original document.
configuration.removePages(IndexSet(1..<Int(document.pageCount - 1)))

// Add a new page with a pattern grid as the third page of the report.
configuration.addNewPage(at: 2, configuration: PSPDFNewPageConfiguration(tiledPattern: PSPDFNewPagePatternGrid5mm) { builder in
    builder.backgroundColor = .white
})

// Add a page from an existing document.
let anotherDocument = ...
configuration.addNewPage(at: 3, configuration: PSPDFNewPageConfiguration(document: anotherDocument, sourcePageIndex: 7))

// PSPDFProcessor doesn't modify the document, but rather it creates an output file instead.
let generatedReportURL = ...
do {
    let processor = PSPDFProcessor(configuration: configuration, securityOptions: nil)
    processor.delegate = self
    try processor.write(toFileURL: generatedReportURL)
} catch {
    print("Error while processing document: \(error)")
    return false
}
PSPDFDocument *document = ...
PSPDFProcessorConfiguration *configuration = [[PSPDFProcessorConfiguration alloc] initWithDocument:document];

// Keep only the first and last page of the original document.
[configuration removePages:[NSIndexSet indexSetWithIndexesInRange:NSMakeRange(1, document.pageCount - 1)]];

[configuration addNewPageAtIndex:2 configuration:[PSPDFNewPageConfiguration newPageConfigurationWithTiledPattern:PSPDFNewPagePatternLines5mm builderBlock:^(PSPDFNewPageConfigurationBuilder *builder) {
        builder.backgroundColor = UIColor.whiteColor;
}];

// Add a page from an existing document.
PSPDFDOcument *anotherDocument = ...
[configuration addNewPageAtIndex:3 configuration:[PSPDFNewPageConfiguration newPageConfigurationWithDocument:anotherDocument sourcePageIndex:7 builderBlock:NULL]];

// PSPDFProcessor doesn't modify the document, but rather it creates an output file instead.
NSURL *generatedReportURL = ...
PSPDFProcessor *processor = [[PSPDFProcessor alloc] initWithConfiguration:configuration securityOptions:nil];
processor.delegate = self;
[processor writeToFileURL:outputFileURL error:NULL]
Adding Text and Images
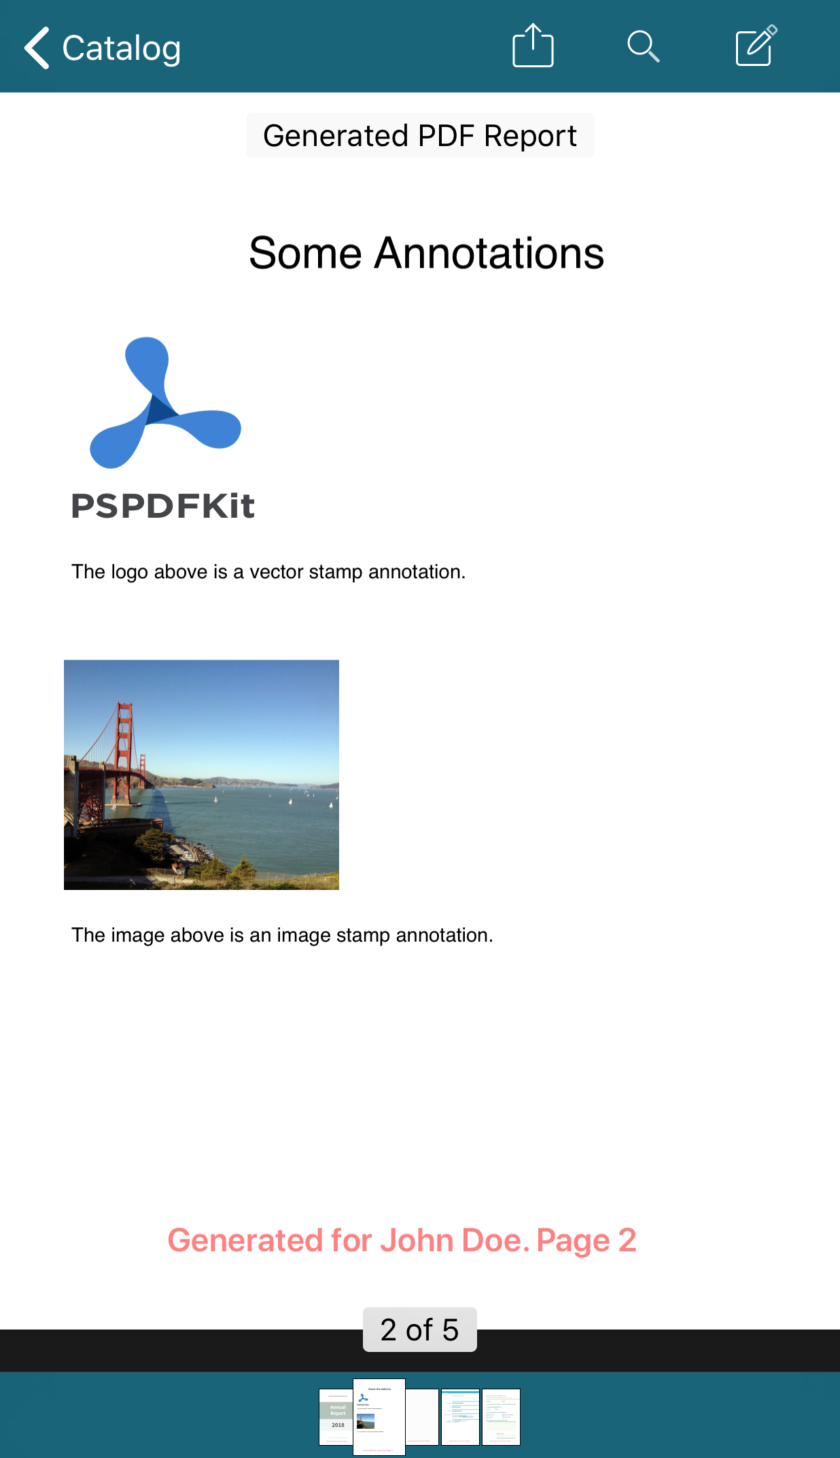
To add text and images, we use free text and stamp annotations, like so:
// Create a free text annotation.
let freeTextAnnotation = PSPDFFreeTextAnnotation()
freeTextAnnotation.contents = "Some Annotations"
freeTextAnnotation.boundingBox = CGRect(x: 228, y: 924, width: 600, height: 80)
freeTextAnnotation.fontSize = 40

// Add the free text annotation to the document.
document.add([freeTextAnnotation])

// Create an image stamp annotation.
let imageStampAnnotation = PSPDFStampAnnotation()
let image = UIImage(named: "exampleimage.jpg")!
imageStampAnnotation.image = image
imageStampAnnotation.boundingBox = CGRect(x: 60, y: 400, width: image.size.width / 4, height: image.size.height / 4)

// Add the image stamp annotation to the document.
document.add([imageStampAnnotation])
// Create a free text annotation.
PSPDFFreeTextAnnotation *freeTextAnnotation = [[PSPDFFreeTextAnnotation alloc] init];
freeTextAnnotation.contents = @"Some Annotations";
freeTextAnnotation.boundingBox = CGRectMake(228.f, 924.f, 600.f, 80.f);
freeTextAnnotation.fontSize = 40.f;

// Add the free text annotation to the document.
[document addAnnotations:@[imageStampAnnotation] options:nil]

// Create an image stamp annotation.
PSPDFStampAnnotation *imageStampAnnotation = [[PSPDFStampAnnotation alloc] init];
imageStampAnnotation.image = [UIImage imageNamed:@"exampleimage.jpg"];
imageStampAnnotation.boundingBox = CGRectMake(60.f, 400.f, imageStampAnnotation.image.size.width / 4.f, imageStampAnnotation.image.size.height / 4.f);

// Add the image stamp annotation to the document.
[document addAnnotations:@[imageStampAnnotation] options:nil];
See our Programmatically Creating Annotations guide for more details.
Adding PDF Pages or Content into Existing PDF Pages
Vector stamp annotations allow you to embed and freely place and scale PDF pages into other PDF pages, like so:
// Create the URL of the appearance stream that uses a PDF file.
let samplesURL = Bundle.main.resourceURL?.appendingPathComponent("Samples")
let logoURL = samplesURL?.appendingPathComponent("PSPDFKit Logo.pdf")

// Create the vector stamp annotation.
let vectorStampAnnotation = PSPDFStampAnnotation()
vectorStampAnnotation.boundingBox = CGRect(x: 50, y: 724, width: 200, height: 200)
vectorStampAnnotation.appearanceStreamGenerator = PSPDFFileAppearanceStreamGenerator(fileURL: logoURL)

// Add the vector stamp annotation to the document.
document.add([vectorStampAnnotation])
// Create the URL of the appearance stream that uses a PDF file.
NSURL *samplesURL = [NSBundle.mainBundle.resourceURL URLByAppendingPathComponent:@"Samples"];
NSURL *logoURL = [samplesURL URLByAppendingPathComponent:@"PSPDFKit Logo.pdf"];

// Create the vector stamp annotation.
PSPDFStampAnnotation *vectorStampAnnotation = [[PSPDFStampAnnotation alloc] init];
vectorStampAnnotation.boundingBox = CGRectMake(50.f, 724.f, 200.f, 200.f);
vectorStampAnnotation.appearanceStreamGenerator = [[PSPDFFileAppearanceStreamGenerator alloc] initWithFileURL:logoURL];

// Add the vector stamp annotation to the document.
[document addAnnotations:@[vectorStampAnnotation] options:nil];
Refer to our Use Vector Stamps Instead of Blurry Shapes blog post for more details.
Adding Watermarks
We then draw a “Generated for John Doe. Page X” watermark on every page, like this:
// Create a default configuration.
guard let configuration = PSPDFProcessorConfiguration(document: document) else {
    // Handle failure
    abort()
}

let renderDrawBlock: PSPDFRenderDrawBlock = { context, page, cropBox, _, _ in
    // Careful. This code is executed on background threads. Only use thread-safe drawing methods.
    let name =  "John Doe"
    let text = "Generated for \(name). Page \(page + 1)"
    let stringDrawingContext = NSStringDrawingContext()
    stringDrawingContext.minimumScaleFactor = 0.1

    // Add text over the diagonal of the page.
    context.translateBy(x: 0, y: cropBox.size.height / 2)
    context.rotate(by: -.pi / 4)
    let attributes: [NSAttributedString.Key: Any] = [
        .font: UIFont.boldSystemFont(ofSize: 30),
        .foregroundColor: UIColor.red.withAlphaComponent(0.5)
    ]
    text.draw(with: cropBox, options: .usesLineFragmentOrigin, attributes: attributes, context: stringDrawingContext)
}

configuration.draw(onAllCurrentPages: renderDrawBlock)

do {
    // Start the conversion from document to processedDocumentURL.
    let processor = PSPDFProcessor(configuration: configuration, securityOptions: ni)
    try processor.write(toFileURL: processedDocumentURL)
} catch {
    // Handle failure.
    abort()
}
// Create default configuration.
PSPDFProcessorConfiguration *configuration = [[PSPDFProcessorConfiguration alloc] initWithDocument:document];

PSPDFRenderDrawBlock renderBlock = ^(CGContextRef context, NSUInteger page, CGRect cropBox, NSUInteger rotation, NSDictionary *options) {
    // Careful. this code is executed on background threads. Only use thread-safe drawing methods.
    NSString *name =  "John Doe"
    NSString *text = [NSString stringWithFormat:@"Generated for %@. Page %d", name, page + 1];
    NSStringDrawingContext *stringDrawingContext = [NSStringDrawingContext new];
    stringDrawingContext.minimumScaleFactor = 0.1f;

    // Add text over the diagonal of the page.
    CGContextTranslateCTM(context, 0.f, cropBox.size.height/2.f);
    CGContextRotateCTM(context, -(CGFloat)M_PI / 4.f);
    [text drawWithRect:cropBox
               options:NSStringDrawingUsesLineFragmentOrigin
            attributes:@{NSFontAttributeName: [UIFont boldSystemFontOfSize:100],
                         NSForegroundColorAttributeName: [UIColor.redColor colorWithAlphaComponent:0.5f]}
               context:stringDrawingContext];
};

[configuration drawOnAllCurrentPages:renderBlock];

// Start the conversion from document to processedDocumentURL.
PSPDFProcessor *processor = [[PSPDFProcessor alloc] initWithConfiguration:configuration securityOptions:nil];
[processor writeToFileURL:processedDocumentURL];
See our Adding Watermarks guide for more details.
Below is how the resulting page now appears.
Adding Form Elements
PSPDFKit allows you to add, remove, and modify interactive form elements to allow things like user input or requesting a signature. These elements include text input, radio buttons, and checkboxes:
do {
    // Create two radio buttons and position them in the document.
    let radio1 = PSPDFButtonFormElement()
    radio1.boundingBox = CGRect(x: 100, y: 100, width: 20, height: 20)
    radio1.pageIndex = 0
    let radio2 = PSPDFButtonFormElement()
    radio2.boundingBox = CGRect(x: 130, y: 100, width: 20, height: 20)
    radio2.pageIndex = 0

    // The buttonValues specify the radio buttons' onStateName.
    let buttonValues = ["RadioButton1", "RadioButton2"]

    let radioButtonFormField = try PSPDFButtonFormField.insertedButtonField(with: .radioButton, fullyQualifiedName: "RadioButton", documentProvider: document.documentProviders.first!, formElements: [radio1, radio2], buttonValues: buttonValues)
} catch {
    // Handle error.
}
// Create two radio buttons and position them in the document.
PSPDFButtonFormElement *radio1 = [[PSPDFButtonFormElement alloc] init];
radio1.boundingBox = CGRectMake(100.f, 100.f, 20.f, 20.f);
radio1.pageIndex = 0;
PSPDFButtonFormElement *radio2 = [[PSPDFButtonFormElement alloc] init];
radio2.boundingBox = CGRectMake(130.f, 100.f, 20.f, 20.f);
radio2.pageIndex = 0;

// The buttonValues specify the radio buttons' onStateName.
NSArray<NSString *> *buttonValues = @[@"RadioButton1", @"RadioButton2"];
NSError *error;
PSPDFButtonFormField *radioButtonFormField = [PSPDFButtonFormField insertedButtonFieldWithType:PSPDFFormFieldTypeRadioButton fullyQualifiedName:@"RadioButton" documentProvider:document.documentProviders[0] formElements:@[radio1, radio2] buttonValues:buttonValues
error:&error];
if (!radioButtonFormField) {
    // Handle error.
}
See our Form Creation guide for more details.
Flatten Annotations
Flattening annotations can be useful to prevent users from modifying them. In the sample code below, we flatten all annotation types except for link annotations:
let processorConfiguration = ...

// Flatten all annotations except for link annotations.
var types = PSPDFAnnotationType.all
types.remove(.link)
processorConfiguration.modifyAnnotations(ofTypes: types, change: .flatten)
PSPDFProcessorConfiguration *processorConfiguration = ...

// Flatten all annotations except for link annotations.
[processorConfiguration modifyAnnotationsOfTypes:PSPDFAnnotationTypeAll & ~PSPDFAnnotationTypeLink change:PSPDFAnnotationChangeFlatten];
See our Document Processing guide for more details.
Securing Your PDF Document
PSPDFKit allows you to secure a document against additional changes by adding a password:
// Set owner password to only allow printing.
let processorConfiguration = ...
let ownerPassword = "test123"
let securedDocumentURL = ...
let documentSecurityOptions = try? PSPDFDocumentSecurityOptions(ownerPassword: ownerPassword, userPassword: nil, keyLength: PSPDFDocumentSecurityOptionsKeyLengthAutomatic, permissions: [.printing])
let processor = PSPDFProcessor(configuration: processorConfiguration, securityOptions: documentSecurityOptions)
try processor.write(toFileURL: securedDocumentURL)

// The newly processed PSPDFDocument.
let securedDocument = PSPDFDocument(url: securedDocumentURL)
// Set owner password to only allow printing.
PSPDFProcessorConfiguration *processorConfiguration = ...
NSString *ownerPassword = @"test123";
NSURL *securedDocumentURL = ...
PSPDFDocumentSecurityOptions *documentSecurityOptions = [[PSPDFDocumentSecurityOptions alloc] initWithOwnerPassword:ownerPassword userPassword:nil keyLength:PSPDFDocumentSecurityOptionsKeyLengthAutomatic permissions:PSPDFDocumentPermissionsPrinting error:NULL];

PSPDFProcessor *processor = [[PSPDFProcessor alloc] initWithConfiguration:processorConfiguration securityOptions:documentSecurityOptions];
[processor writeToFileURL:securedDocumentURL];

// The newly processed PSPDFDocument.
PSPDFDocument *securedDocument = [[PSPDFDocument alloc] initWithURL:securedDocumentURL];
See our Creating a Password-Protected Document guide for more details.
Conclusion
In this article, we covered how to generate a PDF report using the Document Editor, Annotations, and Forms. You can generate the PDF report we discussed in this article in ReportPDFGenerationExample.swift from the Catalog app. There are also plenty of other features you can explore in your reports, such as digital signatures, annotation replies and reviews, and file annotations with embedded files, to name a few.