This guide walks you through the steps necessary to start Document Engine. It also shows you how to use it to process documents. By the end, you’ll be able to merge two PDF documents into one using Document Engines’s HTTP API via curl.
PSPDFKit Document Engine can be evaluated without a trial license key, but with certain limitations (such as a red watermark added to documents). To evaluate with fewer limitations, get a trial key.
PSPDFKit does not collect any data during your evaluation of the SDK.
Requirements
Document Engine runs on a variety of platforms. The following operating systems are supported:
macOS Ventura, Monterey, Mojave, Catalina, or Big Sur
Ubuntu, Fedora, Debian, or CentOS. Ubuntu and Debian derivatives such as Kubuntu or Xubuntu are supported as well. Currently, 64-bit Intel (x86_64) and ARM (AArch64) processors are supported.
Regardless of your operating system, you’ll need at least 4 GB of RAM.
Installing Docker
Document Engine is distributed as a Docker container. To run it on your computer, you need to install a Docker runtime distribution for your operating system.
Install and start Docker Desktop for Mac. Refer to the Docker website for instructions.
Install and start Docker Desktop for Windows. Refer to the Docker website for instructions.
Install and start Docker Engine. Refer to the Docker website for instructions on how to install it for your Linux distribution.
After you install Docker, use these instructions to install Docker Compose.
Starting Document Engine
First, open your terminal emulator.
Use the terminal emulator integrated with your code editor or IDE. Alternatively, you can use Terminal.app or iTerm2.
Use the terminal emulator integrated with your code editor or IDE. Alternatively, you can use PowerShell.
Use the terminal emulator integrated with your code editor or IDE, or one bundled with your desktop environment.
Now run the following command:
docker run --rm -t -p 5000:5000 -e API_AUTH_TOKEN=secret pspdfkit/document-engine:1.3.0
This command might take a while to run, depending on your internet connection speed. Wait until you see a message like this in the terminal:
[info] 2024-02-05 18:56:45.286 Running Document Engine version 1.3.0
Document Engine is now up and running!
Installing curl
The interaction with Document Engine happens via its HTTP API: You send documents and commands in the request and receive the resulting file in the response. To do this, you’ll first install curl so that it can call the API.
curl is bundled with macOS, so there are no extra steps you need to take to install it.
Go to the curl website and download the curl for 64 bit package.
Create a folder anywhere on your C: drive. Unzip the downloaded package and copy the curl.exe executable from the bin subfolder into the folder you just created.
Open the terminal and switch to the directory where you placed the curl executable:
cd C:\path\to\directory
Now run the .\curl.exe --version command. The output should start with curl 7 — you can ignore the rest of the message.
curl is bundled with most desktop Linux distributions. You can check if it’s installed by running the curl --version command in the terminal. If you get an error, you can install it using your distribution’s package manager:
apt-get update && apt-get install -y curl
dnf install -y curl
Now run the curl --version command. The output should start with curl 7 — you can ignore the rest of the message.
Merging PDFs
Now that everything is set up, you can start using Document Engine to merge PDFs. More specifically, you’ll add a cover page to the existing document.
(Optional) If you don’t have any sample documents, download and use these files: cover.pdf and document.pdf.
Move both files to the same directory (if you’re running on Windows, use the same folder where you placed the curl.exe executable).
Run the command below.
When merging documents, the order of the instruction parts reflects the order you want the final document to be in. In this example, the cover page comes before the rest of the document in the final merged output. This means that the instructions for the /api/build request reflect the parts in that order.
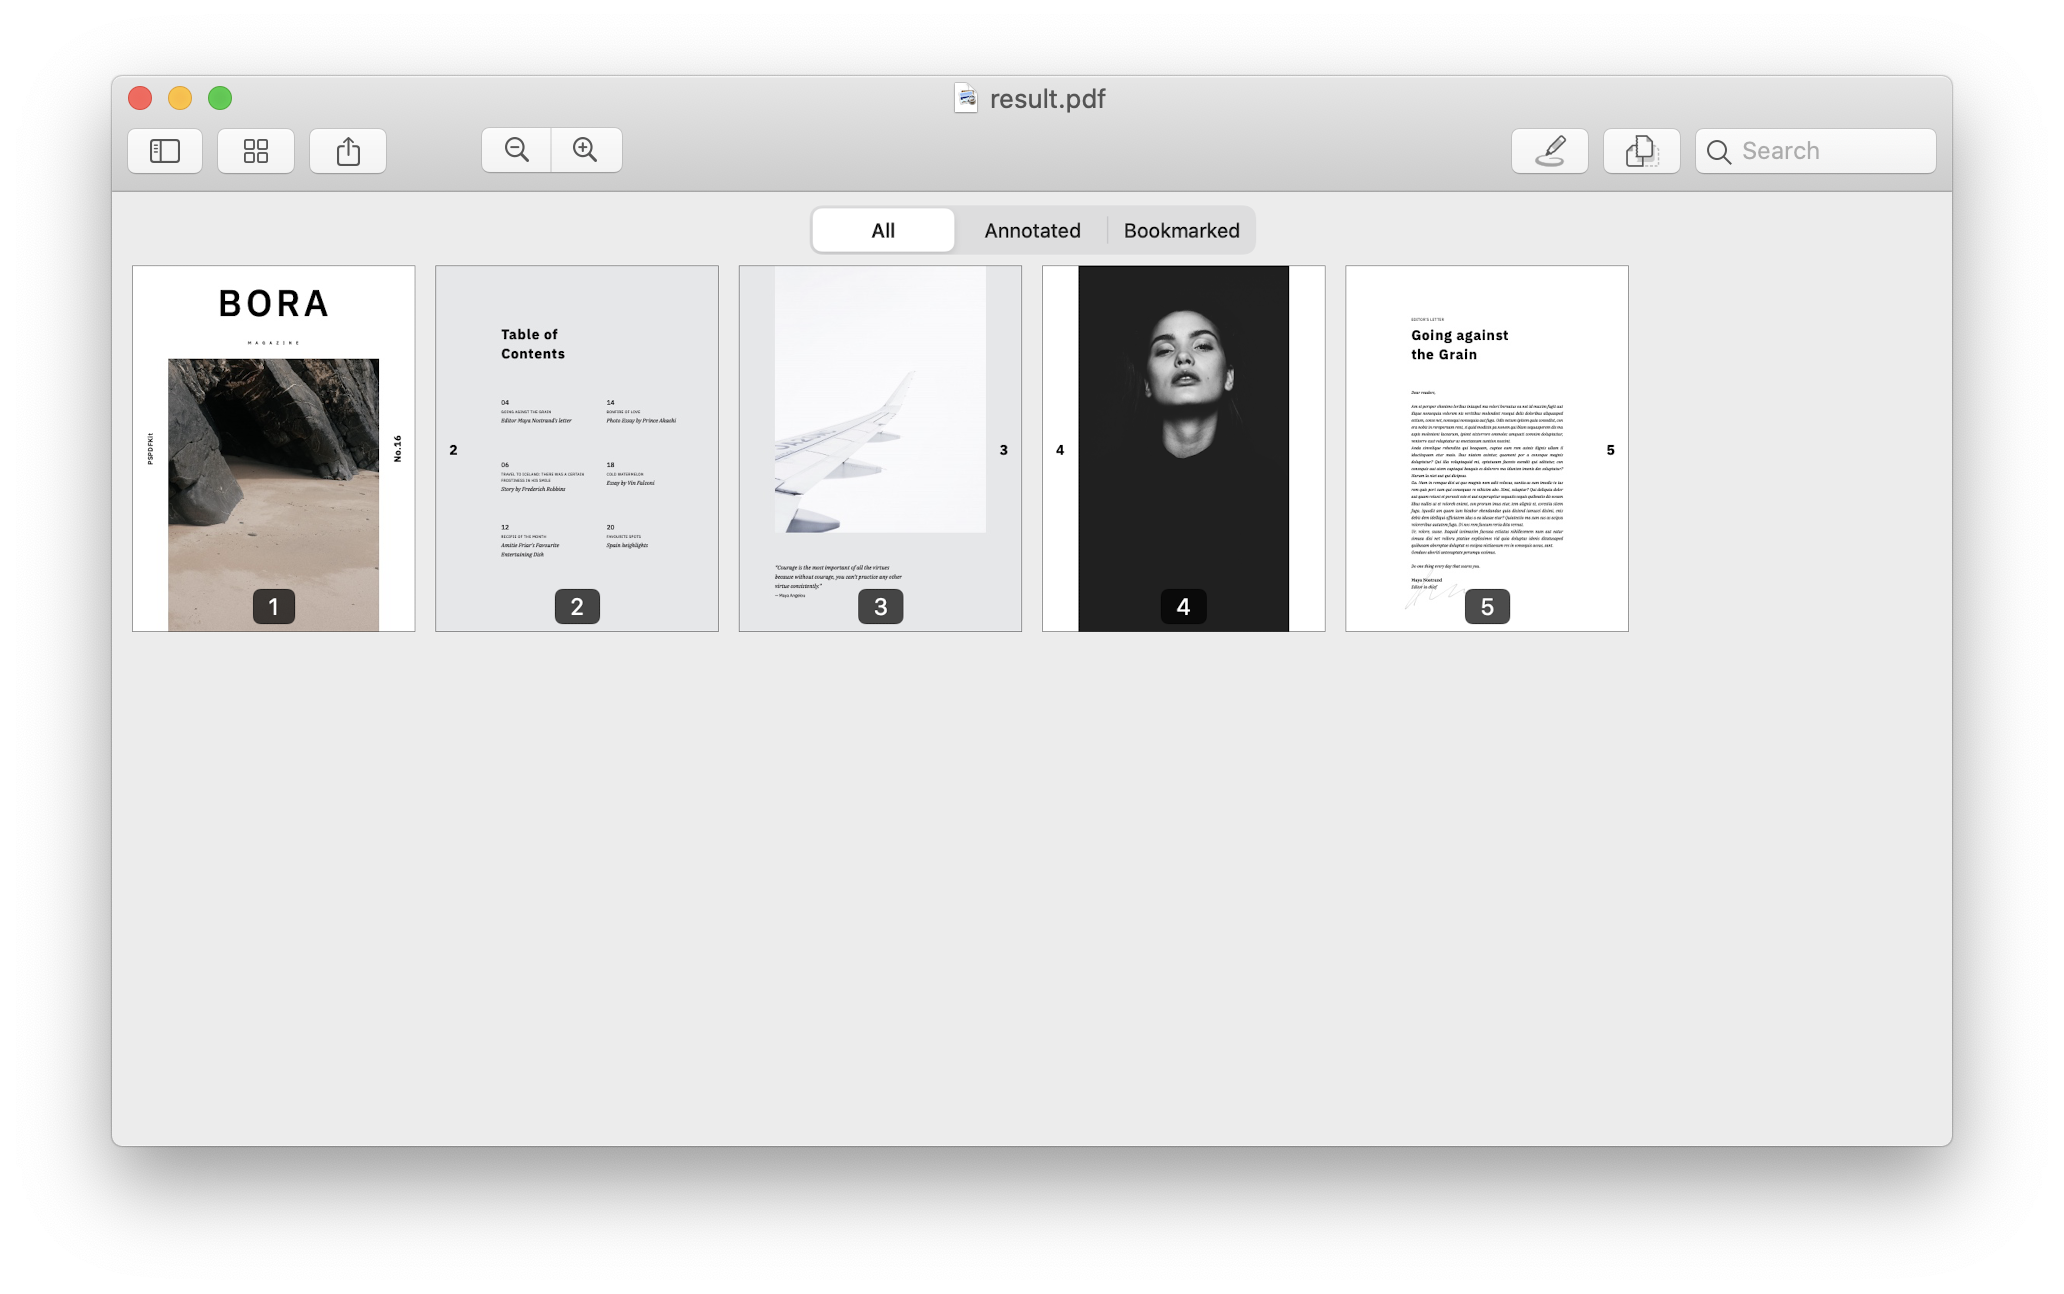
Open the result.pdf file in any PDF viewer — you’ll see a five-page PDF document like what’s shown below.
To learn more about the actions you can perform on documents with Document Engine’s /build endpoint, go to our API Reference.
This guide walks you through the steps necessary to start Document Engine. It also shows you how to use it to process documents. By the end, you’ll be able to merge two PDF documents into one using Document Engine’s HTTP API with Golang.
PSPDFKit Document Engine can be evaluated without a trial license key, but with certain limitations (such as a red watermark added to documents). To evaluate with fewer limitations, get a trial key.
PSPDFKit does not collect any data during your evaluation of the SDK.
Requirements
Document Engine runs on a variety of platforms. The following operating systems are supported:
macOS Ventura, Monterey, Mojave, Catalina, or Big Sur
Ubuntu, Fedora, Debian, or CentOS. Ubuntu and Debian derivatives such as Kubuntu or Xubuntu are supported as well. Currently, 64-bit Intel (x86_64) and ARM (AArch64) processors are supported.
Regardless of your operating system, you’ll need at least 4 GB of RAM.
Installing Docker
Document Engine is distributed as a Docker container. To run it on your computer, you need to install a Docker runtime distribution for your operating system.
Install and start Docker Desktop for Mac. Refer to the Docker website for instructions.
Install and start Docker Desktop for Windows. Refer to the Docker website for instructions.
Install and start Docker Engine. Refer to the Docker website for instructions on how to install it for your Linux distribution.
After you install Docker, use these instructions to install Docker Compose.
Starting Document Engine
First, open your terminal emulator.
Use the terminal emulator integrated with your code editor or IDE. Alternatively, you can use Terminal.app or iTerm2.
Use the terminal emulator integrated with your code editor or IDE. Alternatively, you can use PowerShell.
Use the terminal emulator integrated with your code editor or IDE, or one bundled with your desktop environment.
Now run the following command:
docker run --rm -t -p 5000:5000 -e API_AUTH_TOKEN=secret pspdfkit/document-engine:1.3.0
This command might take a while to run, depending on your internet connection speed. Wait until you see a message like this in the terminal:
[info] 2024-02-05 18:56:45.286 Running Document Engine version 1.3.0
Document Engine is now up and running!
Installing Golang
The interaction with Document Engine happens via its HTTP API. Documents and commands are sent in API request calls, and the resulting files are received in API response calls. API calls are invoked from the Go package, so you need to install Golang.
Go to any directory in your system using your terminal. Create a new directory called merging-pdfs and go to the newly created directory:
mkdir merging-pdfs
cd merging-pdfs
Create a new go module by running the command below from the merging-pdfs directory. Replace YOUR-GITHUB-USERNAME with your actual GitHub username:
go mod init github.com/YOUR-GITHUB-USERNAME/merging-pdfs
Create a new file in the directory called merge.go and add the following content:
package main

import "fmt"

func main() {
  fmt.Println("Hello World")
}
Run the file from your terminal with go run merge.go to make sure everything is working properly.
Merging PDFs with Golang
If you don’t have any sample documents, download and use these files: cover.pdf and document.pdf
Replace the contents of the merge.go file with the code below.
Replace /path/to/cover.pdf in lines 37 and 46, and replace /path/to/document.pdf in lines 59 and 68 with the actual paths to the example documents on your machine:
To run the code, ensure you’re in the merging-pdfs directory and type the following command in your terminal:
go run merge.go
Most of this code, up until the client.Do(req) statement, constructs a multipart request that’s sent to Document Engine. It includes two files — in this case, cover and document — and a list of instructions for Document Engine.
By default, Document Engine’s output for the /api/build endpoint is the result of merging all input documents or parts of the instructions.
The result of this code is a merged result.pdf file in the merging-pdfs directory.
To learn more about the various actions you can apply to PDFs using Document Engine, go to Document Engine’s API Reference.
This guide walks you through the steps necessary to start Document Engine. It also shows you how to use it to process documents. By the end, you’ll be able to merge two PDF documents into one using Document Engine’s HTTP API from PHP.
PSPDFKit Document Engine can be evaluated without a trial license key, but with certain limitations (such as a red watermark added to documents). To evaluate with fewer limitations, get a trial key.
PSPDFKit does not collect any data during your evaluation of the SDK.
Requirements
Document Engine runs on a variety of platforms. The following operating systems are supported:
macOS Ventura, Monterey, Mojave, Catalina, or Big Sur
Ubuntu, Fedora, Debian, or CentOS. Ubuntu and Debian derivatives such as Kubuntu or Xubuntu are supported as well. Currently, 64-bit Intel (x86_64) and ARM (AArch64) processors are supported.
Regardless of your operating system, you’ll need at least 4 GB of RAM.
Installing Docker
Document Engine is distributed as a Docker container. To run it on your computer, you need to install a Docker runtime distribution for your operating system.
Install and start Docker Desktop for Mac. Refer to the Docker website for instructions.
Install and start Docker Desktop for Windows. Refer to the Docker website for instructions.
Install and start Docker Engine. Refer to the Docker website for instructions on how to install it for your Linux distribution.
After you install Docker, use these instructions to install Docker Compose.
Starting Document Engine
First, open your terminal emulator.
Use the terminal emulator integrated with your code editor or IDE. Alternatively, you can use Terminal.app or iTerm2.
Use the terminal emulator integrated with your code editor or IDE. Alternatively, you can use PowerShell.
Use the terminal emulator integrated with your code editor or IDE, or one bundled with your desktop environment.
Now run the following command:
docker run --rm -t -p 5000:5000 -e API_AUTH_TOKEN=secret pspdfkit/document-engine:1.3.0
This command might take a while to run, depending on your internet connection speed. Wait until you see a message like this in the terminal:
[info] 2024-02-05 18:56:45.286 Running Document Engine version 1.3.0
Document Engine is now up and running!
Installing PHP
The interaction with Document Engine happens via its HTTP API: You send documents and commands in the request and receive the resulting file in the response. To do this, you’ll invoke the API from the PHP script. But first, you need to install PHP for your operating system:
The easiest way to install PHP on macOS is via Homebrew. Follow the instructions on the Homebrew website to install it. Then, to install PHP, run:
brew install php@7.4 && brew link php@7.4
Verify the installation by running the following command in the terminal:
php --version
The output should start with PHP 7.4 — you can ignore the rest of the message.
ℹ️ Note: If the output doesn’t match the above, try restarting your terminal app by typing exit and opening it again.
Download the PHP ZIP archive from the PHP website (pick the x86 Thread Safe build of the 7.4 release).
Create a folder anywhere on your C: drive.
Extract the ZIP archive into the folder you just created.
Open the terminal and switch to that folder:
cd C:\path\to\directory
Now run the .\php.exe --version command. The output should start with PHP 7.4 — you can ignore the rest of the message.
To proceed, you’ll also need to create a PHP configuration file to enable a specific extension. So in the same directory, create a php.ini file with the following content:
[PHP]
extension=curl
Save the file, as you’ll need it shortly.
You can install PHP using your distribution’s package manager:
apt-get update && apt-get install -y php
dnf install -y php
Now run the php --version command. The output should start with PHP 7.4 — you can ignore the rest of the message.
Handling File Uploads
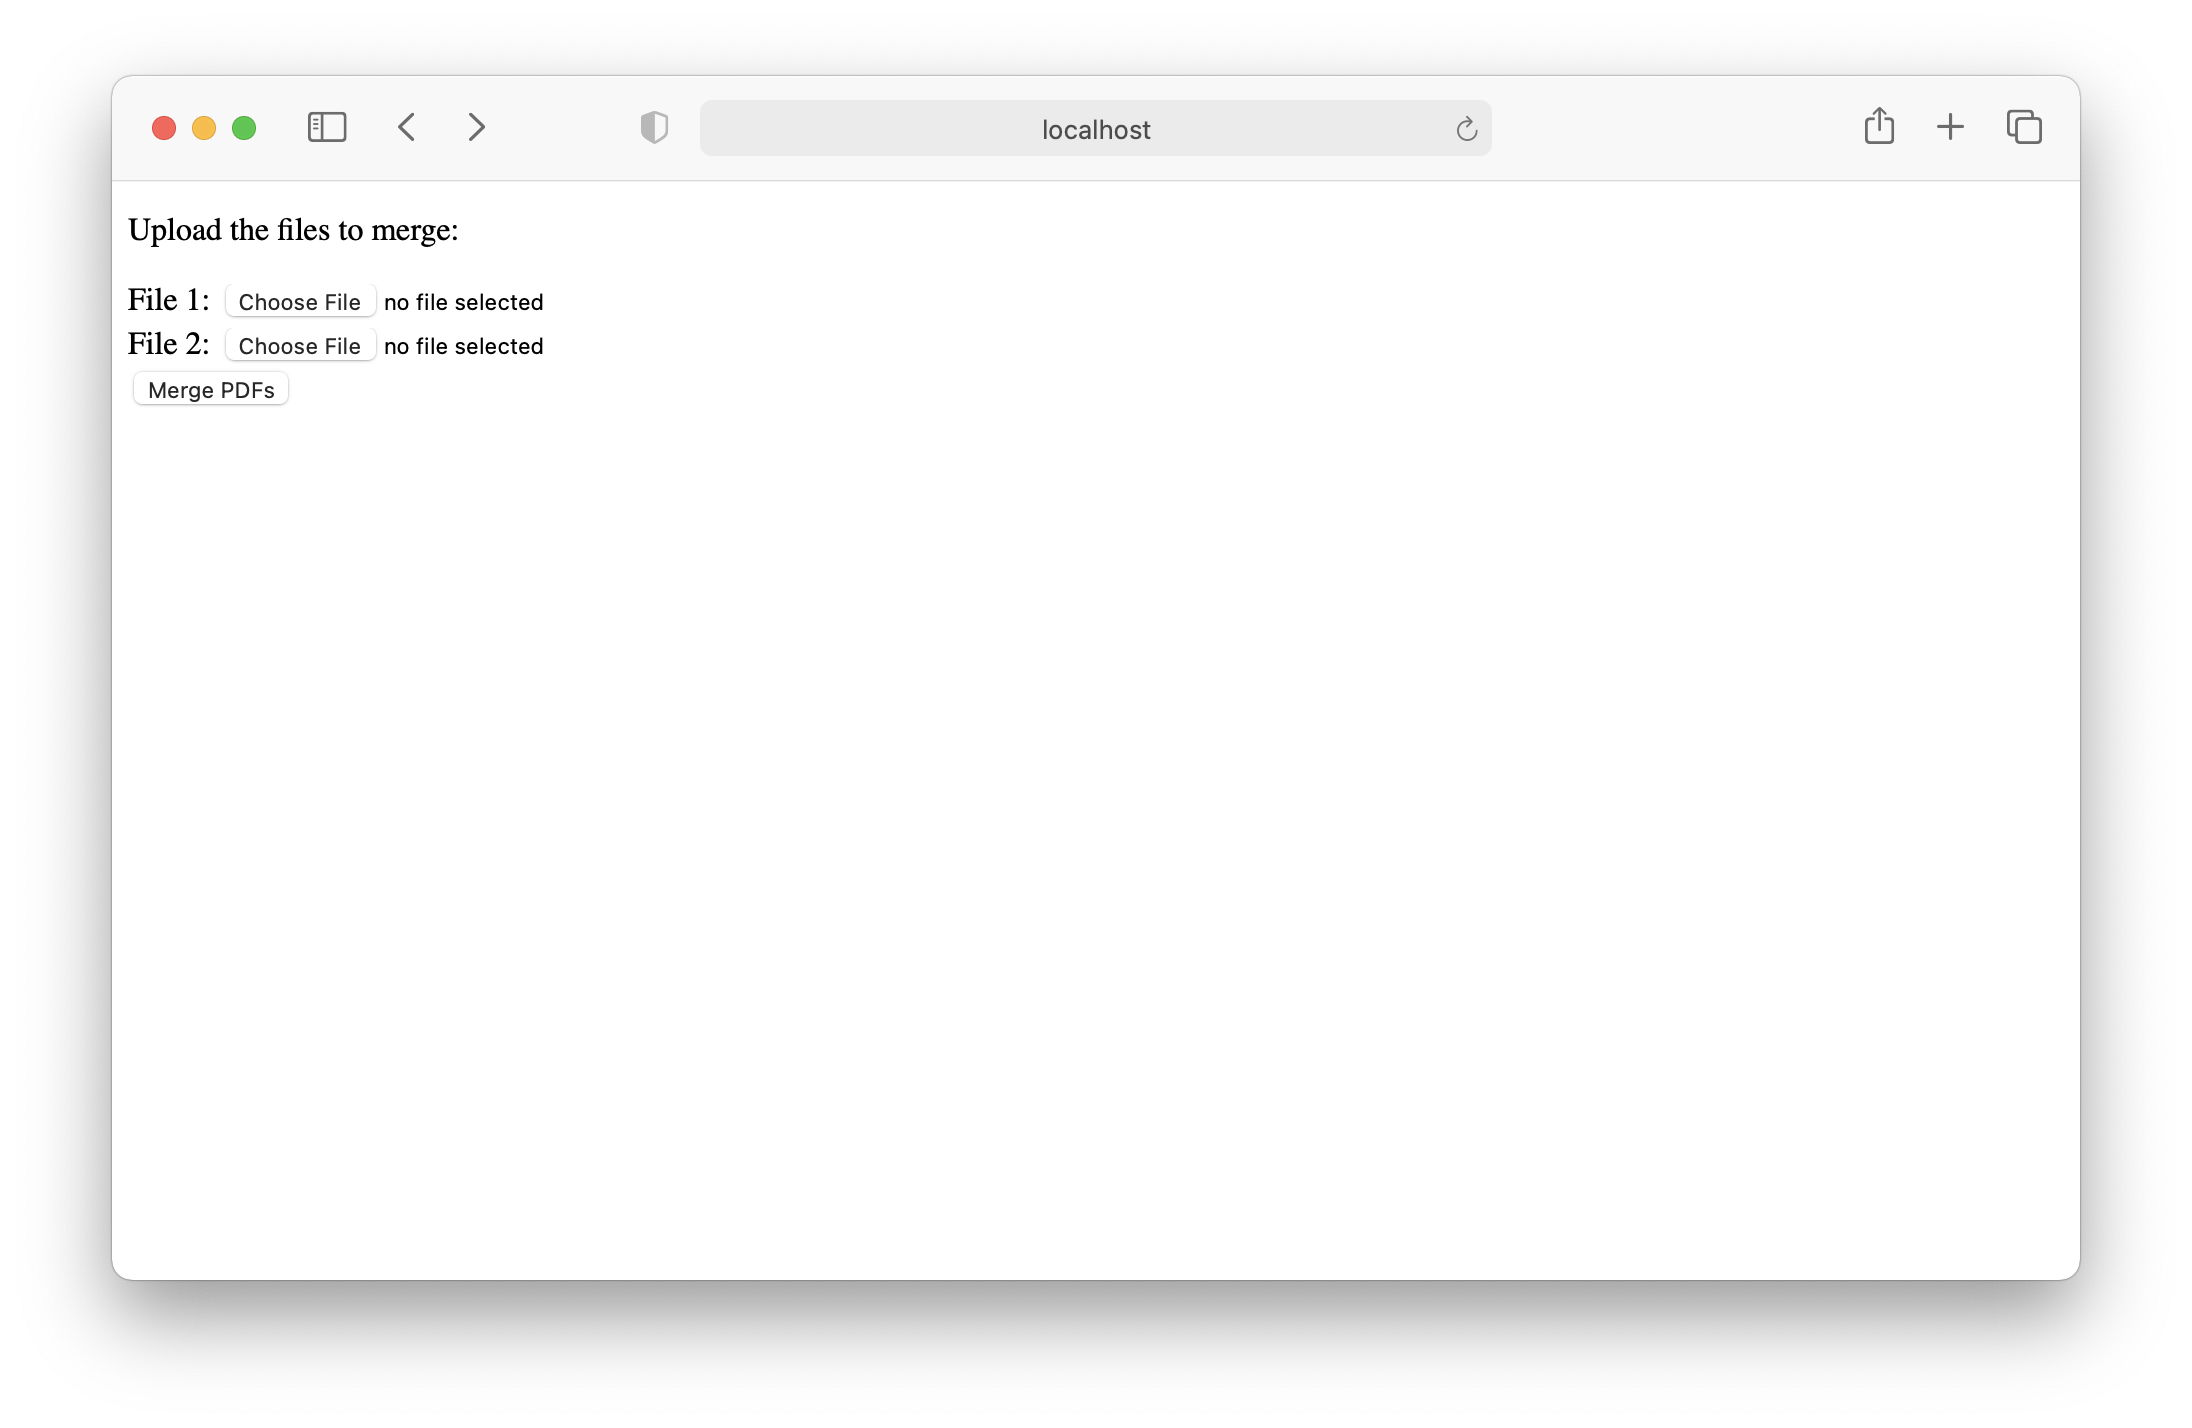
In this example project, the PDF files you’ll merge will be uploaded through a simple webpage via a standard HTML form. Create a file called index.php with the following content:
Now open the terminal and type the following command in the same directory where you created the index.php file:
php -S localhost:8000
.\php.exe -c php.ini -S localhost:8000
php -S localhost:8000
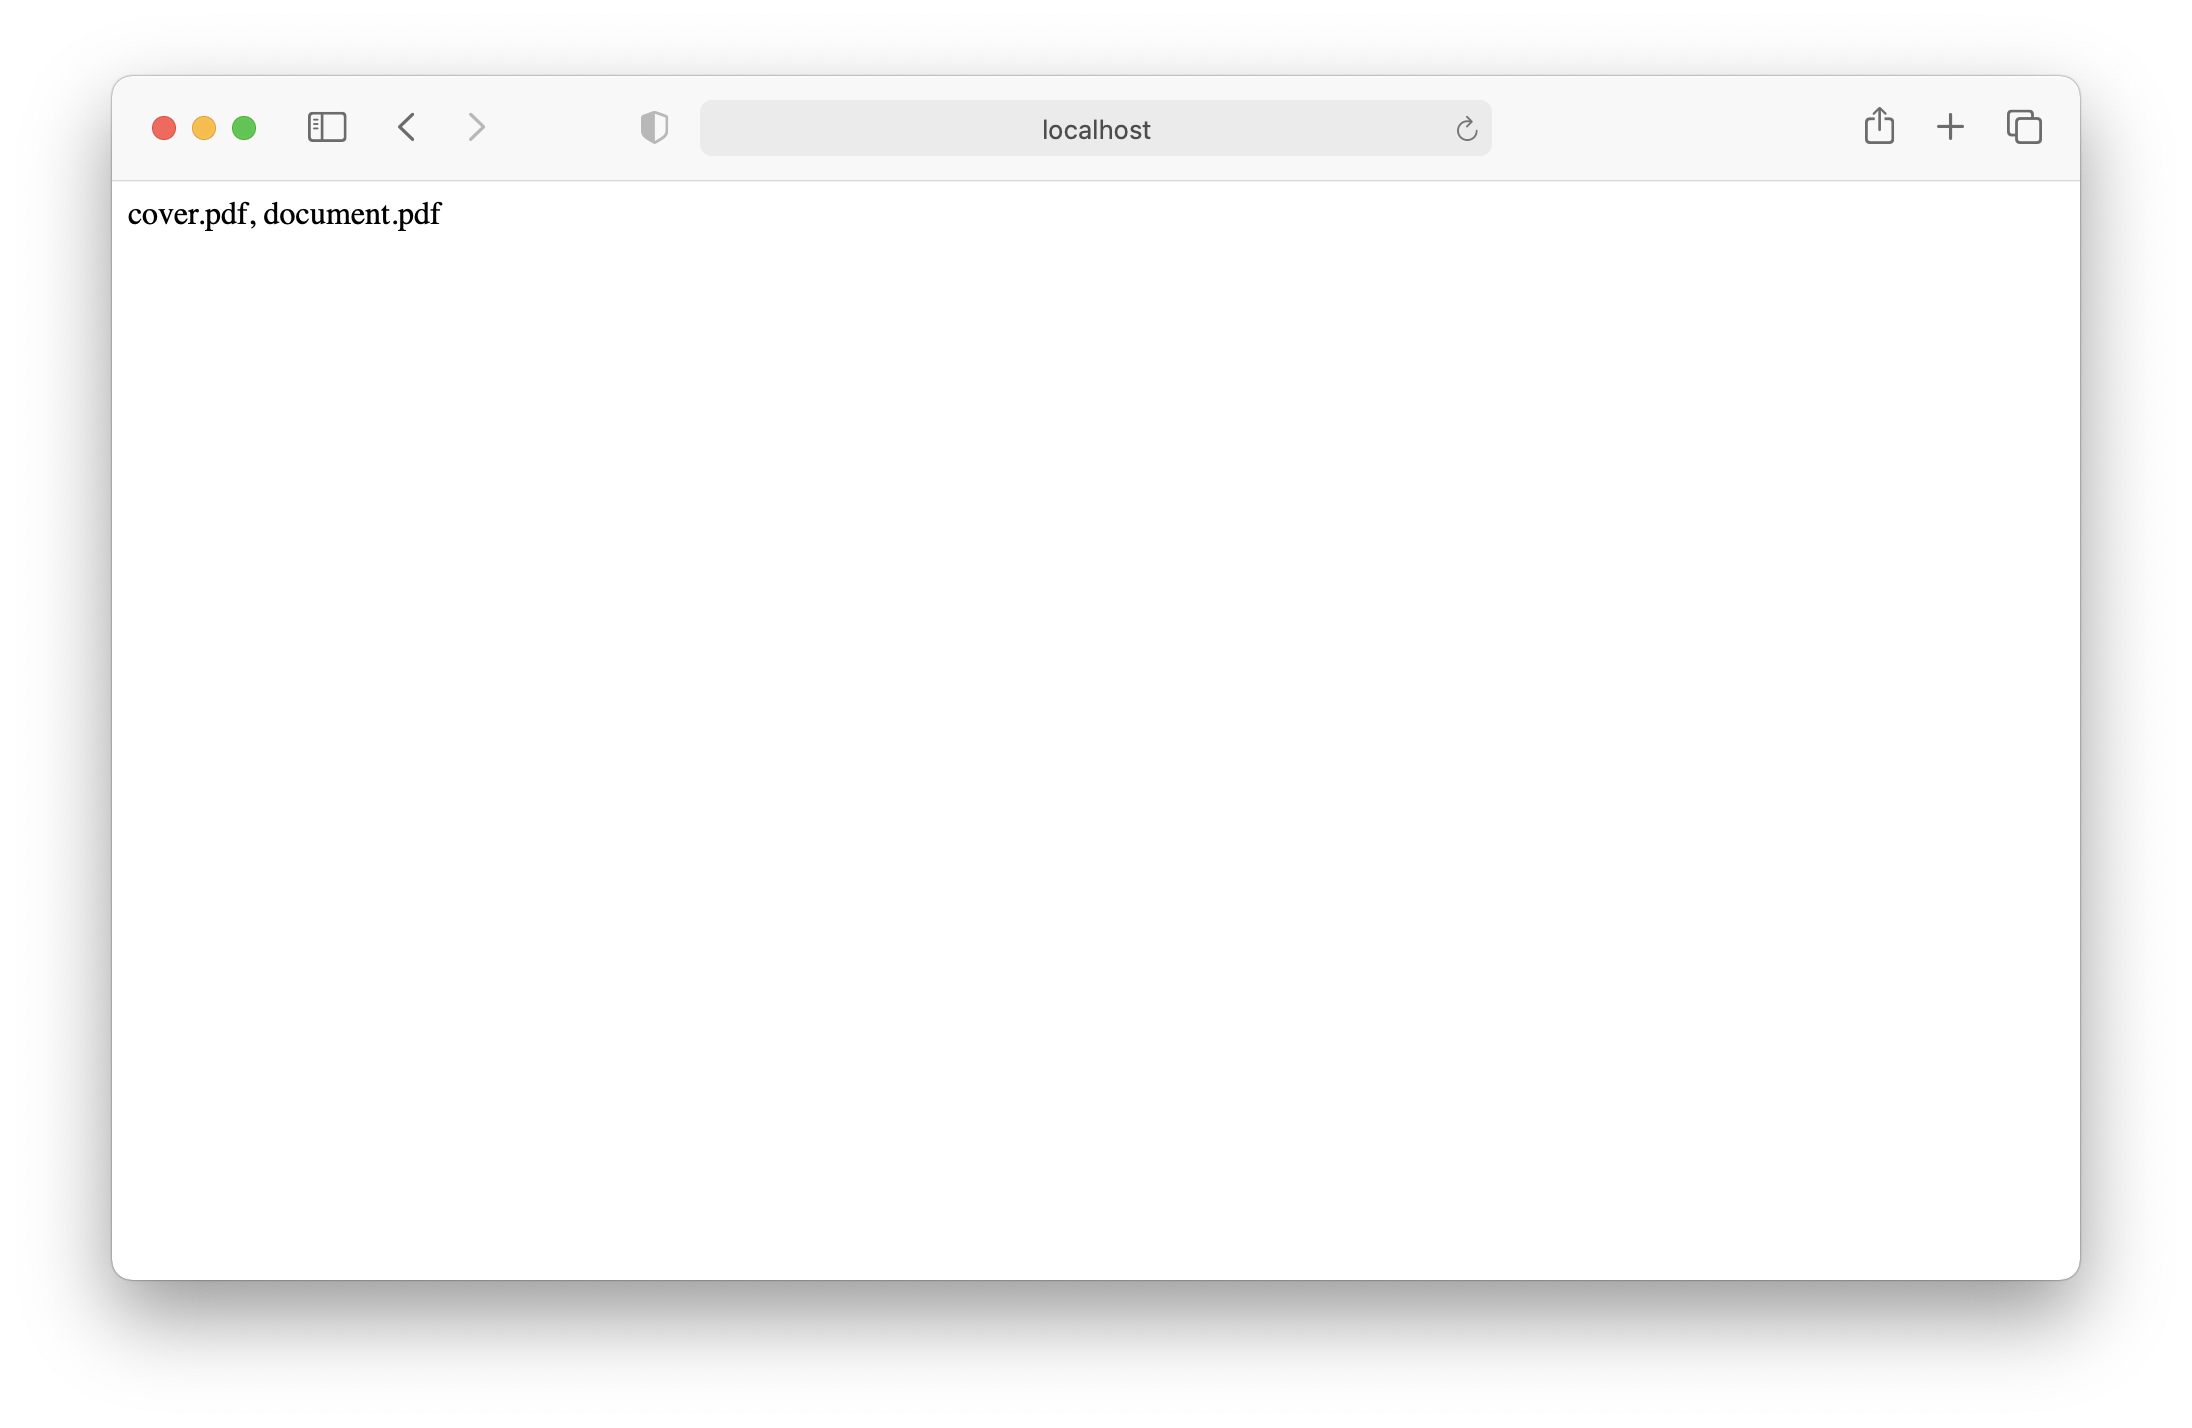
Go to http://localhost:8000 in the browser. You should see a webpage similar to this:
When you choose files and click the Merge PDFs button, you’ll receive an error. This is because you haven’t yet written any code to handle the form submission.
Create a merge.php file in the same directory and add the following content to it:
Now when you go back to http://localhost:8000, choose the files, and submit the form, you should see the names of the files you picked printed on the screen:
Merging PDFs
You can now use Document Engine’s API to merge the files uploaded from the browser. Replace the contents of the merge.php file with:
Most of this code, up until the curl_exec function, constructs a request that’s sent to Document Engine. It includes two files — document1 and document2 — and a list of instructions for Document Engine. By default, Document Engine’s output for the /api/build endpoint is the result of merging all documents or parts of the instructions. To learn more about the /api/build instructions, go to Document Engine’s API Reference.
The rest of the code deals with error handling, and if everything goes well, it returns the resulting file back to the browser.
You can check how it works in practice yourself! Go to http://localhost:8000, pick any two PDFs on your disk (or use file1.pdf and file2.pdf if you don’t have any), and click Merge PDFs again. Depending on your browser, it will either automatically download the file for you or ask you for permission to download. In any case, look for the result.pdf file in the downloads folder on your computer. Open that file in any PDF viewer application. If you used the two files from the links above, you should see a five-page PDF document like what’s shown below.
That’s it! Now you know how to use Document Engine’s API to perform operations on documents with PHP. To learn more about the various operations you can perform on documents with Document Engine, visit Document Engine’s API Reference
This guide walks you through the steps necessary to start Document Engine. It also shows you how to use it to process documents. By the end, you’ll be able to merge two PDF documents into one using Document Engine’s HTTP API from Python.
PSPDFKit Document Engine can be evaluated without a trial license key, but with certain limitations (such as a red watermark added to documents). To evaluate with fewer limitations, get a trial key.
PSPDFKit does not collect any data during your evaluation of the SDK.
Requirements
Document Engine runs on a variety of platforms. The following operating systems are supported:
macOS Ventura, Monterey, Mojave, Catalina, or Big Sur
Ubuntu, Fedora, Debian, or CentOS. Ubuntu and Debian derivatives such as Kubuntu or Xubuntu are supported as well. Currently, 64-bit Intel (x86_64) and ARM (AArch64) processors are supported.
Regardless of your operating system, you’ll need at least 4 GB of RAM.
Installing Docker
Document Engine is distributed as a Docker container. To run it on your computer, you need to install a Docker runtime distribution for your operating system.
Install and start Docker Desktop for Mac. Refer to the Docker website for instructions.
Install and start Docker Desktop for Windows. Refer to the Docker website for instructions.
Install and start Docker Engine. Refer to the Docker website for instructions on how to install it for your Linux distribution.
After you install Docker, use these instructions to install Docker Compose.
Starting Document Engine
First, open your terminal emulator.
Use the terminal emulator integrated with your code editor or IDE. Alternatively, you can use Terminal.app or iTerm2.
Use the terminal emulator integrated with your code editor or IDE. Alternatively, you can use PowerShell.
Use the terminal emulator integrated with your code editor or IDE, or one bundled with your desktop environment.
Now run the following command:
docker run --rm -t -p 5000:5000 -e API_AUTH_TOKEN=secret pspdfkit/document-engine:1.3.0
This command might take a while to run, depending on your internet connection speed. Wait until you see a message like this in the terminal:
[info] 2024-02-05 18:56:45.286 Running Document Engine version 1.3.0
Document Engine is now up and running!
Installing Python
The interaction with Document Engine happens via its HTTP API: You send documents and commands in the request and receive the resulting file in the response. To do this, you’ll invoke the API from the Python script. But first, you need to install Python for your operating system:
To install Python, first you need to install the Xcode Command Line Tools. Install them by running the following command:
xcode-select --install
The easiest way to install Python on macOS is via Homebrew. Follow the instructions on the Homebrew website to install it. Then, to install Python, run:
brew install python
Verify the installation by running the following command in the terminal:
python3 --version
The output should start with Python 3.9 — you can ignore the rest of the message.
ℹ️ Note: ️If the output doesn’t match the above, try restarting the terminal app by typing exit and opening it again.
Now run the python3 --version command. The output should start with Python 3.9 — you can ignore the rest of the message.
Merging PDFs
To make HTTP requests to Document Engine’s API, you need an HTTP client library. For this scenario, you’ll use the excellent Requests package. Install it by running the following command:
python3 -m pip install requests==2.25.1
python -m pip install requests==2.25.1
python3 -m pip install requests==2.25.1
Now you can create a script to merge the PDFs. It’ll take two file paths as command-line arguments, send the files to Document Engine to merge them, and save the result in another file on disk. Create a merge.py file with the following content:
import sys
import json
import requests

if len(sys.argv) < 3:
  print("Too few arguments.")
  exit(1)

file1 = sys.argv[1]
file2 = sys.argv[2]

url = "http://localhost:5000/api/build"

payload= {
  "instructions": json.dumps({
    "parts": [
      {
        "file": "file1"
      },
      {
        "file": "file2"
      }
    ]
})}

files=[
  ('file1',('file1.pdf',open(file1,'rb'),'application/pdf')),
  ('file2',('file2.pdf',open(file2,'rb'),'application/pdf'))
]
headers = {
  'Authorization': 'Token token=secret'
}

response = requests.post(url, headers = headers, data = payload, files = files)

if response.status_code == 200:
  with open("result.pdf", "wb") as f:
    f.write(response.content)
else:
  print(
    f"Request to Document Engine failed with status code {response.status_code}: '{response.text}'."
  )
The script verifies that the number of arguments is correct and prepares the request data. It includes two files — file1 and file2 — and a list of instructions for Document Engine. By default, Document Engine’s output for the /api/build endpoint is the result of merging all documents or parts of the instructions. To learn more about the /api/build instructions, go to Document Engine’s API Reference.
The rest of the code deals with error handling, and if everything goes well, it saves the result in the result.pdf file in the current working directory.
You can check how it works in practice yourself! Pick any two PDFs on your computer (or use file1.pdf and file2.pdf if you don’t have any), and run the script:
Make sure to replace path/to/file1.pdf and path/to/file2.pdf with the actual location of the PDF files on your computer.
If you used the two files from the links above, you should see a five-page PDF document like what’s shown below.
That’s it! Now you know how to use Document Engine’s API to perform operations on documents with Python. To learn more about the various operations you can perform on documents with Document Engine, visit Document Engine’s API Reference.
This guide walks you through the steps necessary to start Document Engine. It also shows you how to use it to process documents. By the end, you’ll be able to merge two PDF documents into one using Document Engine’s HTTP API from Rust.
PSPDFKit Document Engine can be evaluated without a trial license key, but with certain limitations (such as a red watermark added to documents). To evaluate with fewer limitations, get a trial key.
PSPDFKit does not collect any data during your evaluation of the SDK.
Requirements
Document Engine runs on a variety of platforms. The following operating systems are supported:
macOS Ventura, Monterey, Mojave, Catalina, or Big Sur
Ubuntu, Fedora, Debian, or CentOS. Ubuntu and Debian derivatives such as Kubuntu or Xubuntu are supported as well. Currently, 64-bit Intel (x86_64) and ARM (AArch64) processors are supported.
Regardless of your operating system, you’ll need at least 4 GB of RAM.
Installing Docker
Document Engine is distributed as a Docker container. To run it on your computer, you need to install a Docker runtime distribution for your operating system.
Install and start Docker Desktop for Mac. Refer to the Docker website for instructions.
Install and start Docker Desktop for Windows. Refer to the Docker website for instructions.
Install and start Docker Engine. Refer to the Docker website for instructions on how to install it for your Linux distribution.
After you install Docker, use these instructions to install Docker Compose.
Starting Document Engine
First, open your terminal emulator.
Use the terminal emulator integrated with your code editor or IDE. Alternatively, you can use Terminal.app or iTerm2.
Use the terminal emulator integrated with your code editor or IDE. Alternatively, you can use PowerShell.
Use the terminal emulator integrated with your code editor or IDE, or one bundled with your desktop environment.
Now run the following command:
docker run --rm -t -p 5000:5000 -e API_AUTH_TOKEN=secret pspdfkit/document-engine:1.3.0
This command might take a while to run, depending on your internet connection speed. Wait until you see a message like this in the terminal:
[info] 2024-02-05 18:56:45.286 Running Document Engine version 1.3.0
Document Engine is now up and running!
Installing Rust
The interaction with Document Engine happens via its HTTP API. Documents and commands are sent in API request calls, and the resulting files are received in response. API calls are invoked from the Rust code, so you need to install Rust.
To install Rust:
Follow the instructions for your operating system in Rust’s installation guide.
Go to any directory in your system using your terminal. Create a new directory called merging-pdfs and go the newly created directory:
mkdir merging-pdfs
cd merging-pdfs
Create a new cargo project:
cargo new merging-pdfs-pspdfkit
Run the project with the cargo run command.
Merging PDFs with Rust
If you don’t have any sample documents, download and use these files: cover.pdf and document.pdf
Paste the following content into the Cargo.toml file in the merging-pdfs-pspdfkit project directory:
[dependencies]
tokio = { version = "1.23.0", features = ["full"] }
reqwest = { version = "0.11.13", features = ["json", "multipart"] }
serde_json = "1.0.91"
Next, replace /path/to/cover.pdf on line 24 and /path/to/document.pdf on line 30 with the actual paths to the example documents on your machine. Then, replace the contents of the src/main.rs file with this code:
use reqwest::Result;
use std::borrow::Cow;
use std::fs;
use std::fs::File;
use std::io::Write;
#[tokio::main]
asyncfn main() -> Result<()> {
// Multipart Requestlet body = serde_json::json!({
"parts": [
{
"file": "cover"
},
{
"file": "document"
}
],
"output": {
"type": "pdf"
}
});
let cover = fs::read("src/cover.pdf").unwrap();
let cover_part = reqwest::multipart::Part::bytes(cover)
.file_name("cover.pdf")
.mime_str("application/pdf")
.unwrap();
let document = fs::read("src/document.pdf").unwrap();
let document_part = reqwest::multipart::Part::bytes(document)
.file_name("document.pdf")
.mime_str("application/pdf")
.unwrap();
let instructions = serde_json::to_vec(&body).unwrap();
let instructions_bytes = Cow::from(instructions);
let instructions_part = reqwest::multipart::Part::bytes(instructions_bytes);
let form = reqwest::multipart::Form::new()
.part("cover", cover_part)
.part("document", document_part)
.part("instructions", instructions_part);
let client = reqwest::Client::new();
let res = client
.post("http://localhost:5000/api/build")
.header("Authorization", "Token token=secret")
.multipart(form)
.send()
.await?;
letmut result_file = File::create("result.pdf").expect("Error creating file");
result_file
.write_all(&res.bytes().await.unwrap())
.expect("Error writing to file");
Ok(())
}
Most of this code deals with creating and sending a multipart request containing files and instructions to Document Engine’s /api/build endpoint using Rust’s reqwest crate.
To run the code, ensure you’re in the merging-pdfs directory and type the following command in your terminal:
cargo run
To learn more about the various actions you can apply to PDFs using Document Engine, go to Document Engine’s API Reference.
This guide will walk you through the steps necessary to integrate PSPDFKit for Web backed by Document Engine into your project. By the end, you’ll be able to present a PDF document in the PSPDFKit UI.
PSPDFKit Document Engine can be evaluated without a trial license key, but with certain limitations (such as a red watermark added to documents). To evaluate with fewer limitations, get a trial key.
PSPDFKit does not collect any data during your evaluation of the SDK.
Requirements
Document Engine runs on a variety of platforms. The following operating systems are supported:
macOS Ventura, Monterey, Mojave, Catalina, or Big Sur
Ubuntu, Fedora, Debian, or CentOS. Ubuntu and Debian derivatives such as Kubuntu or Xubuntu are supported as well. Currently, 64-bit Intel (x86_64) and ARM (AArch64) processors are supported.
Regardless of your operating system, you’ll need at least 4 GB of RAM.
Installing Docker
Document Engine is distributed as a Docker container. To run it on your computer, you need to install a Docker runtime distribution for your operating system.
Install and start Docker Desktop for Mac. Refer to the Docker website for instructions.
Install and start Docker Desktop for Windows. Refer to the Docker website for instructions.
Install and start Docker Engine. Refer to the Docker website for instructions on how to install it for your Linux distribution.
After you install Docker, use these instructions to install Docker Compose.
Setting Up Document Engine
Copy the code snippet below and save it anywhere on your computer in a file called docker-compose.yml:
Use the terminal emulator integrated with your code editor or IDE. Alternatively, you can use Terminal.app or iTerm2.
Use the terminal emulator integrated with your code editor or IDE. Alternatively, you can use PowerShell.
Use the terminal emulator integrated with your code editor or IDE, or one bundled with your desktop environment.
Go to the directory where you saved the docker-compose.yml file:
cd <path-to-directory-with-docker-compose-yml>
Run the following:
docker-compose up
This command might take a while to run, depending on your internet connection speed. Wait until you see the following message in the terminal:
pspdfkit_1 | Access the web dashboard at http://localhost:5000/dashboard
Document Engine is now up and running!
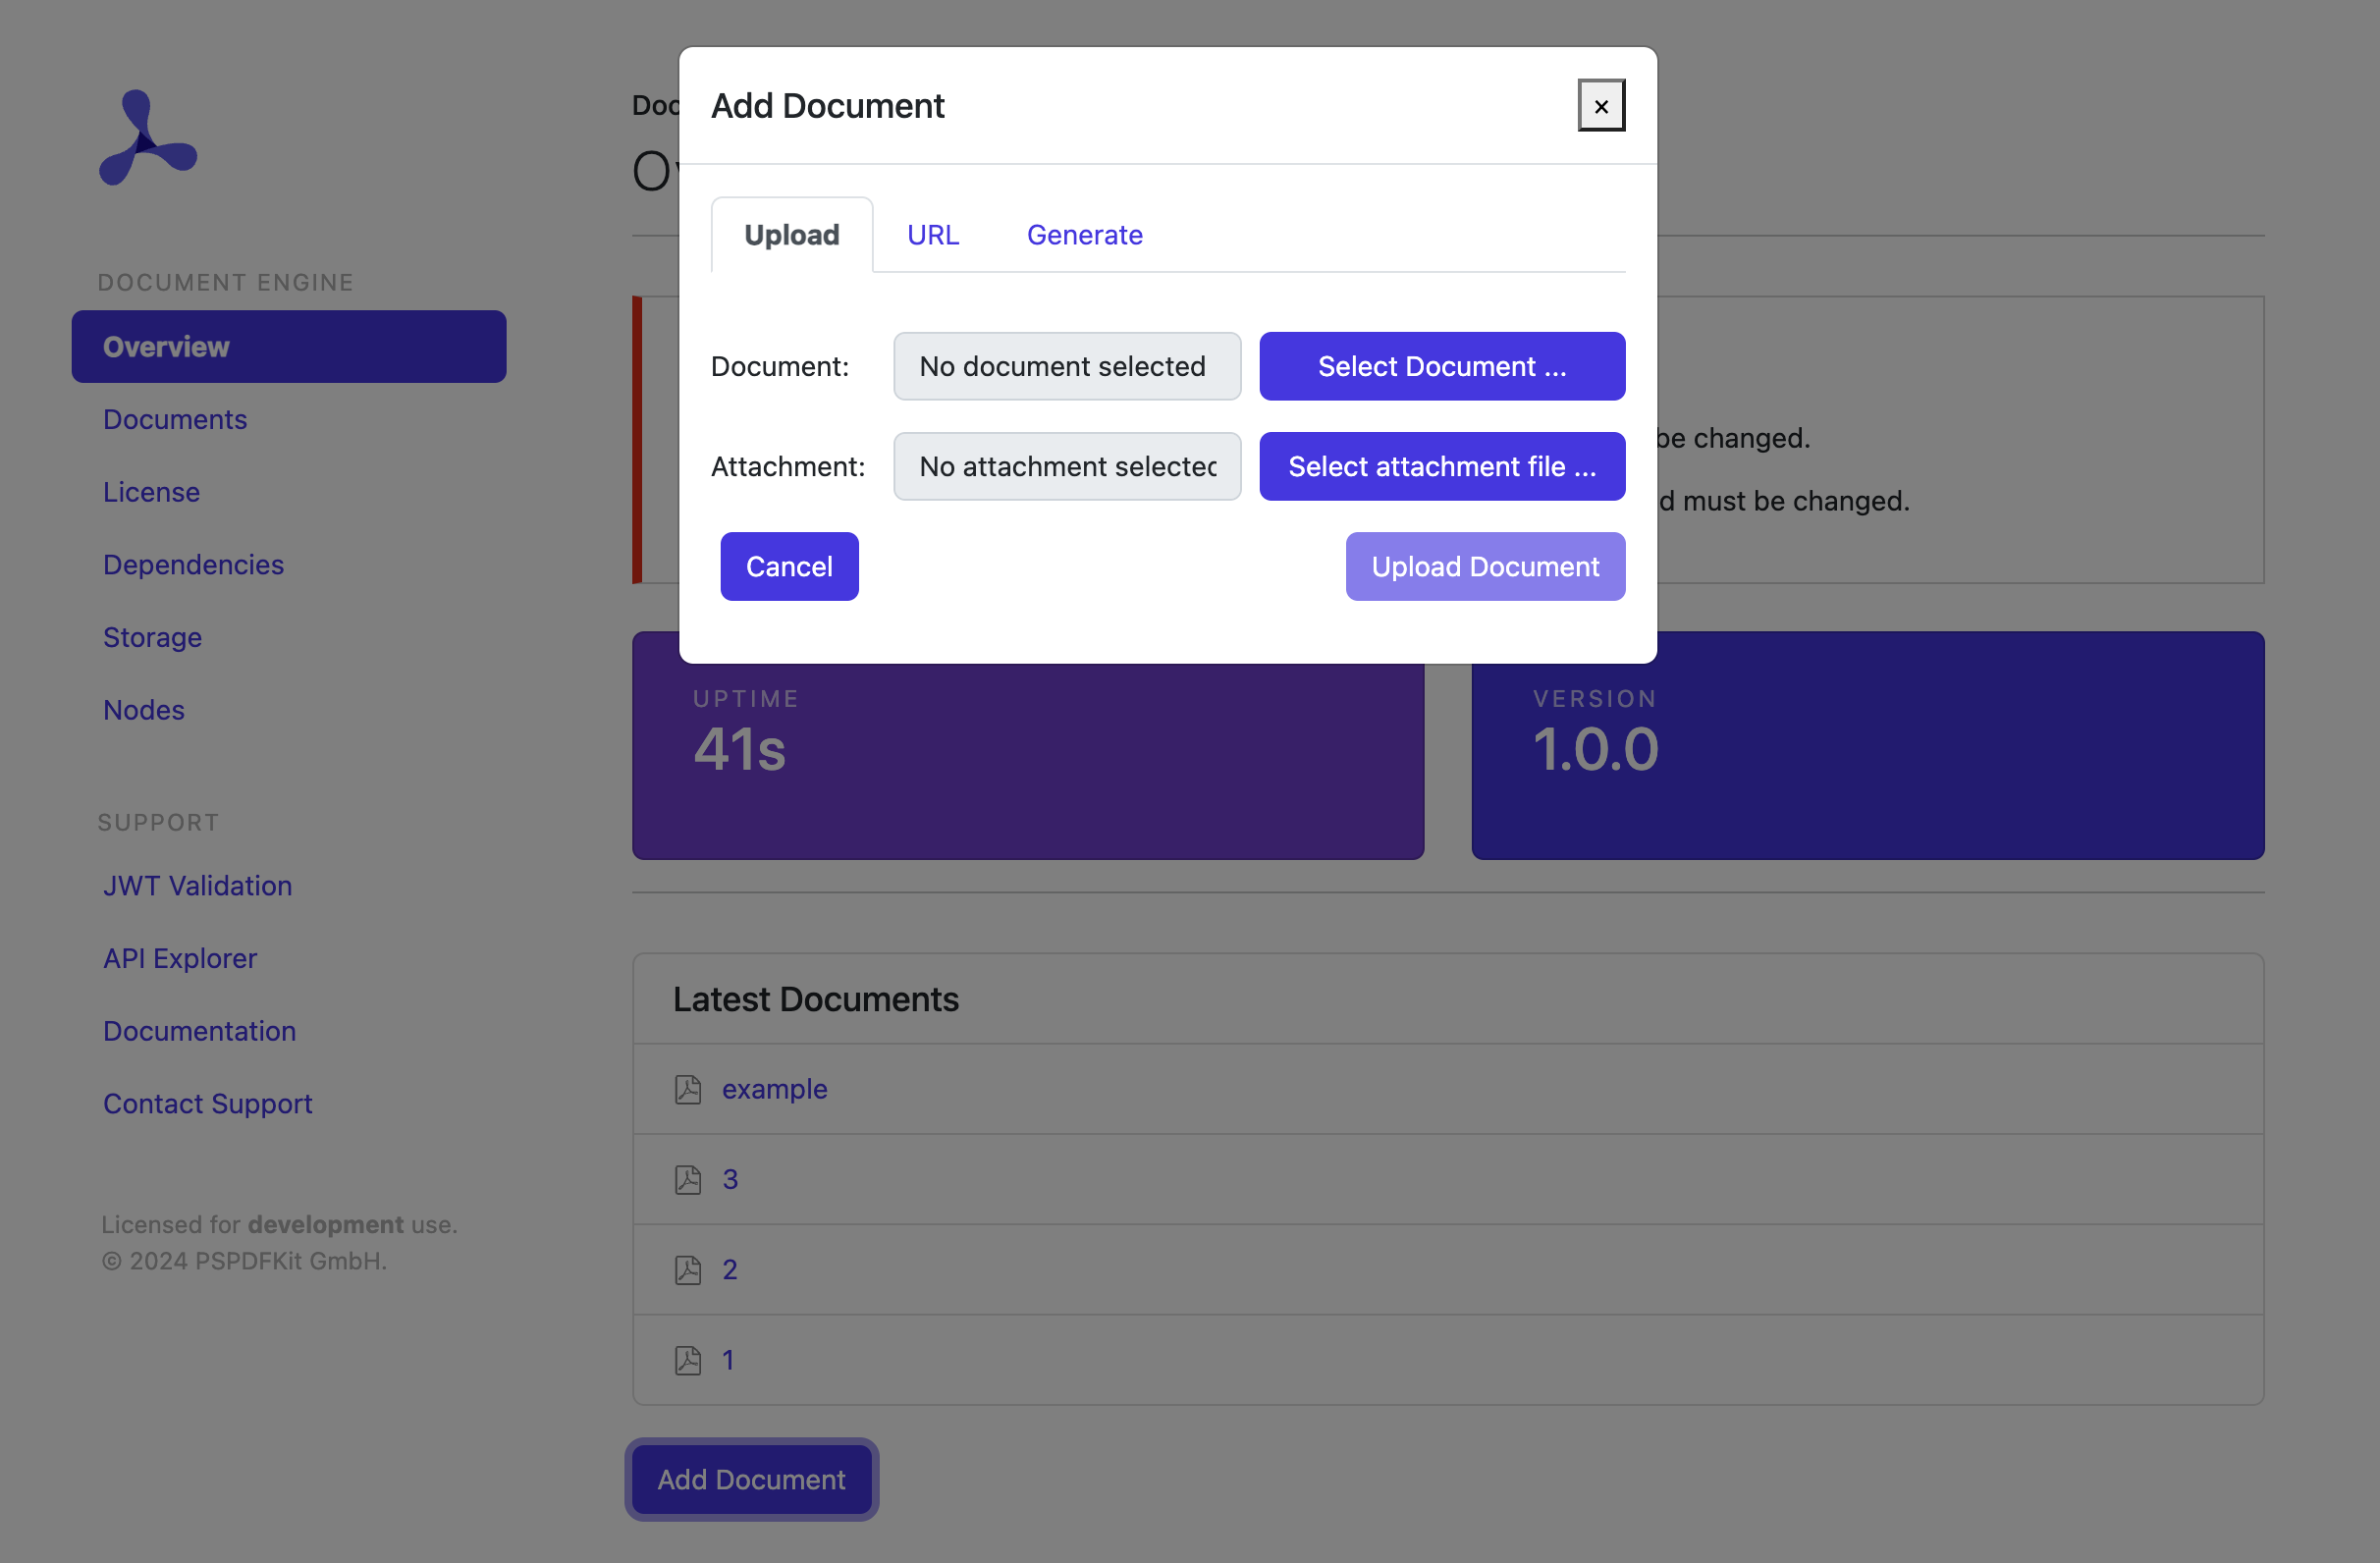
Uploading a Document to Document Engine
With Document Engine running, visit http://localhost:5000/dashboard and authenticate using “dashboard” for the username and “secret” for the password. Choose Add Document and upload the document you want to work with.
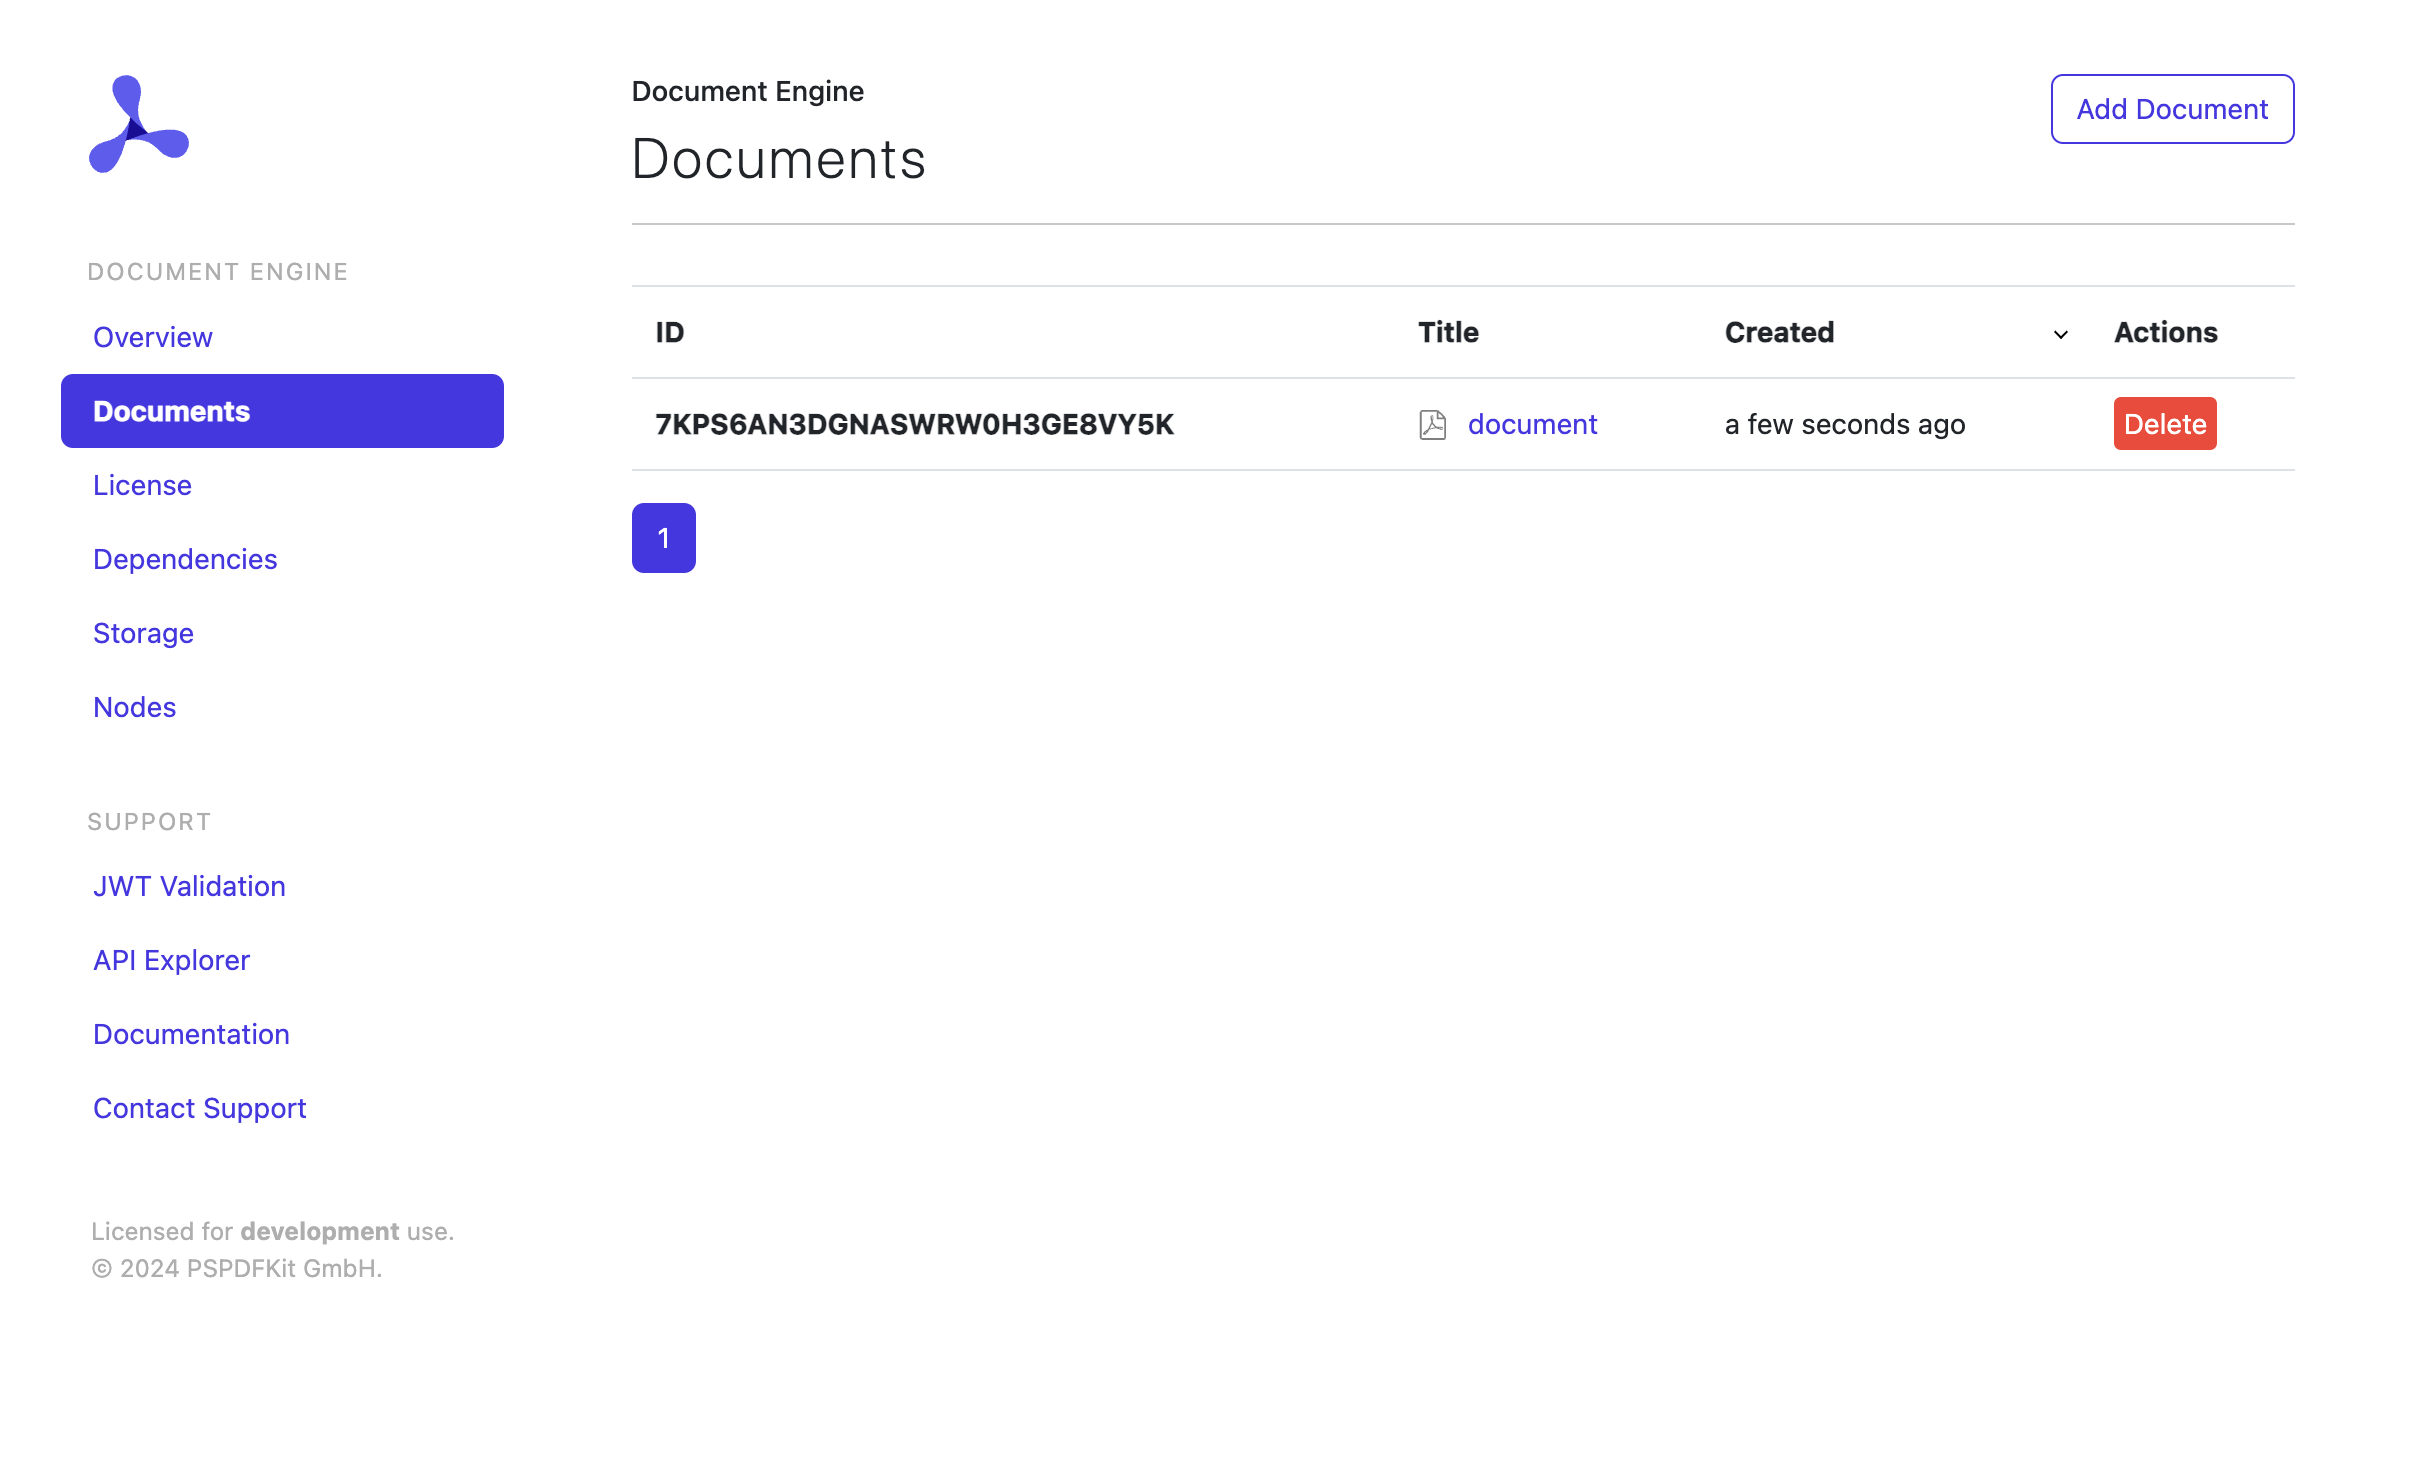
Once the document is uploaded, visit http://localhost:5000/dashboard/documents to see the list of available documents. Each document is identified by an ID. Take note of the ID of the document you just uploaded, as you’ll need it shortly.
The ID will look similar to 7KPS8X13JRB2G841X4V7EQ3T2J.
Installing Node.js
If you haven’t installed Node.js, head to the official guides and follow the instructions. By the end of the installation process, you should be able to run the following command:
node --version
The output should be something like v14. You can ignore any subsequent number.
Generating the Application
You’ll use Express, one of the most common Node.js web frameworks. To create a new Express application, you can use the official generator.
Run:
npx express-generator pspdfkit_example --view=ejs
This command will generate a project structure and instruct you on the steps to follow to install dependencies and start the project.
Once you’ve followed all the steps, you should be able to visit http://localhost:3000 to confirm the application is working as expected.
Adding a Page to View the Document
You need to create a page that will show a document stored inside Document Engine.
You’ll want this page to be available at http://localhost:3000/documents/:id, where the document ID is the ID automatically assigned by Document Engine when uploading a document.
To achieve this, create a new route to display a document and mount it in the application.
Create the document’s route:
./routes/documents.js
var express = require("express");
var router = express.Router();

router.get("/:documentId", function (req, res, next) {
  res.render("documents/show", { documentId: req.params.documentId });
});

module.exports = router;
Inside the route, retrieve the ID captured by the routing logic and assign it to a documentId variable you can refer to in the view.
Create a corresponding view with some minimal HTML that prints the document ID:
./views/documents/show.ejs
<h1>Show document <%= documentId %></h1>
Mount the new route in the application:
./app.js
var indexRouter = require('./routes/index');
 var usersRouter = require('./routes/users');
+var documentsRouter = require("./routes/documents");
 // ...
 // rest of the file
 // ...
 app.use('/', indexRouter);
 app.use('/users', usersRouter);
+app.use("/documents", documentsRouter);
Stop and restart the Express server.
You can now visit http://localhost:3000/documents/:id, replacing :id with the ID of the document you uploaded to the Document Engine dashboard.
The page should contain the text Show document, followed by your document ID.
Creating a JSON Web Token (JWT)
PSPDFKit requires the use of JWTs to authenticate and authorize a viewer session against Document Engine.
To create JWTs, install the jsonwebtoken dependency:
npm install --save jsonwebtoken
Stop and restart the Express server.
Working with JWTs requires a private and public key pair. The private key is used by the Express application, while the public key is used by Document Engine.
The public key has already been configured in the Document Engine docker-compose.yml file via the JWT_PUBLIC_KEY environment variable.
To configure the private key, create a config/pspdfkit/jwt.pem file with the following contents:
Refresh the page, and you’ll see the PSPDFKit for Web viewer showing the document you just uploaded. If you annotate the document and refresh the page, all changes will be automatically persisted.
This guide will walk you through the steps necessary to integrate PSPDFKit for Web backed by Document Engine into your project. By the end, you’ll be able to present a PDF document in the PSPDFKit UI.
PSPDFKit Document Engine can be evaluated without a trial license key, but with certain limitations (such as a red watermark added to documents). To evaluate with fewer limitations, get a trial key.
PSPDFKit does not collect any data during your evaluation of the SDK.
Requirements
Document Engine runs on a variety of platforms. The following operating systems are supported:
macOS Ventura, Monterey, Mojave, Catalina, or Big Sur
Ubuntu, Fedora, Debian, or CentOS. Ubuntu and Debian derivatives such as Kubuntu or Xubuntu are supported as well. Currently, 64-bit Intel (x86_64) and ARM (AArch64) processors are supported.
Regardless of your operating system, you’ll need at least 4 GB of RAM.
Installing Docker
Document Engine is distributed as a Docker container. To run it on your computer, you need to install a Docker runtime distribution for your operating system.
Install and start Docker Desktop for Mac. Refer to the Docker website for instructions.
Install and start Docker Desktop for Windows. Refer to the Docker website for instructions.
Install and start Docker Engine. Refer to the Docker website for instructions on how to install it for your Linux distribution.
After you install Docker, use these instructions to install Docker Compose.
Setting Up Document Engine
Copy the code snippet below and save it anywhere on your computer in a file called docker-compose.yml:
Use the terminal emulator integrated with your code editor or IDE. Alternatively, you can use Terminal.app or iTerm2.
Use the terminal emulator integrated with your code editor or IDE. Alternatively, you can use PowerShell.
Use the terminal emulator integrated with your code editor or IDE, or one bundled with your desktop environment.
Go to the directory where you saved the docker-compose.yml file:
cd <path-to-directory-with-docker-compose-yml>
Run the following:
docker-compose up
This command might take a while to run, depending on your internet connection speed. Wait until you see the following message in the terminal:
pspdfkit_1 | Access the web dashboard at http://localhost:5000/dashboard
Document Engine is now up and running!
Uploading a Document to Document Engine
With Document Engine running, visit http://localhost:5000/dashboard and authenticate using “dashboard” for the username and “secret” for the password. Choose Add Document and upload the document you want to work with.
Once the document is uploaded, visit http://localhost:5000/dashboard/documents to see the list of available documents. Each document is identified by an ID. Take note of the ID of the document you just uploaded, as you’ll need it shortly.
The ID will look similar to 7KPS8X13JRB2G841X4V7EQ3T2J.
Generating the Application
Now, the application using Document Engine needs to be provisioned.
To use Document Engine, you’ll need a web application library or framework. Depending on the chosen technology, different steps might be necessary. Refer to the technology/framework-specific guidelines for setting up the project.
Creating a JSON Web Token (JWT)
PSPDFKit requires the use of a JSON Web Token (JWT) to authenticate and authorize a viewer session against Document Engine.
You can generate JWTs using one of the libraries available in the programming language of your choice. The list of available libraries can be found at jwt.io.
When generating the JWT, make sure to use the RS256 signing algorithm and the private key below:
When it comes to claims, you must provide the document ID, the set of permissions, and an expiry time in the future. Note that some libraries might automatically inject the exp (expiration time) field, while other ones expect the field to be present in the payload. Check the documentation of the chosen JWT library to see how it’s handled:
To view the document in the browser, first you need to load the PSPDFKit for Web JavaScript library. Add the following script tag to the page that will present the document:
There are two variables that need to be passed in: documentId and jwt. Refer to the documentation of the web application framework you use to see how to pass variables to the page, or use hardcoded values. When you open the page, you’ll see the PSPDFKit for Web viewer showing the document you just uploaded. If you annotate the document and refresh the page, all changes will be automatically persisted.
Integrate into .NET
This guide explains how to integrate GdPicture.NET SDK into your application.
About GdPicture.NET SDK
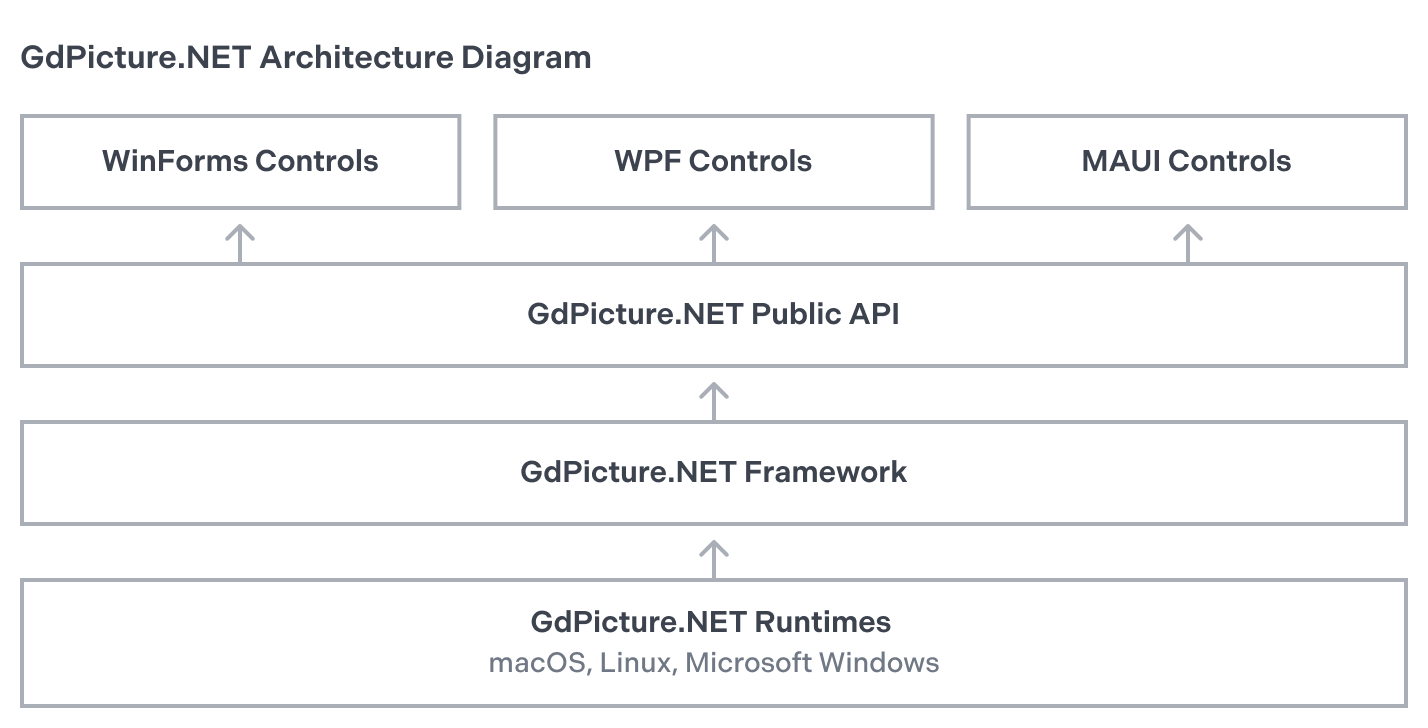
GdPicture.NET SDK is a cross-platform developer solution for building intelligent PDF and document processing applications. This toolkit enables you to compose, display, capture, edit, and print documents. You can build applications using GdPicture.NET SDK with numerous development environments and deploy these applications to different platforms.
The diagram below displays how GdPicture.NET integrates into different platforms and development environments.
Prerequisites
Before you follow the procedure in this guide:
Install Visual Studio and the workloads or components that are necessary for the type of application you want to build. For more information, see the Microsoft documentation.
For more information on the supported frameworks and operating systems, see the system compatibility guide.
Once downloaded, follow the installation wizard, which will guide you through the installation process.
It’s recommended to install the toolkit at a destination such as C:\GdPicture.NET\.
Getting a Trial License Key
A trial license lets you try the GdPicture.NET software package for free for 60 days. This includes full access and technical support.
To get a trial license key, follow these steps:
Go to the folder where you installed GdPicture.NET.
Run licenseManager.exe.
Click Request a trial key.
Enter your email address and a password.
Click Send Request. You’ll receive a trial license key by email.
If you don’t immediately receive a key via email, or if the application can’t be run on a system that allows web requests, contact our Sales team.
Adding GdPicture to Your Application
This section explains how to add GdPicture.NET to your application.
Adding a Reference to the NuGet Package
First, add a reference to the GdPicture.API NuGet package by following these steps:
In Visual Studio, create a new project or open the code of your existing application. For more information on creating a new project, see the Microsoft documentation. It’s recommended to create a project that runs on .NET 6.0 or newer.
Select Project > Manage NuGet Packages.
In the Package source field, select nuget.org.
Click the Browse tab, and then search for GdPicture.
Select one of the following options:
Recommended: If your application runs on .NET 6.0 or newer, select GdPicture.API, and then click Install.
If your application runs on .NET 4.6.2 or .NET Core 3.1, select GdPicture, and then click Install.
Dim licenseManager As New LicenseManager
Call licenseManager.RegisterKEY("LICENSE_KEY")
Dim licenseManager As New GdPicture_NET_14.LicenseManager
licenseManager.RegisterKey ("LICENSE_KEY")
This activates your trial license for 60 days. Once you purchase a commercial license, you might need to change this trial key. For more information on activating a commercial license, refer to our guide on activating GdPicture.NET for development.
Converting a Word Document to a PDF
In this example, convert a Word document to a PDF by following these steps:
Create a GdPictureDocumentConverter object.
Load the source Word document by passing its path to the LoadFromFile method of the GdPictureDocumentConverter object.
Convert the source document to PDF by passing the path of the output file to the SaveAsPDF method of the GdPictureDocumentConverter object.
using GdPictureDocumentConverter gdpictureDocumentConverter = new GdPictureDocumentConverter();
gdpictureDocumentConverter.LoadFromFile(@"C:\temp\source.docx");
gdpictureDocumentConverter.SaveAsPDF(@"C:\temp\output.pdf");
Using gdpictureDocumentConverter As GdPictureDocumentConverter = New GdPictureDocumentConverter()
gdpictureDocumentConverter.LoadFromFile("C:\temp\source.docx")
gdpictureDocumentConverter.SaveAsPDF("C:\temp\output.pdf")
With this example, you can batch convert multiple Word files.
After installation, look at our code samples to see some examples of how to use GdPicture.NET.
Integrate into Visual Basic 6
This guide explains how to integrate GdPicture.NET SDK into your application.
About GdPicture.NET SDK
GdPicture.NET SDK is a cross-platform developer solution for building intelligent PDF and document processing applications. This toolkit enables you to compose, display, capture, edit, and print documents. You can build applications using GdPicture.NET SDK with numerous development environments and deploy these applications to different platforms.
The diagram below displays how GdPicture.NET integrates into different platforms and development environments.
Prerequisites
Before you follow the procedure in this guide:
Install Visual Studio and the workloads or components that are necessary for the type of application you want to build. For more information, see the Microsoft documentation.
For more information on the supported frameworks and operating systems, see the system compatibility guide.
Dim licenseManager As New LicenseManager
Call licenseManager.RegisterKEY("LICENSE_KEY")
Dim licenseManager As New GdPicture_NET_14.LicenseManager
licenseManager.RegisterKey ("LICENSE_KEY")
This activates your trial license for 60 days. Once you purchase a commercial license, you might need to change this trial key. For more information on activating a commercial license, refer to our guide on activating GdPicture.NET for development.
Your First Application Using COM
GdPicture.NET includes a COM edition that can be used like a COM/ActiveX component with IntelliSense support in environments supporting this technology (e.g. Visual Basic 6, Visual C++ with MFC, HTML pages, Delphi, Visual FoxPro, and more).
This edition is automatically registered on your computer when installing the GdPicture.NET package.
The DLL is located in [INSTALLATION FOLDER]\Redist\COM Interop\, and it can be registered on other computers using the regasm command with admin privileges, like this:
This section provides you with a step-by-step guide to getting started using GdPicture.NET with Microsoft Visual Basic 6.
You can find three sample projects demonstrating the use of several GdPicture.NET features using COM Interop in the [INSTALLATION FOLDER]\Samples\WinForm\vb6 folder.
IntelliSense is fully supported in Visual Basic 6.
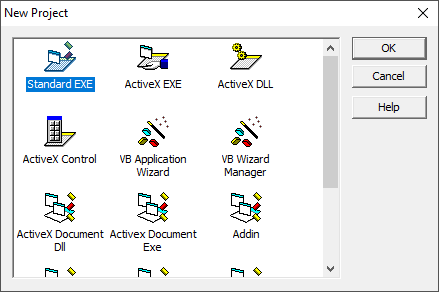
Start with a new project (or open an existing project) and click OK.
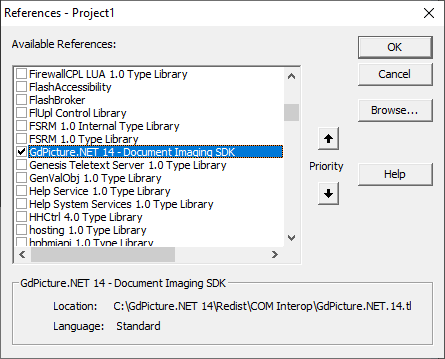
Click Project in the application menu, and then select References…
Scroll through the list of available references, check the GdPicture.NET 14 - Document Imaging SDK entry, and click OK.
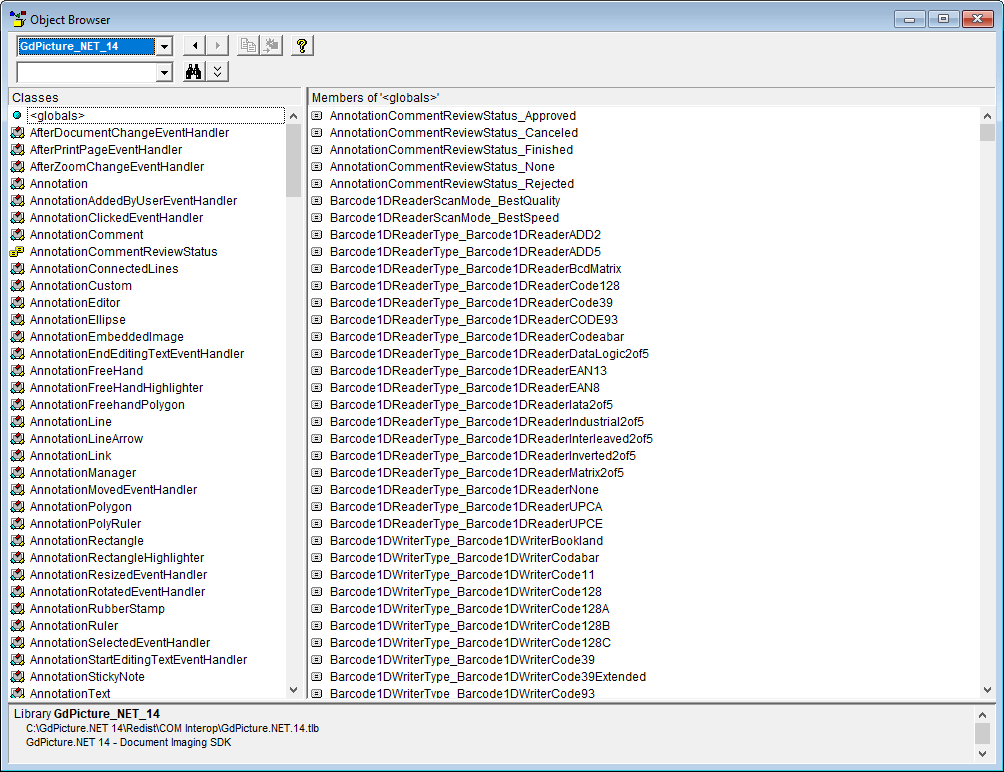
Using the Object Browser (accessed with the F2 shortcut), you’ll see all the classes, enumerations, methods, properties, etc…
Now you can use GdPicture.NET like any other object in your code.
Integrate into Visual C++ and MFC
This guide explains how to integrate GdPicture.NET SDK into your application.
About GdPicture.NET SDK
GdPicture.NET SDK is a cross-platform developer solution for building intelligent PDF and document processing applications. This toolkit enables you to compose, display, capture, edit, and print documents. You can build applications using GdPicture.NET SDK with numerous development environments and deploy these applications to different platforms.
The diagram below displays how GdPicture.NET integrates into different platforms and development environments.
Prerequisites
Before you follow the procedure in this guide:
Install Visual Studio and the workloads or components that are necessary for the type of application you want to build. For more information, see the Microsoft documentation.
For more information on the supported frameworks and operating systems, see the system compatibility guide.
Dim licenseManager As New LicenseManager
Call licenseManager.RegisterKEY("LICENSE_KEY")
Dim licenseManager As New GdPicture_NET_14.LicenseManager
licenseManager.RegisterKey ("LICENSE_KEY")
This activates your trial license for 60 days. Once you purchase a commercial license, you might need to change this trial key. For more information on activating a commercial license, refer to our guide on activating GdPicture.NET for development.
Visual C++ with MFC
This section provides you with a step-by-step guide to getting started using GdPicture.NET with Visual C++ (up to VS 2017) with an MFC environment.
You can find an example using COM Interop in the [INSTALLATION FOLDER]\Samples\WinForm\c++ mfc folder.
IntelliSense is fully supported in Visual C++.
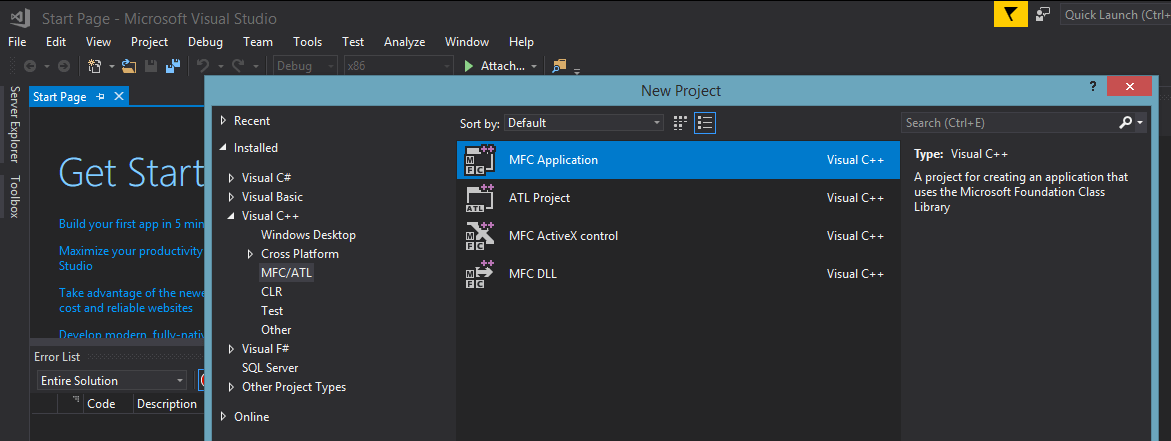
Start a new project in Visual Studio > File > New > Project. Then select MFC/ATL > MFC Application.
Set your Application Type to Dialog based.
Copy GdPicture.NET.14.dll and GdPicture.NET.14.tlb to your application folder.
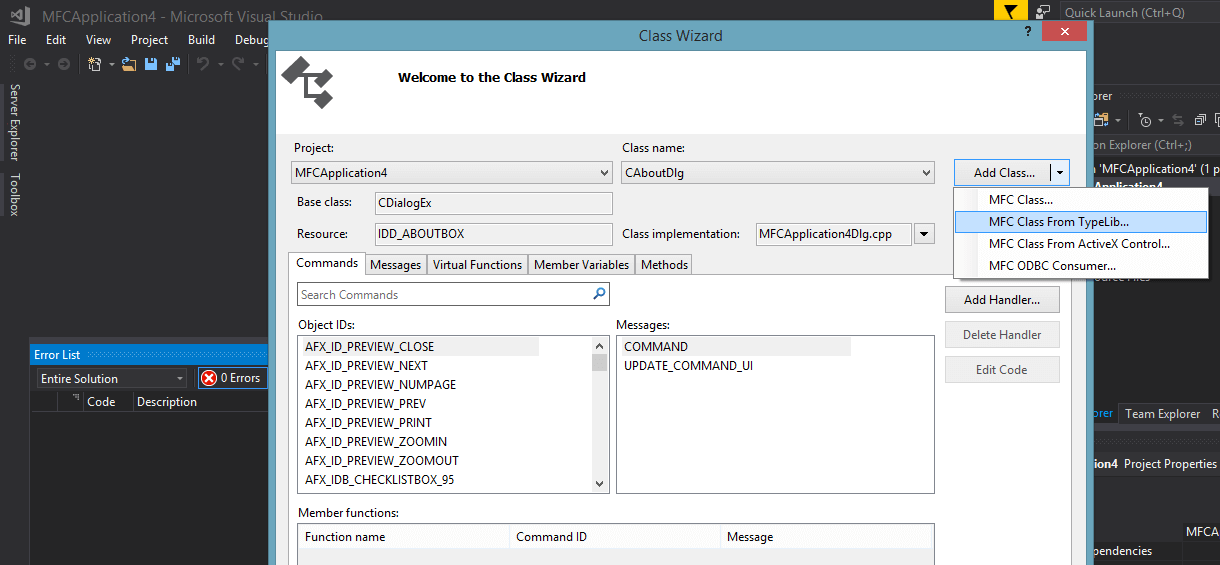
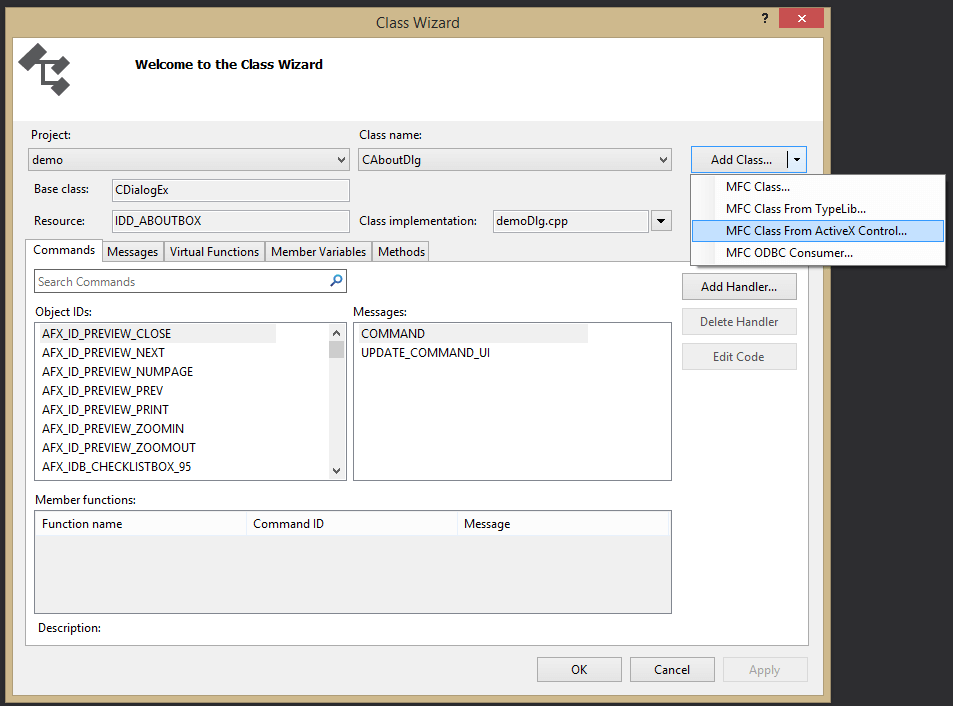
To import the DLL, use Project > Class Wizard (available until VS 2017), choose the Add Class… dropdown, and select MFC Class From TypeLib…
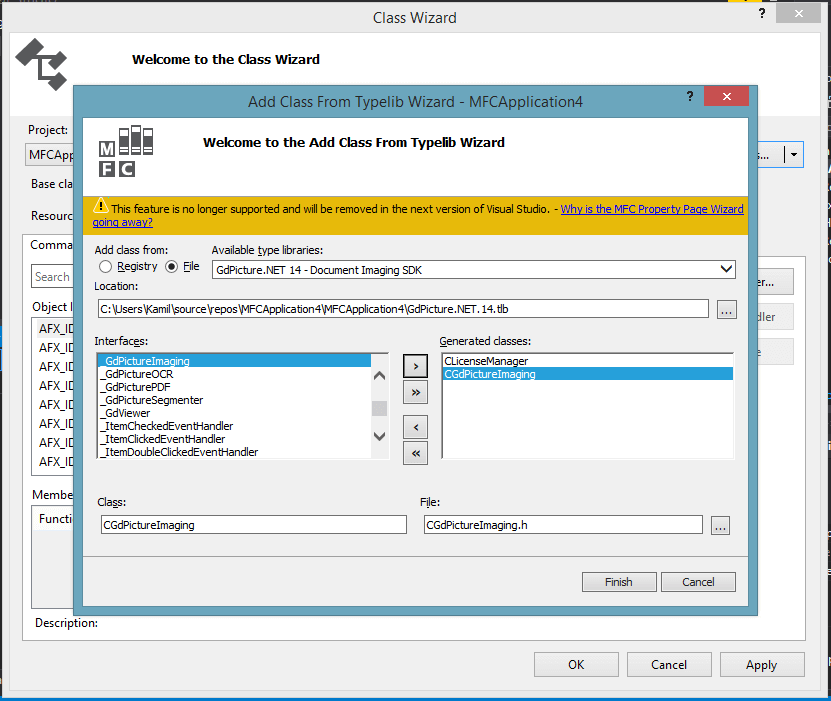
Under Add class from: in the wizard dialog, select File. Then, click the … button on the right-hand side, next to the Location field, to select the GdPicture.NET.14.tlb file located in [INSTALLDIR]/Redist/COM Interop or in your application directory if you copied it.
Select the interfaces you need from the list to generate the C++ wrappers.
Each GdPicture class, which also contains events, will be split into two classes: one defining events, and another one defining properties and methods. For example, to import the `GdPicturePDF` class, select `__GdPicturePDF` and `GdPicturePDF`.
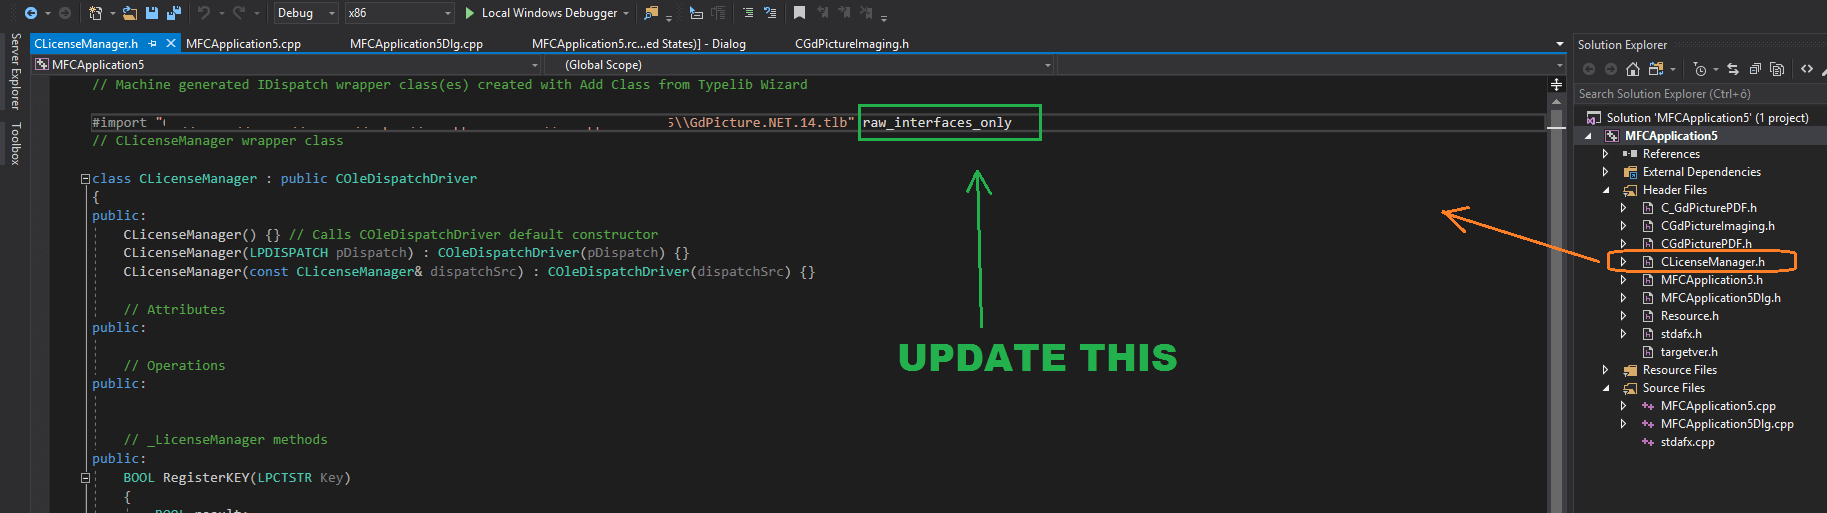
Change the way the DLL is imported in generated header files (if needed). Change no_namespace to raw_interfaces_only in the #import code line in the generated headers.
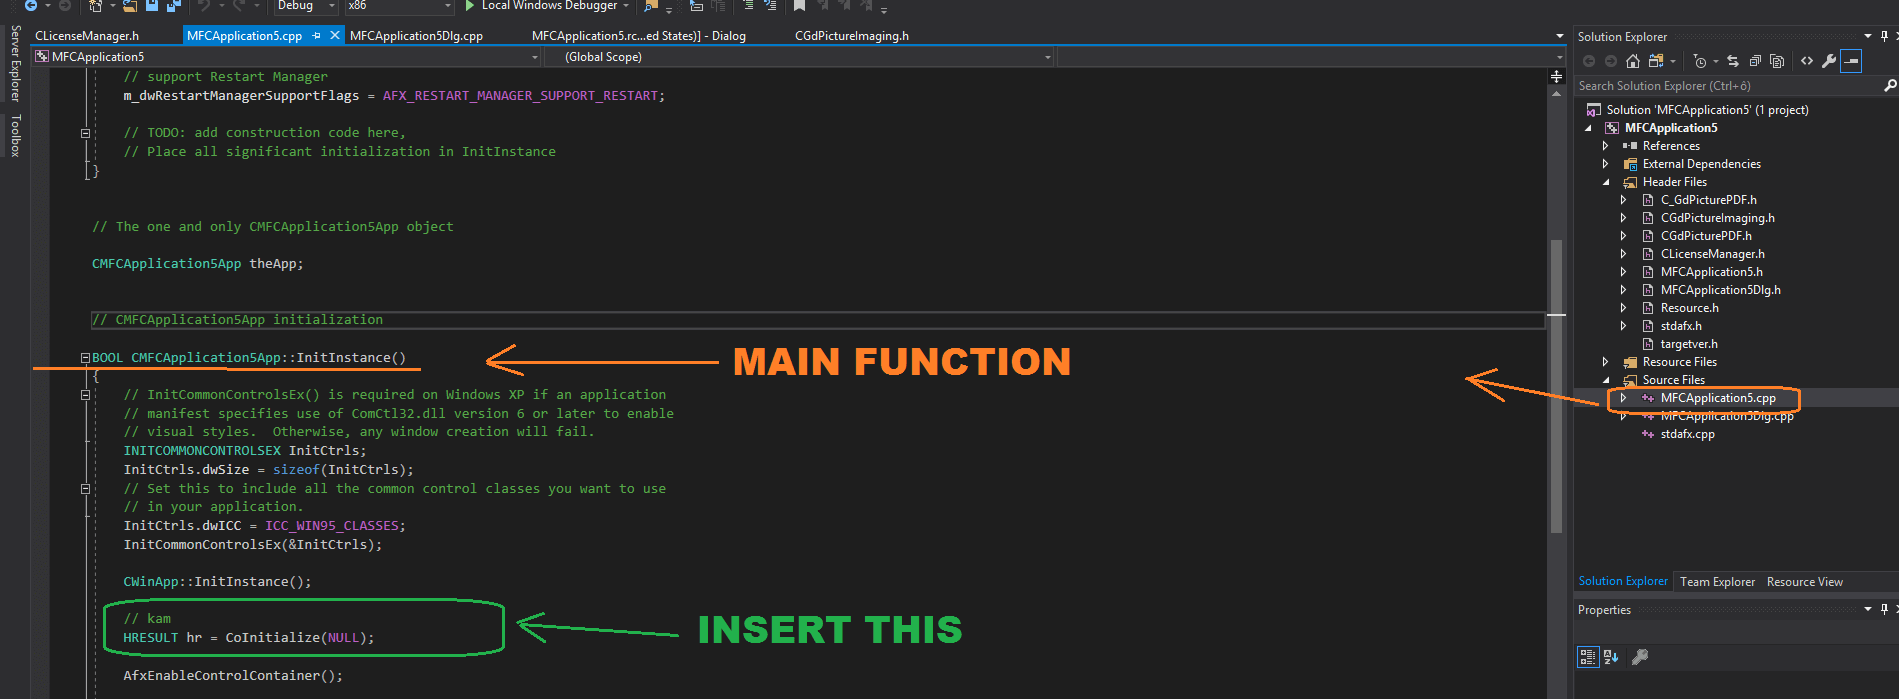
Initialize COM objects in your application by adding HRESULT hr = CoInitialize(NULL); under the main function.
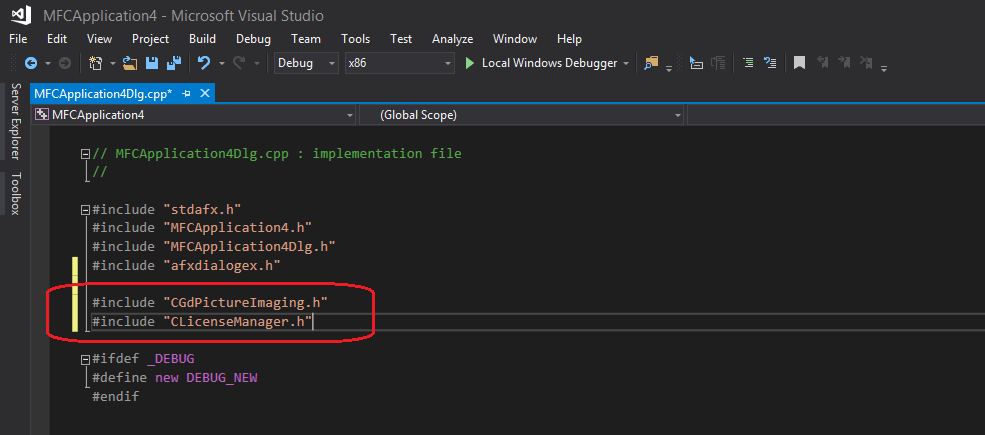
Include the generated headers in your file and build the application.
GdViewer Integration in Visual C++ with MFC
This section provides you with a step-by-step guide to getting started creating a simple MFC application using GdPicture.NET with Visual C++ (up to VS 2017) and containing a GdViewer ActiveX component.
You can find an example using COM Interop in the [INSTALLATION FOLDER]\Samples\WinForm\c++ mfc folder.
IntelliSense is fully supported in Visual C++.
Integration
Start a new project in Visual Studio > File > New > Project. Then select Visual C++ > MFC/ATL > MFC Application. Write the project name and confirm.
Set your Application Type to Dialog based. Copy GdPicture.NET.14.(64).dll and GdPicture.NET.14.tlb to your application folder.
To import the installed GdPicture.NET toolkit (DLL) and to integrate the GdViewer control, you need to follow two steps.
To import as an ActiveX control:
Use Project > Class Wizard (available until VS 2017) and select the Add Class dropdown. Then, choose MFC Class From ActiveX Control… This is necessary for controls like GdViewer.
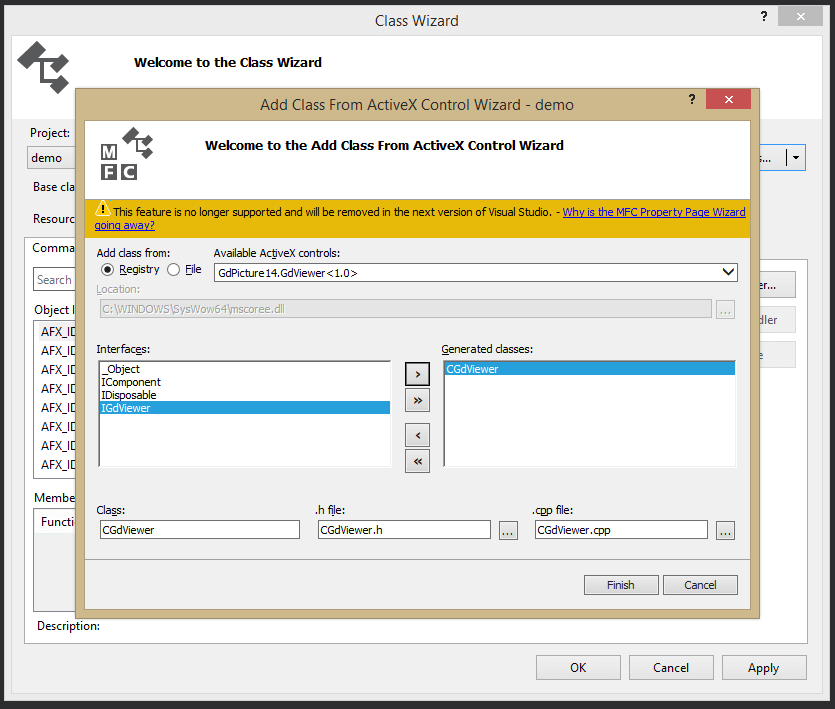
The window with the wizard will appear, and from the Available ActiveX controls list, choose GdPicture14.GdViewer.
From the Interfaces list, choose IGdViewer and add it to the Generated classes list. Then click Finish and press OK.
To import from TypeLib:
Use Project > Class Wizard (available until VS 2017) and select the Add Class dropdown. Then, choose MFC Class From TypeLib…
The window with the wizard will appear, and from the Available type libraries list, choose GdPicture14 - Document Imaging.
From the Interfaces list, choose ILicenseManager and __GdViewer and add them to the Generated classes list. Then click Finish and press OK.
Initialize COM objects in your application by adding HRESULT hr = CoInitialize(NULL); under the main function.
Include the generated headers in your file and build the application.
Here’s the adapted source code:
// Add GdViewer control to the `demoDlg.h` file:
  class CdemoDlg : public CDialogEx
  {
  // Construction
  public:
      CGdViewer sampleView;
      ...
  }

  // Include headers in the `demoDlg.cpp` file:
  #include "C_GdViewer.h"
  #include "CLicenseManager.h"
Adding Code to Initialize the GdViewer Component
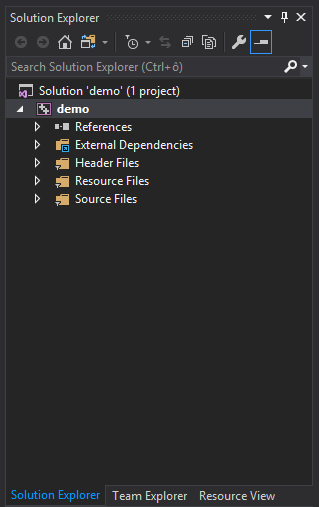
Your default solution will look like what’s shown below. In Resource View, select Dialog/IDD_DEMO_DIALOG.
When the form appears, choose Button from the toolbox on the left side and place it on the form.
Double-click the form, and the method for the button click will appear.
Update it with this code:
const int CTRL_ID = 280;
void CdemoDlg::OnBnClickedButton1()
 {
      // TODO: Add your control notification handler code here.
      CLicenseManager oLicenseManager;
      oLicenseManager.CreateDispatch(L"GdPicture14.LicenseManager");
      oLicenseManager.RegisterKEY(L" XXX ");

      // Create the control, but make sure to use `WS_CHILD` and `WS_VISIBLE`.
      if (!sampleView.Create(L"PdfWnd", WS_CHILD | WS_VISIBLE, CRect(0, 0, 200, 200), this, CTRL_ID))
          {
            AfxMessageBox(L"Failed to create GdViewer control");
             return;
         }

      // Sample init settings — not necessary.
      sampleView.put_EnableMenu(false);
      sampleView.put_ContinuousViewMode(TRUE);
      sampleView.put_MouseWheelMode(2);
      sampleView.put_ScrollBars(TRUE);
      sampleView.DisplayFromFile(L"image.jpg");
      sampleView.Redraw();
}
Adding Code to Dispose of the GdViewer Component
The following example shows how you can release the GdViewer component. What’s important to note is that you need to dispose of the objects properly.
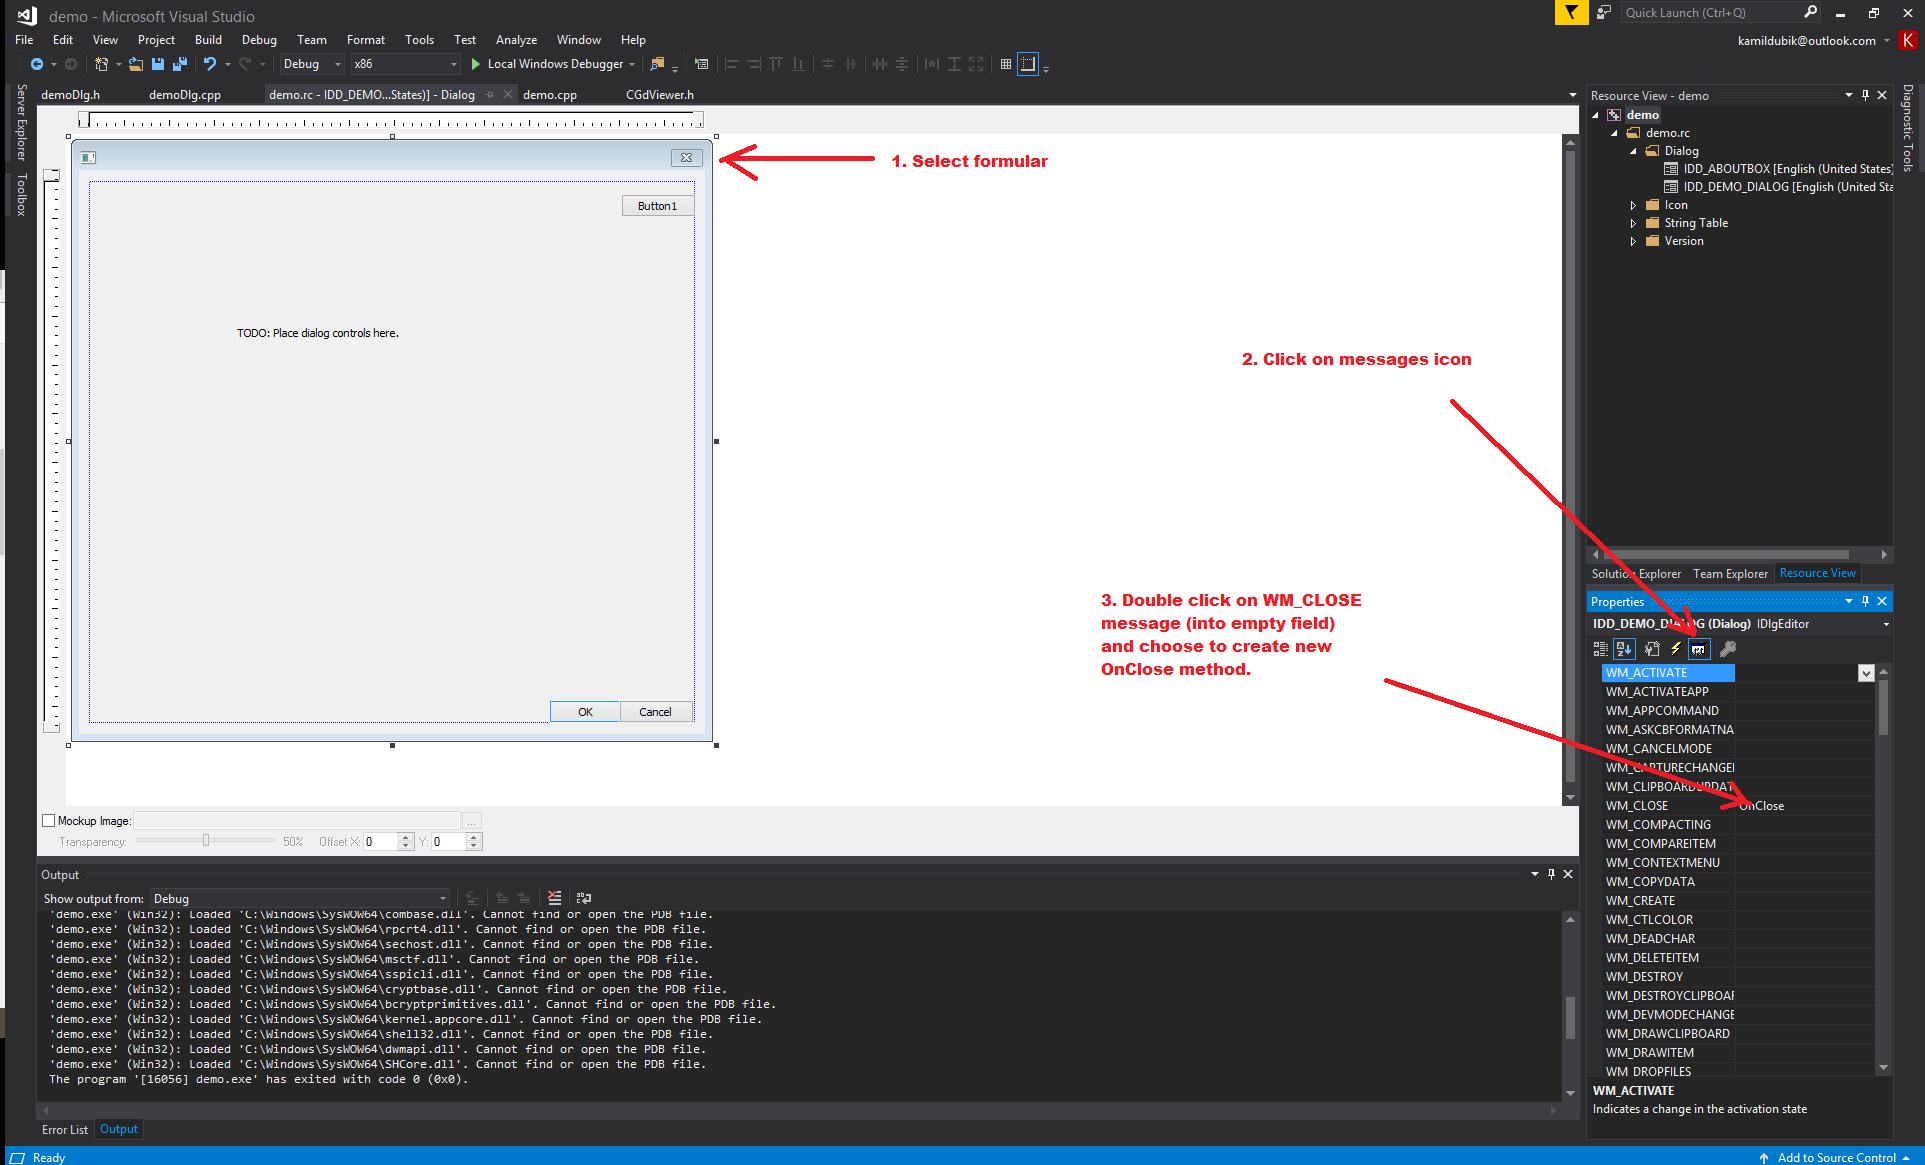
Add a new method for handling the Close() message by choosing Resource View > Demo > Dialog > IDD_DEMO_DIALOG.
Select the form that appears.
Click the messages icon in the properties bar.
Double-click the field next to WM_CLOSE. This will give you the option to create a method for handling Close() messages.
Add the following code to the method you just created:
sampleView.CloseDocument();
sampleView.Dispose();
To handle the Close() message, use the following code:
// The result will look like this:
void CdemoDlg::OnClose()
{
    // TODO: Add your message handler code here and/or call default.
    CDialogEx::OnClose();
    sampleView.CloseDocument();
    sampleView.Dispose();
}
Integrate into Delphi and C++Builder
This guide explains how to integrate GdPicture.NET SDK into your application.
About GdPicture.NET SDK
GdPicture.NET SDK is a cross-platform developer solution for building intelligent PDF and document processing applications. This toolkit enables you to compose, display, capture, edit, and print documents. You can build applications using GdPicture.NET SDK with numerous development environments and deploy these applications to different platforms.
The diagram below displays how GdPicture.NET integrates into different platforms and development environments.
Prerequisites
Before you follow the procedure in this guide:
Install Visual Studio and the workloads or components that are necessary for the type of application you want to build. For more information, see the Microsoft documentation.
For more information on the supported frameworks and operating systems, see the system compatibility guide.
Dim licenseManager As New LicenseManager
Call licenseManager.RegisterKEY("LICENSE_KEY")
Dim licenseManager As New GdPicture_NET_14.LicenseManager
licenseManager.RegisterKey ("LICENSE_KEY")
This activates your trial license for 60 days. Once you purchase a commercial license, you might need to change this trial key. For more information on activating a commercial license, refer to our guide on activating GdPicture.NET for development.
Delphi and C++Builder
This section provides you with a step-by-step guide to getting started using GdPicture.NET with Delphi and C++Builder.
You can find two sample projects that demonstrate the use of GdPicture.NET features. These are located in the [INSTALLATION FOLDER]\Samples\WinForm\delphi folder and use COM Interop.
IntelliSense is fully supported in Delphi and C++Builder.
Integration
You have two integration options, outlined below.
Importing as ActiveX Controls
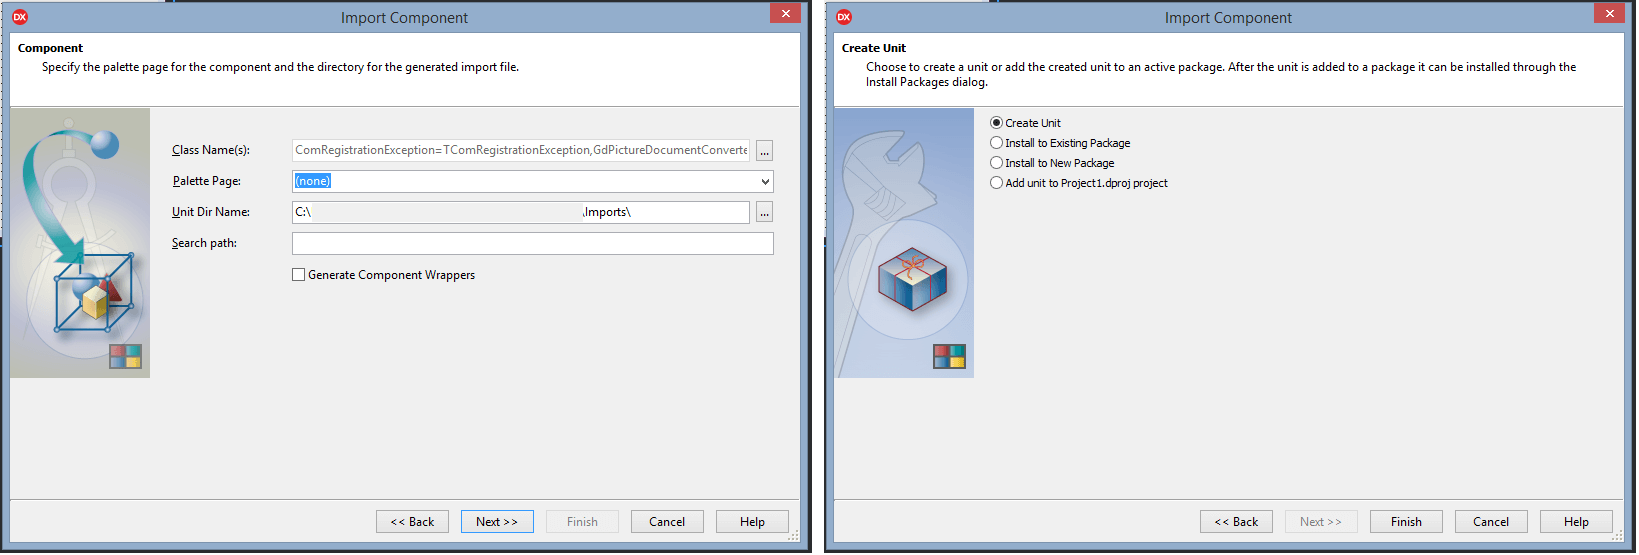
Start a new project in your Delphi environment and select Component > Import Component > Import ActiveX Control > Next.
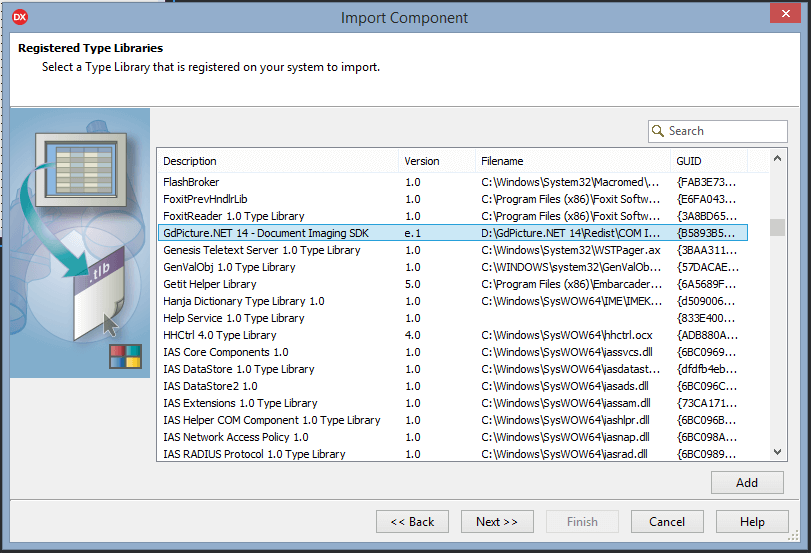
Scroll through the list until you find GdPicture.NET 14 - Document Imaging SDK. Select it and click Next.
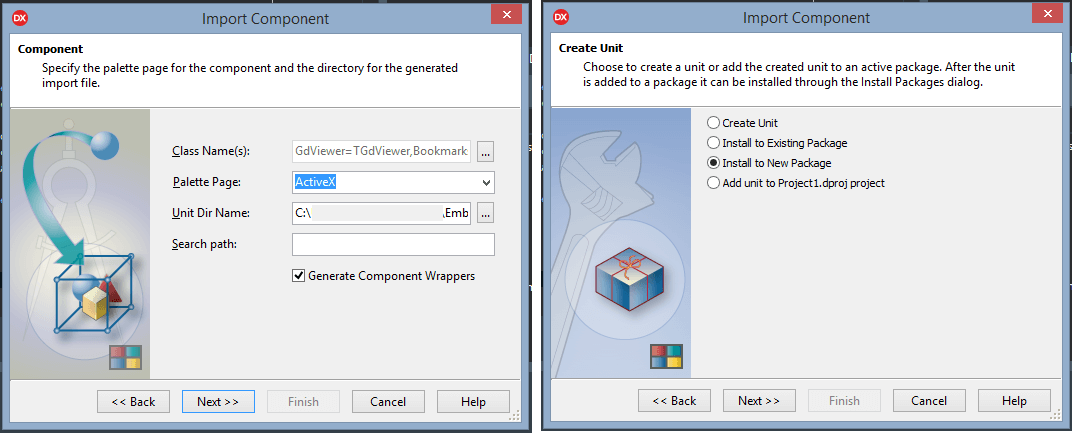
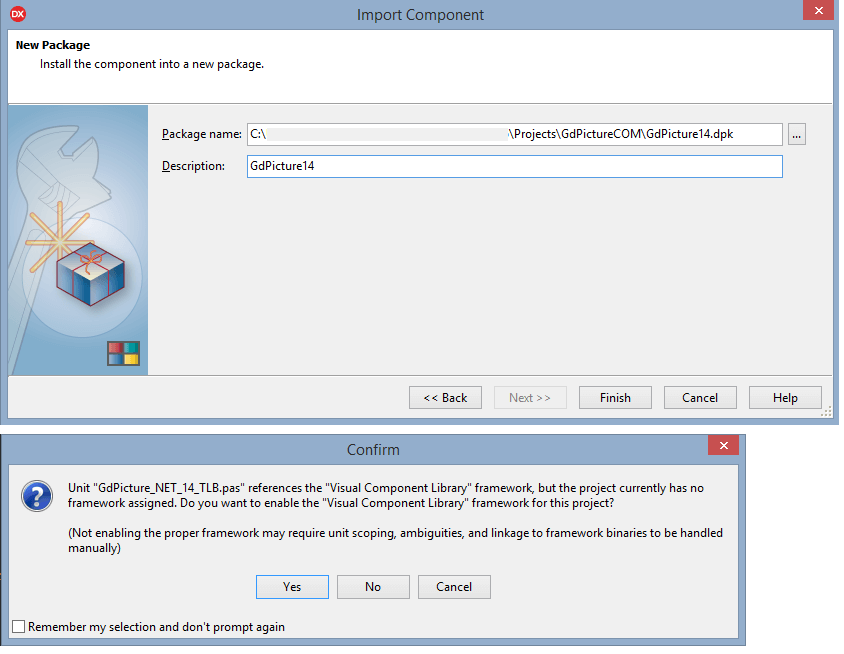
In the Class Name(s) field, you’ll see all the classes available for import. Ensure Palette Page is set to ActiveX, and check that Unit Dir Name is how you want it. Select the Generate Component Wrappers checkbox and click Next. Then, select the Install to New Package option and click Next again.
Browse for the proper path and add it as the Package name. Then click Finish. Finally, add and confirm the framework by clicking Yes.
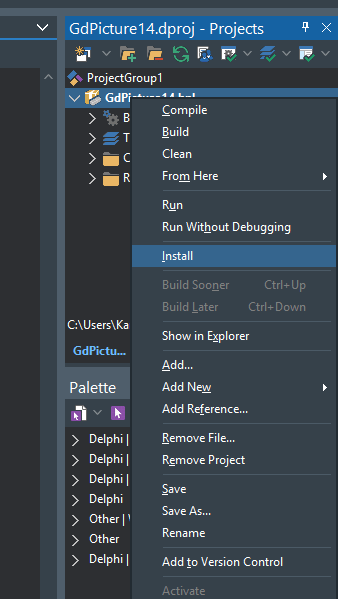
Build the package. Change all instances of UIntPtr to Cardinal in the GdPicture_NET_14_TLB.pas file. After you’ve successfully built the package, you need to install it.
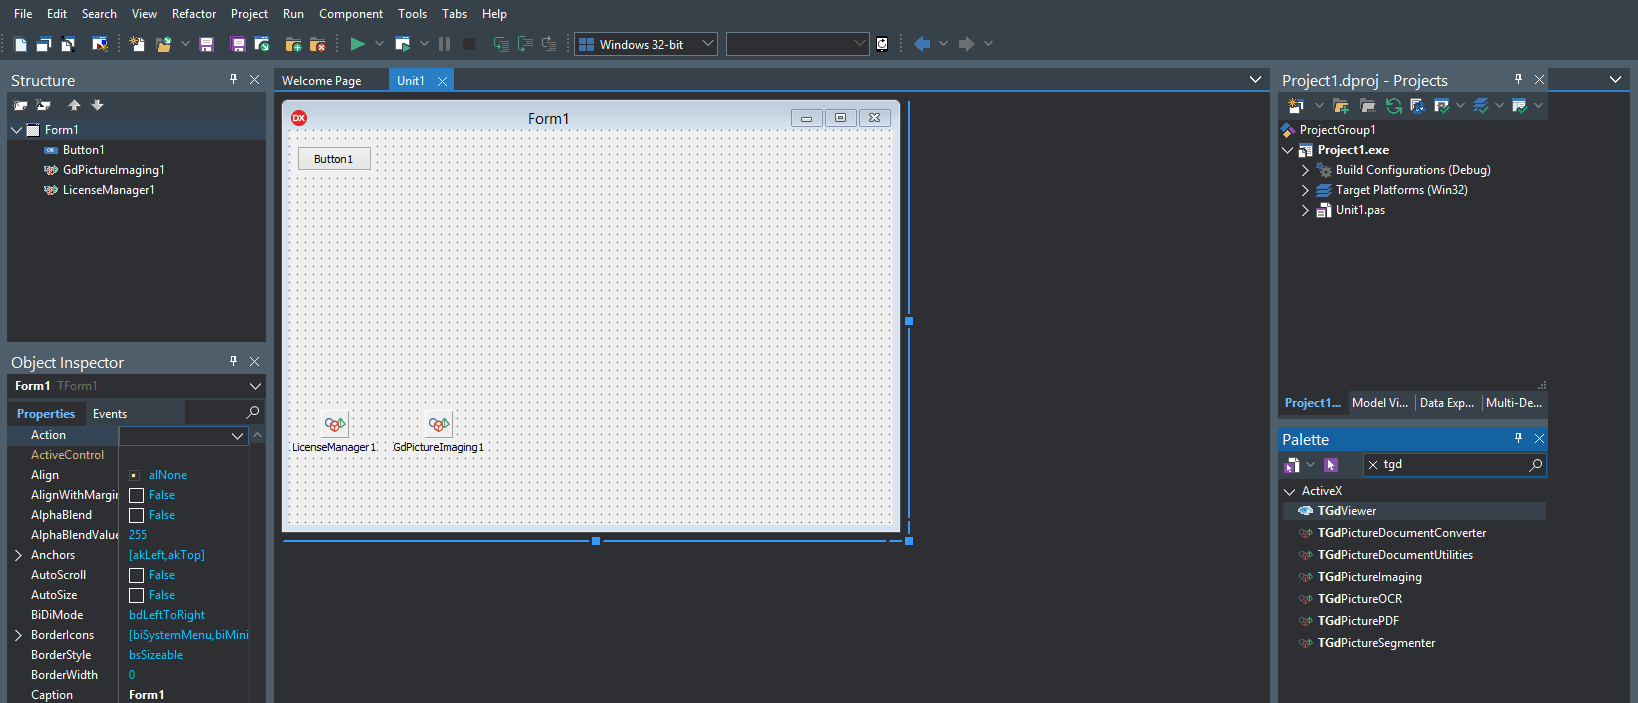
Finally, create your project, select your favorite components from the ActiveX palette, and use them in your application.
Turn off floating-point exceptions.
In a Delphi 32-bit app, use `Set8087CW($133f);`.
In a Delphi 64-bit app, use `SetExceptionMask(exAllArithmeticExceptions);`. To use this, you first need to import the math runtime library.
In C++Builder, add `Set8087CW(0x133f);` to the `WTypes.h` file.
Example Use
The following code snippet demonstrates how to load a TIFF file and save it as a BMP:
procedure Test;
var TiffImageID, Status  : Integer;
begin
     LicenseManager1.RegisterKEY('XXX');    //Please, replace XXX by a valid demo or commercial KEY
     TiffImageID  := GdPictureImaging1.CreateGdPictureImageFromFile('d:\test.tif');
     Status := GdPictureImaging1.SaveAsBMP(TiffImageID, 'd:\output.bmp');
     if Status  <> 0 then
          MessageBox(0,Pchar('Error saving file. Status: ' + inttostr(Status)),'', 0)
     else
          MessageBox(0,Pchar('Done'),'', 0);
end;
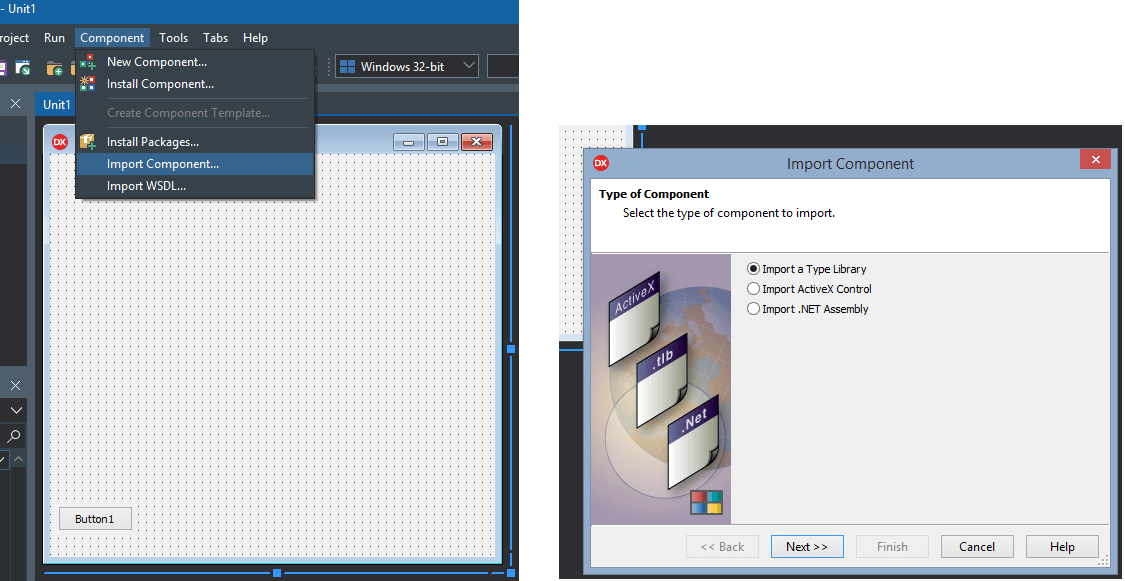
Importing a Type Library
Start a new project in your Delphi environment and select Component > Import Component… > Import a Type Library > Next.
Scroll through the list until you find GdPicture.NET 14 - Document Imaging SDK. Select this and click Next.
In the Class Name(s) field, you’ll see all the classes available for import. Check that Unit Dir Name is how you want it. Leave the Generate Component Wrappers checkbox empty, and then click Next. Then, select the Create Unit option and click Finish.
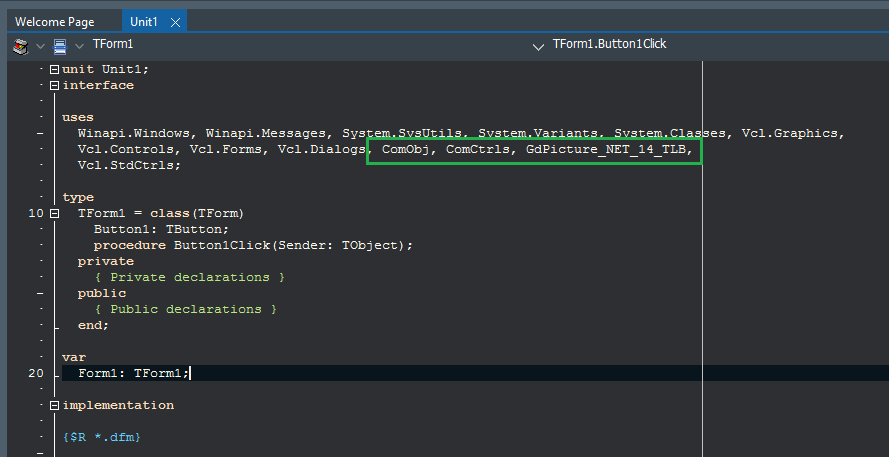
Include the generated unit in your files using the standard uses command, and build the application.
Example Use
The following code snippet demonstrates how to load a TIFF file and save it as a BMP:
procedure Test;
var
  LicenseManager1: Variant;
  GdPictureImaging1: _GdPictureImaging;
  TiffImageID  : Integer;
  Status: Integer;
begin
  LicenseManager1 := CreateOleObject('GdPicture14.LicenseManager');
  LicenseManager1.RegisterKey('XXX');  //Please, replace XXX by a valid demo or commercial KEY
  GdPictureImaging1 := CreateComObject(CLASS_GdPictureImaging) as _GdPictureImaging;
  TiffImageID  := GdPictureImaging1.CreateGdPictureImageFromFile('d:\test.tif');
  Status := GdPictureImaging1.SaveAsBMP(TiffImageID, 'd:\output.bmp');
        if Status  <> 0 then
          MessageBox(0,Pchar('Error saving file. Status: ' + inttostr(Status)),'', 0)
        else
           MessageBox(0,Pchar('Done'),'', 0);
end;
Integrate into Microsoft Access
This guide explains how to integrate GdPicture.NET SDK into your application.
About GdPicture.NET SDK
GdPicture.NET SDK is a cross-platform developer solution for building intelligent PDF and document processing applications. This toolkit enables you to compose, display, capture, edit, and print documents. You can build applications using GdPicture.NET SDK with numerous development environments and deploy these applications to different platforms.
The diagram below displays how GdPicture.NET integrates into different platforms and development environments.
Prerequisites
Before you follow the procedure in this guide:
Install Visual Studio and the workloads or components that are necessary for the type of application you want to build. For more information, see the Microsoft documentation.
For more information on the supported frameworks and operating systems, see the system compatibility guide.
Dim licenseManager As New LicenseManager
Call licenseManager.RegisterKEY("LICENSE_KEY")
Dim licenseManager As New GdPicture_NET_14.LicenseManager
licenseManager.RegisterKey ("LICENSE_KEY")
This activates your trial license for 60 days. Once you purchase a commercial license, you might need to change this trial key. For more information on activating a commercial license, refer to our guide on activating GdPicture.NET for development.
Microsoft Access
Currently, we only provide examples in the [INSTALLATION FOLDER]\Samples\WinForm\msaccess folder using COM Interop .
IntelliSense is fully supported in Microsoft Access.
If you want to resize GdPicture controls, here’s a helpful trick:
Use the menu at the top to insert an ActiveX control. Pick the GdPicture.NET user control. It’ll be the default size.
Then, select the lower-right corner and drag the size of the control to what you want. Save the form, close it, and then double-click to open it.
Be sure you also set the anchoring to the top-left corner of the control so Windows doesn’t try to resize it based on the form size.
Integrate into Visual FoxPro
This guide explains how to integrate GdPicture.NET SDK into your application.
About GdPicture.NET SDK
GdPicture.NET SDK is a cross-platform developer solution for building intelligent PDF and document processing applications. This toolkit enables you to compose, display, capture, edit, and print documents. You can build applications using GdPicture.NET SDK with numerous development environments and deploy these applications to different platforms.
The diagram below displays how GdPicture.NET integrates into different platforms and development environments.
Prerequisites
Before you follow the procedure in this guide:
Install Visual Studio and the workloads or components that are necessary for the type of application you want to build. For more information, see the Microsoft documentation.
For more information on the supported frameworks and operating systems, see the system compatibility guide.
Dim licenseManager As New LicenseManager
Call licenseManager.RegisterKEY("LICENSE_KEY")
Dim licenseManager As New GdPicture_NET_14.LicenseManager
licenseManager.RegisterKey ("LICENSE_KEY")
This activates your trial license for 60 days. Once you purchase a commercial license, you might need to change this trial key. For more information on activating a commercial license, refer to our guide on activating GdPicture.NET for development.
Visual FoxPro
Currently, we only provide examples in the [INSTALLATION FOLDER]\Samples\WinForm\vfp folder using COM Interop.
IntelliSense is fully supported in Visual FoxPro.
We suggest adding the following line of code in the initialization of your program: application.AutoYield = .F.
Integrate into WinForms
This guide explains how to integrate GdPicture.NET SDK into your application.
About GdPicture.NET SDK
GdPicture.NET SDK is a cross-platform developer solution for building intelligent PDF and document processing applications. This toolkit enables you to compose, display, capture, edit, and print documents. You can build applications using GdPicture.NET SDK with numerous development environments and deploy these applications to different platforms.
The diagram below displays how GdPicture.NET integrates into different platforms and development environments.
Prerequisites
Before you follow the procedure in this guide:
Install Visual Studio and the workloads or components that are necessary for the type of application you want to build. For more information, see the Microsoft documentation.
For more information on the supported frameworks and operating systems, see the system compatibility guide.
Once downloaded, follow the installation wizard, which will guide you through the installation process.
It’s recommended to install the toolkit at a destination such as C:\GdPicture.NET\.
Getting a Trial License Key
A trial license lets you try the GdPicture.NET software package for free for 60 days. This includes full access and technical support.
To get a trial license key, follow these steps:
Go to the folder where you installed GdPicture.NET.
Run licenseManager.exe.
Click Request a trial key.
Enter your email address and a password.
Click Send Request. You’ll receive a trial license key by email.
If you don’t immediately receive a key via email, or if the application can’t be run on a system that allows web requests, contact our Sales team.
Adding GdPicture to Your Application
This section explains how to add GdPicture.NET to your application.
Adding a Reference to the NuGet Package
First, add a reference to the GdPicture.API NuGet package by following these steps:
In Visual Studio, create a new project or open the code of your existing application. For more information on creating a new project, see the Microsoft documentation. It’s recommended to create a project that runs on .NET 6.0 or newer.
Select Project > Manage NuGet Packages.
In the Package source field, select nuget.org.
Click the Browse tab, and then search for GdPicture.
Dim licenseManager As New LicenseManager
Call licenseManager.RegisterKEY("LICENSE_KEY")
Dim licenseManager As New GdPicture_NET_14.LicenseManager
licenseManager.RegisterKey ("LICENSE_KEY")
This activates your trial license for 60 days. Once you purchase a commercial license, you might need to change this trial key. For more information on activating a commercial license, refer to our guide on activating GdPicture.NET for development.
Integrate into WPF
This guide explains how to integrate GdPicture.NET SDK into your application.
About GdPicture.NET SDK
GdPicture.NET SDK is a cross-platform developer solution for building intelligent PDF and document processing applications. This toolkit enables you to compose, display, capture, edit, and print documents. You can build applications using GdPicture.NET SDK with numerous development environments and deploy these applications to different platforms.
The diagram below displays how GdPicture.NET integrates into different platforms and development environments.
Prerequisites
Before you follow the procedure in this guide:
Install Visual Studio and the workloads or components that are necessary for the type of application you want to build. For more information, see the Microsoft documentation.
For more information on the supported frameworks and operating systems, see the system compatibility guide.
Once downloaded, follow the installation wizard, which will guide you through the installation process.
It’s recommended to install the toolkit at a destination such as C:\GdPicture.NET\.
Getting a Trial License Key
A trial license lets you try the GdPicture.NET software package for free for 60 days. This includes full access and technical support.
To get a trial license key, follow these steps:
Go to the folder where you installed GdPicture.NET.
Run licenseManager.exe.
Click Request a trial key.
Enter your email address and a password.
Click Send Request. You’ll receive a trial license key by email.
If you don’t immediately receive a key via email, or if the application can’t be run on a system that allows web requests, contact our Sales team.
Adding GdPicture to Your Application
This section explains how to add GdPicture.NET to your application.
Adding a Reference to the NuGet Package
First, add a reference to the GdPicture.API NuGet package by following these steps:
In Visual Studio, create a new project or open the code of your existing application. For more information on creating a new project, see the Microsoft documentation. It’s recommended to create a project that runs on .NET 6.0 or newer.
Select Project > Manage NuGet Packages.
In the Package source field, select nuget.org.
Click the Browse tab, and then search for GdPicture.
Dim licenseManager As New LicenseManager
Call licenseManager.RegisterKEY("LICENSE_KEY")
Dim licenseManager As New GdPicture_NET_14.LicenseManager
licenseManager.RegisterKey ("LICENSE_KEY")
This activates your trial license for 60 days. Once you purchase a commercial license, you might need to change this trial key. For more information on activating a commercial license, refer to our guide on activating GdPicture.NET for development.
This guide explains how to integrate XtractFlow into your application.
About XtractFlow
XtractFlow is an intelligent document processing (IDP) SDK that extends our existing key-value pair (KVP) technology with large language models (LLMs) to deliver best-in-class extraction and classification accuracy.
This new paradigm breaks traditional data extraction barriers to achieve a higher degree of accuracy compared to pure AI/ML alternatives.
Our solution offers the versatility of being used both as a REST microservice, suitable for hosting in any global region, and as an integrated API within desktop or server applications.
The solution operates without the need for storing documents or any extracted content, thereby greatly enhancing alignment with a wide array of data processing and retention policies.
Prerequisites
Before you follow the procedure in this guide, ensure you have:
This guide will take you through the steps necessary to integrate PSPDFKit into your Java application. By the end, you’ll be able to load a PDF document into your application using the PSPDFKit API.
PSPDFKit Library for Java can be evaluated without a trial license key, but with certain limitations (such as a red watermark added to documents). To evaluate without limitations, get a trial key.
Now that the PSPDFKit Java Library is added, you can use the SDK in your application. You need to initialize the SDK prior to calling any other PSPDFKit method. If you have a license key (either a trial key or a production key), you can use the initialize method. You can also use the initializeTrial method to get started right away:
@Throws(PSPDFKitInitializeException::class)
fun initializePSPDFKit() : Void {
    PSPDFKit.initializeTrial();
}
Load a document with:
File file = new File("path/to/document.pdf");
PdfDocument document = PdfDocument.open(new FileDataProvider(file));
val file = File("path/to/document.pdf")
val document = PdfDocument.open(FileDataProvider(file))
Once you have a document loaded, you can use the rest of the library. See the API docs and guides for more information, or try out the Catalog examples (see below).
Building and Running the Catalog App
The PSPDFKit Java Library comes with an example application called the Catalog app, which contains many useful examples for exploring the different features of PSPDFKit and getting started quickly. You can find the app in the Example folder of the SDK ZIP file.
To build and run the Catalog app, follow these steps.
Extract PSPDFKit-Libraries-java_binary-{version}.zip to your desired location and cd into the root of its directory.
cd into the Catalog (cd catalog).
Build and run the Catalog application:
./gradlew runJava
The PSPDFKit Java Library comes with an example application called the Catalog app, which contains many useful examples for exploring the different features of PSPDFKit and getting started quickly. You can find the app in the Example folder of the SDK ZIP file.
To build and run the Catalog app, follow these steps.
Extract PSPDFKit-Libraries-java_binary-{version}.zip to your desired location and cd into the root of its directory.
cd into the Catalog (cd catalog).
Build and run the Catalog application:
gradlew.bat runJava
This guide will take you through the steps necessary to integrate PSPDFKit into your Java application. By the end, you’ll be able to load a PDF document into your application using the PSPDFKit API.
PSPDFKit Library for Java can be evaluated without a trial license key, but with certain limitations (such as a red watermark added to documents). To evaluate without limitations, get a trial key.
PSPDFKit does not collect any data during your evaluation of the SDK.
Only use the manual method if absolutely necessary. Otherwise, please refer to the main Integrating PSPDFKit Java Library guide for more details.
Please select the build system you’re using:
Gradle Build System
If you’re using the Gradle build system, a good example of how to integrate the PSPDFKit Java Library can be seen in the Catalog example distributed in the downloaded ZIP.
Complete the following steps for manual Gradle integration.
To use the PSPDFKit Java Library with Maven, it’s first necessary to install the PSPDFKit JAR to a Maven repository. Only when this is done can it be a reference for a Maven project.
Extract the files from PSPDFKit-Java-binary-1.5.0.zip into a known location.
Within your project, using mvn on the command line, add the PSPDFKit JAR to a repository, replacing both the version (where necessary) and the path to the JAR and POM (extracted from PSPDFKit-Java-binary-1.5.0.zip):
This will install the JAR to a local repository. It’s also possible to publish this JAR remotely; please see the Maven guides if this is a requirement.
Add the PSPDFKit Java Library as a dependency of your project. In your project’s pom.xml, add the following, replacing the version with the target version:
Now that the PSPDFKit Java Library is added, you can use the SDK in your application. You need to initialize the SDK prior to calling any other PSPDFKit method. If you have a license key (either a trial key or a production key), you can use the initialize method. You can also use the initializeTrial method to get started right away:
@Throws(PSPDFKitInitializeException::class)
fun initializePSPDFKit() : Void {
    PSPDFKit.initializeTrial();
}
Load a document with:
File file = new File("path/to/document.pdf");
PdfDocument document = PdfDocument.open(new FileDataProvider(file));
val file = File("path/to/document.pdf")
val document = PdfDocument.open(FileDataProvider(file))
Once you have a document loaded, you can use the rest of the library. See the API docs and guides for more information, or try out the Catalog examples (see below).
Building and Running the Catalog App
The PSPDFKit Java Library comes with an example application called the Catalog app, which contains many useful examples for exploring the different features of PSPDFKit and getting started quickly. You can find the app in the Example folder of the SDK ZIP file.
To build and run the Catalog app, follow these steps.
Extract PSPDFKit-Libraries-java_binary-{version}.zip to your desired location and cd into the root of its directory.
cd into the Catalog (cd catalog).
Build and run the Catalog application:
./gradlew runJava
The PSPDFKit Java Library comes with an example application called the Catalog app, which contains many useful examples for exploring the different features of PSPDFKit and getting started quickly. You can find the app in the Example folder of the SDK ZIP file.
To build and run the Catalog app, follow these steps.
Extract PSPDFKit-Libraries-java_binary-{version}.zip to your desired location and cd into the root of its directory.
cd into the Catalog (cd catalog).
Build and run the Catalog application:
./gradlew runJava
The PSPDFKit Java Library comes with an example application called the Catalog app, which contains many useful examples for exploring the different features of PSPDFKit and getting started quickly. You can find the app in the Example folder of the SDK ZIP file.
To build and run the Catalog app, follow these steps.
Extract PSPDFKit-Libraries-java_binary-{version}.zip to your desired location and cd into the root of its directory.
cd into the Catalog (cd catalog).
Build and run the Catalog application:
gradlew.bat runJava
Integrate into a Node.js Project
This guide will walk you through the steps necessary to integrate PSPDFKit into a Node.js project.
PSPDFKit for Node.js can be evaluated without a trial license key, but with certain limitations (such as a red watermark added to documents). To evaluate without limitations, get a trial key.
A package manager compatible with npm. This guide contains usage examples for the npm client. The npm client is installed with Node.js by default.
Setting Up a Node.js Project
First, you need to have Node.js and npm (Node Package Manager) installed on your system. You can download Node.js from the official website, and npm will be included.
Once you have Node.js and npm installed, you can verify the installation by running the following commands in your terminal:
node -v
npm -v
Now, navigate to the directory where you want to set up your project. Once you’re in the desired directory, initialize a new Node.js project by running:
npm init -y
This command will create a new package.json file in your directory. The -y flag is used to skip the questionnaire that usually follows npm init. If instead, you’d like to further define details of your project at this point, you can omit the -y flag from the npm init command.
Adding the PSPDFKit for Node.js SDK
Open a terminal and move to the root directory of your Node.js project. Install the @pspdfkit/nodejs library into your project by running the following command in your terminal:
npm install @pspdfkit/nodejs
After running this command, @pspdfkit/nodejs will be added to the list of dependencies in your package.json file.
At this point, you’re ready to develop your Node.js application using the PSPDFKit SDK.
Converting a Document to PDF
Add an Office document or a PNG or JPEG image to your project directory. As an example, we’ll assume you’ll be converting a Word document. You can name it anything you want, but for the sake of this tutorial, let’s call it sample.docx. Remember to update the file name in the following steps if you choose a different name.
Create a new JavaScript file in your project root directory. You can name it anything, but for this example, name it index.js.
In the index.js file, add the following code to import the @pspdfkit/nodejs library and convert the document to PDF:
Note: At this point, the resulting PDF will be converted but will show a PSPDFKit watermark. To convert documents without showing a watermark, you’ll need to specify a license property as part of the object passed as an argument to the load() function call containing key and appName properties. Please get in touch with Sales for more information about obtaining a trial license key.
Running the Project
To run the script, navigate to your project directory in the terminal and run the following command:
node index.js
This will execute the index.js script, and a new converted.pdf file will appear in your filesystem.
Integrate into a Deno Project
This guide will walk you through the steps necessary to integrate PSPDFKit into a Deno project.
PSPDFKit for Node.js can be evaluated without a trial license key, but with certain limitations (such as a red watermark added to documents). To evaluate without limitations, get a trial key.
Note: The minimum version required is Deno 1.36.4.
Setting Up a Deno Project
First, you need to have Deno (≥ 1.36.4) installed on your system. You can download Deno from the official website.
Once you have Deno installed, verify the installation by running the following command in your terminal:
deno --version
Now, navigate to the directory where you want to set up your project. Once you’re in the desired directory, create a TypeScript or JavaScript file that will contain your source code. For this example, create a file called index.ts.
Adding the PSPDFKit for Node.js SDK
Open a terminal and move to the root directory of your Deno project. You’ll rely on Deno’s npm compatibility mode to load the @pspdfkit/nodejs library into your project. Add the following line at the top of your index.ts file:
import { load } from "npm:@pspdfkit/nodejs@latest";
At this point, you’re ready to develop your Deno application using the PSPDFKit SDK.
Converting a Document to PDF
Add an Office document or a PNG or JPEG image to your project directory. As an example, we’ll assume you’ll be converting a Word document. You can name it anything you want, but for the sake of this tutorial, call it sample.docx. Remember to update the file name in the following steps if you choose a different name.
In the index.js file, add the following code to convert the document to PDF:
Note: At this point, the resulting PDF will be converted but will show a PSPDFKit watermark. To convert documents without showing a watermark, you’ll need to specify a license property as part of the object passed as an argument to the load() function call containing key and appName properties. Please get in touch with Sales for more information about obtaining a trial license key.
Running the Project
To run the script, navigate to your project directory in the terminal and run the following command:
deno run -A index.ts
This will execute the index.ts script, and a new converted.pdf file will appear in your filesystem.
PSPDFKit Processor has been deprecated and replaced by PSPDFKit Document Engine. All PSPDFKit Processor licenses will work as before and be supported until 15 May 2024 (we will contact you about license migration). To start using Document Engine, refer to the migration guide. With Document Engine, you’ll have access to robust new capabilities (read the blog for more information).
This guide walks you through the steps necessary to start PSPDFKit Processor. It also shows you how to use it to process documents. By the end, you’ll be able to merge two PDF documents into one using Processor’s HTTP API from PHP.
Requirements
PSPDFKit Processor runs on a variety of platforms. The following operating systems are supported:
macOS Ventura, Monterey, Mojave, Catalina, or Big Sur
Windows 10 Pro, Home, Education, or Enterprise 64-bit
Ubuntu, Fedora, Debian, or CentOS. Ubuntu and Debian derivatives such as Kubuntu or Xubuntu are supported as well. Currently only 64-bit Intel (x86_64) processors are supported.
Regardless of your operating system, you’ll need at least 4 GB of RAM.
Installing Docker
PSPDFKit Processor is distributed as a Docker container. To run it on your computer, you need to install a Docker runtime distribution for your operating system.
Install and start Docker Desktop for Mac. Please refer to the Docker website for instructions.
Install and start Docker Desktop for Windows. Please refer to the Docker website for instructions.
Install and start Docker Engine. Please refer to the Docker website for instructions on how to install it for your Linux distribution.
After you install Docker, use these instructions to install Docker Compose.
Starting PSPDFKit Processor
First, open your terminal emulator.
Use the terminal emulator integrated with your code editor or IDE. Alternatively, you can use Terminal.app or iTerm2.
Use the terminal emulator integrated with your code editor or IDE. Alternatively, you can use PowerShell.
Use the terminal emulator integrated with your code editor or IDE, or one bundled with your desktop environment.
Now run the following command:
docker run --rm -t -p 5000:5000 pspdfkit/processor:2023.11.1
This command might take a while to run, depending on your internet connection speed. Wait until you see a message like this in the terminal:
[info] 2023-02-05 18:56:45.286 Running PSPDFKit Processor version 2023.11.1. pid=<0.1851.0>
The PSPDFKit Processor is now up and running!
Installing PHP
The interaction with Processor happens via its HTTP API: You send documents and commands in the request and receive the resulting file in the response. To do this, you’ll invoke the API from the PHP script. But first, you need to install PHP for your operating system:
The easiest way to install PHP on macOS is via Homebrew. Follow the instructions on the Homebrew website to install it. Then, to install PHP, run:
brew install php@7.4 && brew link php@7.4
Verify the installation by running the following command in the terminal:
php --version
The output should start with PHP 7.4 — you can ignore the rest of the message.
ℹ️ Note: If the output doesn’t match the above, try restarting your terminal app by typing exit and opening it again.
Download the PHP ZIP archive from the PHP website (pick the x86 Thread Safe build of the 7.4 release).
Create a folder anywhere on your C: drive.
Extract the ZIP archive into the folder you just created.
Open the terminal and switch to that folder:
cd C:\path\to\directory
Now run the .\php.exe --version command. The output should start with PHP 7.4 — you can ignore the rest of the message.
To proceed, you’ll also need to create a PHP configuration file to enable a specific extension. So in the same directory, create a php.ini file with the following content:
[PHP]
extension=curl
Save the file, as you’ll need it shortly.
You can install PHP using your distribution’s package manager:
apt-get update && apt-get install -y php
dnf install -y php
Now run the php --version command. The output should start with PHP 7.4 — you can ignore the rest of the message.
Handling File Uploads
In this example project, the PDF files you’ll merge will be uploaded through a simple webpage via a standard HTML form. Create a file called index.php with the following content:
Now open the terminal and type the following command in the same directory where you created the index.php file:
php -S localhost:8000
.\php.exe -c php.ini -S localhost:8000
php -S localhost:8000
Go to http://localhost:8000 in the browser. You should see a webpage similar to this:
When you choose files and click the Merge PDFs button, you’ll receive an error. This is because you haven’t yet written any code to handle the form submission.
Create a merge.php file in the same directory and add the following content to it:
Now when you go back to http://localhost:8000, choose the files, and submit the form, you should see the names of the files you picked printed on the screen:
Merging PDFs
You can now use Processor’s API to merge the files uploaded from the browser. Replace the contents of the merge.php file with:
Most of this code, up until the curl_exec function, constructs a request that’s sent to PSPDFKit Processor. It includes two files — document1 and document2 — and a list of instructions for Processor. By default, Processor’s output (the /build endpoint) is the result of merging all documents or parts of the instructions. To learn more about the /build instructions, go to Processor’s API Reference.
The rest of the code deals with error handling, and if everything goes well, it returns the resulting file back to the browser.
You can check how it works in practice yourself! Go to http://localhost:8000, pick any two PDFs on your disk (or use these two if you don’t have any: file1.pdf, file2.pdf), and click Merge PDFs again. Depending on your browser, it will either automatically download the file for you or ask you for permission to download. In any case, look for the result.pdf file in the downloads folder on your computer. Open that file in any PDF viewer application. If you used the two files from the links above, you should see a five-page PDF document like this:
That’s it! Now you know how to use Processor from PHP to perform operations on documents.
PSPDFKit Processor has been deprecated and replaced by PSPDFKit Document Engine. All PSPDFKit Processor licenses will work as before and be supported until 15 May 2024 (we will contact you about license migration). To start using Document Engine, refer to the migration guide. With Document Engine, you’ll have access to robust new capabilities (read the blog for more information).
This guide walks you through the steps necessary to start PSPDFKit Processor. It also shows you how to use it to process documents. By the end, you’ll be able to merge two PDF documents into one using Processor’s HTTP API from Python.
Requirements
PSPDFKit Processor runs on a variety of platforms. The following operating systems are supported:
macOS Ventura, Monterey, Mojave, Catalina, or Big Sur
Windows 10 Pro, Home, Education, or Enterprise 64-bit
Ubuntu, Fedora, Debian, or CentOS. Ubuntu and Debian derivatives such as Kubuntu or Xubuntu are supported as well. Currently only 64-bit Intel (x86_64) processors are supported.
Regardless of your operating system, you’ll need at least 4 GB of RAM.
Installing Docker
PSPDFKit Processor is distributed as a Docker container. To run it on your computer, you need to install a Docker runtime distribution for your operating system.
Install and start Docker Desktop for Mac. Please refer to the Docker website for instructions.
Install and start Docker Desktop for Windows. Please refer to the Docker website for instructions.
Install and start Docker Engine. Please refer to the Docker website for instructions on how to install it for your Linux distribution.
After you install Docker, use these instructions to install Docker Compose.
Starting PSPDFKit Processor
First, open your terminal emulator.
Use the terminal emulator integrated with your code editor or IDE. Alternatively, you can use Terminal.app or iTerm2.
Use the terminal emulator integrated with your code editor or IDE. Alternatively, you can use PowerShell.
Use the terminal emulator integrated with your code editor or IDE, or one bundled with your desktop environment.
Now run the following command:
docker run --rm -t -p 5000:5000 pspdfkit/processor:2023.11.1
This command might take a while to run, depending on your internet connection speed. Wait until you see a message like this in the terminal:
[info] 2023-02-05 18:56:45.286 Running PSPDFKit Processor version 2023.11.1. pid=<0.1851.0>
The PSPDFKit Processor is now up and running!
Installing Python
The interaction with Processor happens via its HTTP API: You send documents and commands in the request and receive the resulting file in the response. To do this, you’ll invoke the API from the Python script. But first, you need to install Python for your operating system:
To install Python, first you need to install the Xcode Command Line Tools. Install them by running the following command:
xcode-select --install
The easiest way to install Python on macOS is via Homebrew. Follow the instructions on the Homebrew website to install it. Then, to install Python, run:
brew install python
Verify the installation by running the following command in the terminal:
python3 --version
The output should start with Python 3.9 — you can ignore the rest of the message.
ℹ️ Note: ️If the output doesn’t match the above, try restarting the terminal app by typing exit and opening it again.
Now run the python3 --version command. The output should start with Python 3.9 — you can ignore the rest of the message.
Merging PDFs
To make HTTP requests to Processor’s API, you need an HTTP client library. For this scenario, you’ll use the excellent Requests package. Install it by running the following command:
python3 -m pip install requests==2.25.1
python -m pip install requests==2.25.1
python3 -m pip install requests==2.25.1
Now you can create a script to merge the PDFs. It’ll take two file paths as command-line arguments, send the files to Processor to merge them, and save the result in another file on disk. Create a merge.py file with the following content:
import sys
import json
import requests

if len(sys.argv) < 3:
    print("Too few arguments.")
    exit(1)

file1 = sys.argv[1]
file2 = sys.argv[2]

url = "http://localhost:5000/build"

payload= {
    "instructions": json.dumps({
        "parts": [
            {
                "file": "file1"
            },
            {
                "file": "file2"
            }
        ]
})}

files=[
  ('file1',('file1.pdf',open(file1,'rb'),'application/pdf')),
  ('file2',('file2.pdf',open(file2,'rb'),'application/pdf'))
]
headers = {}

response = requests.post(url, data=payload, files=files)

if response.status_code == 200:
    with open("result.pdf", "wb") as f:
        f.write(response.content)
else:
    print(
        f"Request to Processor failed with status code {response.status_code}: '{response.text}'."
    )
The script verifies that the number of arguments is correct and prepares the request data. It includes two files — file1 and file2 — and a list of instructions for Processor. By default, Processor’s output (the /build endpoint) is the result of merging all documents or parts of the instructions. To learn more about the /build instructions, go to Processor’s API Reference.
The rest of the code deals with error handling, and if everything goes well, it saves the result in the result.pdf file in the current working directory.
You can check how it works in practice yourself! Pick any two PDFs on your computer (or use these two if you don’t have any: file1.pdf, file2.pdf), and run the script:
Make sure to replace path/to/file1.pdf and path/to/file2.pdf with the actual location of the PDF files on your computer.
If you used the two files from the links above, you should see a five-page PDF document like this:
That’s it! Now you know how to use Processor from Python to perform operations on documents.
PSPDFKit Processor has been deprecated and replaced by PSPDFKit Document Engine. All PSPDFKit Processor licenses will work as before and be supported until 15 May 2024 (we will contact you about license migration). To start using Document Engine, refer to the migration guide. With Document Engine, you’ll have access to robust new capabilities (read the blog for more information).
This guide walks you through the steps necessary to start PSPDFKit Processor. It also shows you how to use it to process documents. By the end, you’ll be able to merge two PDF documents into one using Processor’s HTTP API from Rust.
Requirements
PSPDFKit Processor runs on a variety of platforms. The following operating systems are supported:
macOS Ventura, Monterey, Mojave, Catalina, or Big Sur
Windows 10 Pro, Home, Education, or Enterprise 64-bit
Ubuntu, Fedora, Debian, or CentOS. Ubuntu and Debian derivatives such as Kubuntu or Xubuntu are supported as well. Currently only 64-bit Intel (x86_64) processors are supported.
Regardless of your operating system, you’ll need at least 4 GB of RAM.
Installing Docker
PSPDFKit Processor is distributed as a Docker container. To run it on your computer, you need to install a Docker runtime distribution for your operating system.
Install and start Docker Desktop for Mac. Please refer to the Docker website for instructions.
Install and start Docker Desktop for Windows. Please refer to the Docker website for instructions.
Install and start Docker Engine. Please refer to the Docker website for instructions on how to install it for your Linux distribution.
After you install Docker, use these instructions to install Docker Compose.
Starting PSPDFKit Processor
First, open your terminal emulator.
Use the terminal emulator integrated with your code editor or IDE. Alternatively, you can use Terminal.app or iTerm2.
Use the terminal emulator integrated with your code editor or IDE. Alternatively, you can use PowerShell.
Use the terminal emulator integrated with your code editor or IDE, or one bundled with your desktop environment.
Now run the following command:
docker run --rm -t -p 5000:5000 pspdfkit/processor:2023.11.1
This command might take a while to run, depending on your internet connection speed. Wait until you see a message like this in the terminal:
[info] 2023-02-05 18:56:45.286 Running PSPDFKit Processor version 2023.11.1. pid=<0.1851.0>
The PSPDFKit Processor is now up and running!
Installing Rust
The interaction with PSPDFKit Processor happens via its HTTP API. Documents and commands are sent in API request calls, and the resulting files are received in API response calls. API calls are invoked from the Rust code, so you need to install Rust.
To install Rust:
Follow the instructions for your operating system in Rust’s Installation Guide.
Go to any directory in your system using your terminal. Create a new directory called merging-pdfs and go the newly created directory:
mkdir merging-pdfs
cd merging-pdfs
Create a new cargo project:
cargo new merging-pdfs-pspdfkit
Run the project with the cargo run command.
Merging PDFs with Rust
If you don’t have any sample documents, download and use these files: cover.pdf and document.pdf
Paste the following content into the Cargo.toml file in the merging-pdfs-pspdfkit project directory:
[dependencies]
tokio = { version = "1.23.0", features = ["full"] }
reqwest = { version = "0.11.13", features = ["json", "multipart"] }
serde_json = "1.0.91"
Next, replace /path/to/cover.pdf on line 24 and /path/to/document.pdf on line 30 with the actual paths to the example documents on your machine. Then, replace the contents of the src/main.rs file with this code:
use reqwest::Result;
use std::borrow::Cow;
use std::fs;
use std::fs::File;
use std::io::Write;
#[tokio::main]
asyncfn main() -> Result<()> {
// Multipart Requestlet body = serde_json::json!({
"parts": [
{
"file": "cover"
},
{
"file": "document"
}
],
"output": {
"type": "pdf"
}
});
let cover = fs::read("src/cover.pdf").unwrap();
let cover_part = reqwest::multipart::Part::bytes(cover)
.file_name("cover.pdf")
.mime_str("application/pdf")
.unwrap();
let document = fs::read("src/document.pdf").unwrap();
let document_part = reqwest::multipart::Part::bytes(document)
.file_name("document.pdf")
.mime_str("application/pdf")
.unwrap();
let instructions = serde_json::to_vec(&body).unwrap();
let instructions_bytes = Cow::from(instructions);
let instructions_part = reqwest::multipart::Part::bytes(instructions_bytes);
let form = reqwest::multipart::Form::new()
.part("cover", cover_part)
.part("document", document_part)
.part("instructions", instructions_part);
let client = reqwest::Client::new();
let res = client
.post("http://localhost:5000/build")
.multipart(form)
.send()
.await?;
letmut result_file = File::create("result.pdf").expect("Error creating file");
result_file
.write_all(&res.bytes().await.unwrap())
.expect("Error writing to file");
Ok(())
}
Most of this code deals with creating and sending a multipart request containing files and instructions to Processor’s /build endpoint using Rust’s reqwest crate.
To run the code, ensure you’re in the merging-pdfs directory and type the following command in your terminal:
cargo run
To learn more about the various actions you can apply to PDFs using PSPDFKit Processor, go to Processor’s API Reference.
PSPDFKit Processor has been deprecated and replaced by PSPDFKit Document Engine. All PSPDFKit Processor licenses will work as before and be supported until 15 May 2024 (we will contact you about license migration). To start using Document Engine, refer to the migration guide. With Document Engine, you’ll have access to robust new capabilities (read the blog for more information).
This guide walks you through the steps necessary to start PSPDFKit Processor. It also shows you how to use it to process documents. By the end, you’ll be able to merge two PDF documents into one using Processor’s HTTP API with Golang.
Requirements
PSPDFKit Processor runs on a variety of platforms. The following operating systems are supported:
macOS Ventura, Monterey, Mojave, Catalina, or Big Sur
Windows 10 Pro, Home, Education, or Enterprise 64-bit
Ubuntu, Fedora, Debian, or CentOS. Ubuntu and Debian derivatives such as Kubuntu or Xubuntu are supported as well. Currently only 64-bit Intel (x86_64) processors are supported.
Regardless of your operating system, you’ll need at least 4 GB of RAM.
Installing Docker
PSPDFKit Processor is distributed as a Docker container. To run it on your computer, you need to install a Docker runtime distribution for your operating system.
Install and start Docker Desktop for Mac. Please refer to the Docker website for instructions.
Install and start Docker Desktop for Windows. Please refer to the Docker website for instructions.
Install and start Docker Engine. Please refer to the Docker website for instructions on how to install it for your Linux distribution.
After you install Docker, use these instructions to install Docker Compose.
Starting PSPDFKit Processor
First, open your terminal emulator.
Use the terminal emulator integrated with your code editor or IDE. Alternatively, you can use Terminal.app or iTerm2.
Use the terminal emulator integrated with your code editor or IDE. Alternatively, you can use PowerShell.
Use the terminal emulator integrated with your code editor or IDE, or one bundled with your desktop environment.
Now run the following command:
docker run --rm -t -p 5000:5000 pspdfkit/processor:2023.11.1
This command might take a while to run, depending on your internet connection speed. Wait until you see a message like this in the terminal:
[info] 2023-02-05 18:56:45.286 Running PSPDFKit Processor version 2023.11.1. pid=<0.1851.0>
The PSPDFKit Processor is now up and running!
Installing Golang
The interaction with PSPDFKit Processor happens via its HTTP API. Documents and commands are sent in API request calls, and the resulting files are received in API response calls. API calls are invoked from the Go package, so you need to install Golang.
Go to any directory in your system using your terminal. Create a new directory called merging-pdfs and go to the newly created directory:
mkdir merging-pdfs
cd merging-pdfs
Create a new go module by running the command below from the merging-pdfs directory. Replace YOUR-GITHUB-USERNAME with your actual GitHub username:
go mod init github.com/YOUR-GITHUB-USERNAME/merging-pdfs
Create a new file in the directory called merge.go and add the following content:
package main

import "fmt"

func main() {
  fmt.Println("Hello World")
}
Run the file from your terminal with go run merge.go to make sure everything is working properly.
Merging PDFs with Golang
If you don’t have any sample documents, download and use these files: cover.pdf and document.pdf
Replace the contents of the merge.go file with the code below.
Replace /path/to/cover.pdf in lines 37 and 46, and replace /path/to/document.pdf in lines 59 and 68 with the actual paths to the example documents on your machine:
To run the code, ensure you’re in the merging-pdfs directory and type the following command in your terminal:
go run merge.go
Most of this code, up until the client.Do(req) statement, constructs a multipart request that’s sent to Processor. It includes two files — in this case, cover and document — and a list of instructions for PSPDFKit Processor.
By default, PSPDFKit Processor’s output (the /build endpoint) is the result of merging all input documents or parts of the instructions.
The result of this code is a merged result.pdf file in the merging-pdfs directory.
PSPDFKit Processor has been deprecated and replaced by PSPDFKit Document Engine. All PSPDFKit Processor licenses will work as before and be supported until 15 May 2024 (we will contact you about license migration). To start using Document Engine, refer to the migration guide. With Document Engine, you’ll have access to robust new capabilities (read the blog for more information).
This guide walks you through the steps necessary to start PSPDFKit Processor. It also shows you how to use it to process documents. By the end, you’ll be able to merge two PDF documents into one using Processor’s HTTP API via curl.
Requirements
PSPDFKit Processor runs on a variety of platforms. The following operating systems are supported:
macOS Ventura, Monterey, Mojave, Catalina, or Big Sur
Windows 10 Pro, Home, Education, or Enterprise 64-bit
Ubuntu, Fedora, Debian, or CentOS. Ubuntu and Debian derivatives such as Kubuntu or Xubuntu are supported as well. Currently only 64-bit Intel (x86_64) processors are supported.
Regardless of your operating system, you’ll need at least 4 GB of RAM.
Installing Docker
PSPDFKit Processor is distributed as a Docker container. To run it on your computer, you need to install a Docker runtime distribution for your operating system.
Install and start Docker Desktop for Mac. Please refer to the Docker website for instructions.
Install and start Docker Desktop for Windows. Please refer to the Docker website for instructions.
Install and start Docker Engine. Please refer to the Docker website for instructions on how to install it for your Linux distribution.
After you install Docker, use these instructions to install Docker Compose.
Starting PSPDFKit Processor
First, open your terminal emulator.
Use the terminal emulator integrated with your code editor or IDE. Alternatively, you can use Terminal.app or iTerm2.
Use the terminal emulator integrated with your code editor or IDE. Alternatively, you can use PowerShell.
Use the terminal emulator integrated with your code editor or IDE, or one bundled with your desktop environment.
Now run the following command:
docker run --rm -t -p 5000:5000 pspdfkit/processor:2023.11.1
This command might take a while to run, depending on your internet connection speed. Wait until you see a message like this in the terminal:
[info] 2023-02-05 18:56:45.286 Running PSPDFKit Processor version 2023.11.1. pid=<0.1851.0>
The PSPDFKit Processor is now up and running!
Installing curl
The interaction with Processor happens via its HTTP API: You send documents and commands in the request and receive the resulting file in the response. To do this, you’ll first install curl so that it can call the API.
curl is bundled with macOS, so there are no extra steps you need to take to install it.
Go to the curl website and download the curl for 64 bit package.
Create a folder anywhere on your C: drive. Unzip the downloaded package and copy the curl.exe executable from the bin subfolder into the folder you just created.
Open the terminal and switch to the directory where you placed the curl executable:
cd C:\path\to\directory
Now run the .\curl.exe --version command. The output should start with curl 7 — you can ignore the rest of the message.
curl is bundled with most desktop Linux distributions. You can check if it’s installed by running the curl --version command in the terminal. If you get an error, you can install it using your distribution’s package manager:
apt-get update && apt-get install -y curl
dnf install -y curl
Now run the curl --version command. The output should start with curl 7 — you can ignore the rest of the message.
Merging PDFs
Now that everything is set up, you can start using Processor to merge PDFs. More specifically, you’ll add a cover page to the existing document.
(Optional) If you don’t have any sample documents, download and use these files: cover.pdf and document.pdf.
Move both files to the same directory (if you’re running on Windows, use the same folder where you placed the curl.exe executable).
Run the command below.
When merging documents, the order of the instruction parts reflects the order you want the final document to be in. In this example, the cover page comes before the rest of the document in the final merged output. This means that the instructions for the /build request reflect the parts in that order.