Using Asset Catalogs for Images

Asset catalogs were introduced in 2013 alongside Xcode 5. They allow developers to add resources such as colors, images, and icons to their apps. Over the years, their features have expanded and now, they not only allow users to add bitmap images, but they also allow adding textures.
This blog post will cover a subset of the features available for images and colors in asset catalogs. This also includes some of the features that were introduced in Xcode 15.
Life before Asset Catalogs
All apps have an image as their app icon. Then, depending on the various user interface (UI) elements, there are additional icons on various screens of the apps. In the past, prior to the introduction of asset catalogs, these images had to be added to an app’s bundled resources, along with any other resources, such as sound files, localizations, and certificates.
Additionally, after the introduction of Retina devices and iPad, different sizes of the same icon image had to be bundled for use, as different screens had different resolutions.
As a result, the suffixes of @2x/@3x had to be added to image file names so that the UIKit API UIKit.image(named:) could pick up the correct image file for the given image name based on a device’s resolution.
However, files like this were problematic when it came to organizing them, as the number of images increased as a result. So asset catalogs were introduced to address these pain points — and more.
The Asset Catalog Era
Since the introduction of asset catalogs, you can now drag and drop an image into a catalog in Xcode, and the catalog manages the rest for you. Of course, it’s still sometimes necessary to supply different sizes of an image for devices with different resolutions. However, this too can be avoided when using vectors (PDF, SVG) instead of bitmaps (PNG).
Benefits of Asset Catalogs
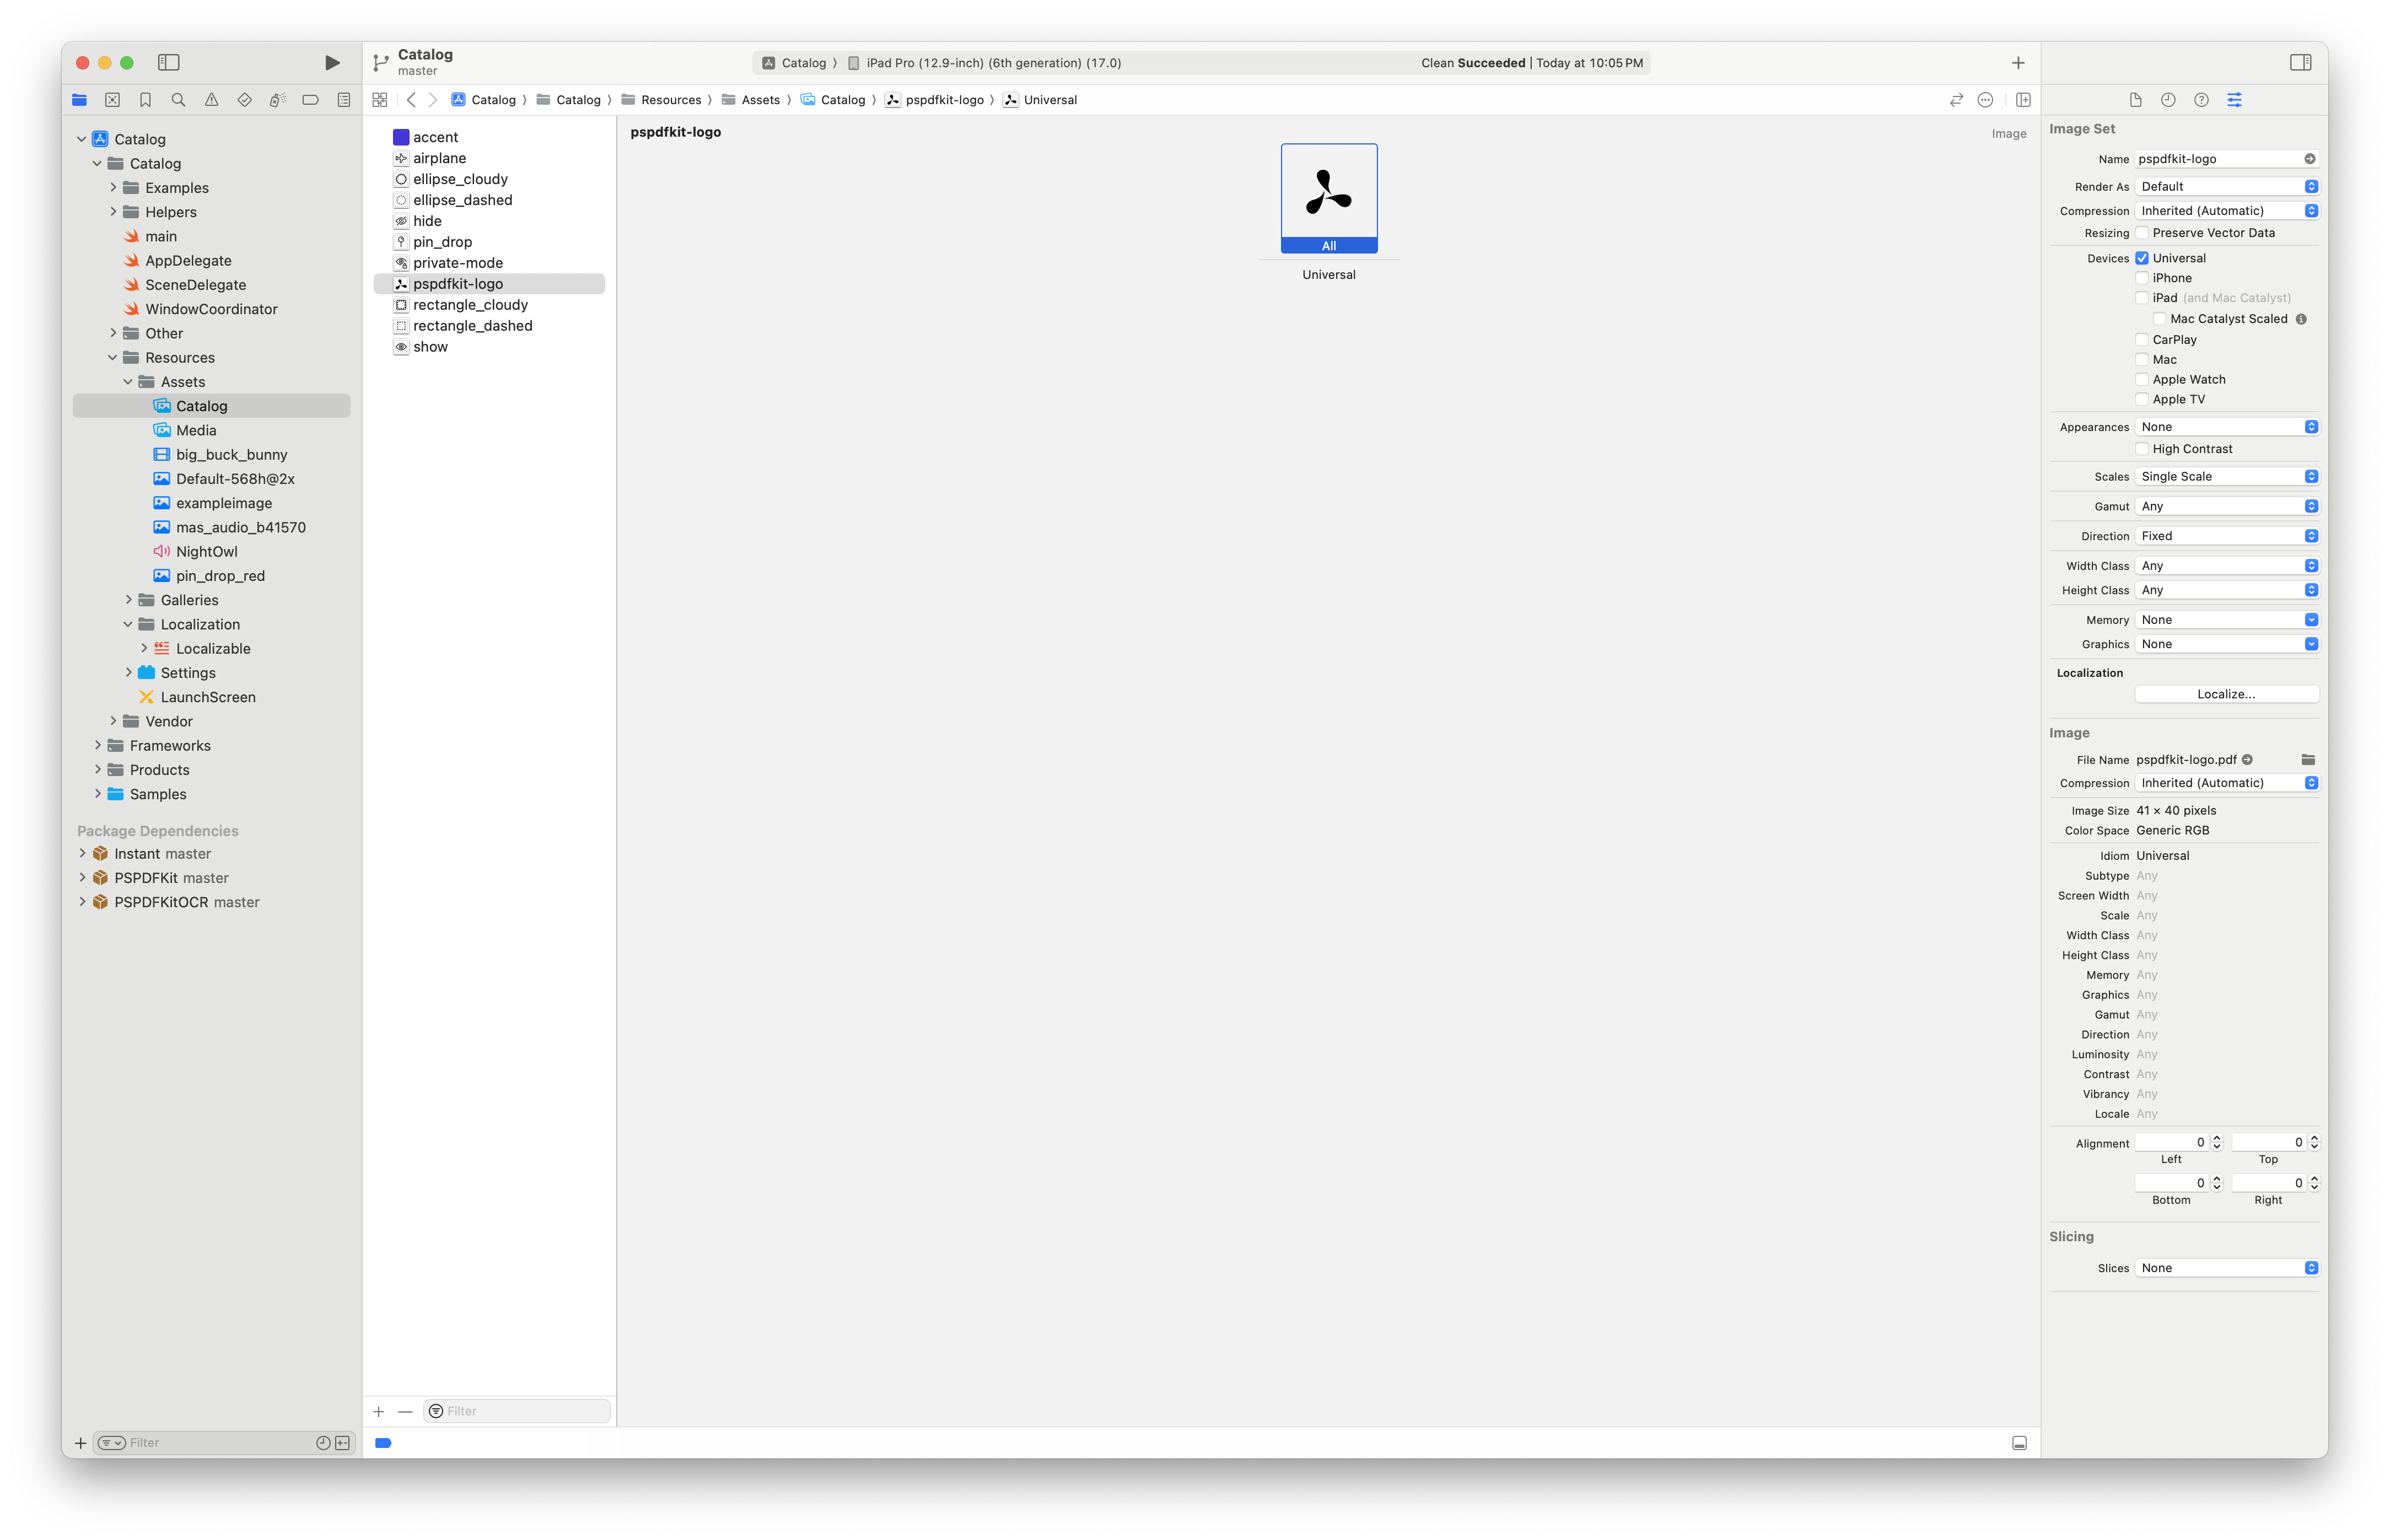
This next section will cover the benefits of using asset catalogs. Everything covered in this section can be found in the Attributes Inspector pane for images.
Every newly created project now includes an asset catalog. This catalog already has placeholders for the app icon and the app’s accent color. It has become incredibly easy to create icons for iOS apps, as you can supply a single vector image which will later be translated to icons of respective sizes. This feature has been available since Xcode 14. However, you can still opt for providing individual images for different icon sizes.
Asset catalogs also have the concept of “image sets,” where each image you want to show is essentially a part of an individual image set. The image set can contain different variants of this one image that you want to show based on certain properties. For all intents and purposes, think of an image set as a single image only.
The concept of an image set allows you to provide an image specifically for dark appearance and another for light appearance; a different image for different devices such as iPhone, iPad, Apple Vision Pro; and more. All of these can be added using the Attributes Inspector. To provide more context, this next section will cover a small subset of the most widely used features of asset catalogs.
-
Rendering As — This attribute lets you decide whether an image should be loaded as it is, i.e Original Image, or in template mode, where it ignores the color information. This allows you to apply a different tint color in the code.
-
Preserve Vector Data — This is useful when the image you’re using will be resized. This ensures that a vector image is bundled with your app as a vector itself. Otherwise, Xcode will inject the image by scaling it according to a device’s screen scale.
-
Localize — This option allows you to provide images to be used based on the device language. As an example, you could use different images for U.S. and U.K English. So, if you have an image that spells out the word “color,” you could also supply an image that says “colour” for when the app isn’t using U.S. English.
-
Appearances — This allows you to specify images specific to light appearance and dark appearance. For example, you might encounter a situation where you’d want to fine tune your image to be specific to dark appearance. Instead of adding two separate images (image sets, to be precise) and managing this in code, you can specify a different image in the image set for dark appearance.
-
High Contrast Appearances — The Appearances option has the High Contrast toggle, and enabling it allows you to specify images for high contrast mode that can be used for light and dark appearances. These images are used when a user has turned on the Increase Contrast option under Accessibility > Display & Text Size in
Settings.app. -
Devices — As mentioned above, you can choose to provide images specifically for a device. This will let you select an extremely custom image for a particular device (looking at you, Apple Vision Pro).
-
Direction — This is probably the most important configuration option when it comes to building support for left-to-right (LTR) and right-to-left (RTL) languages, as it allows you to provide images for both layout directions.
-
Fixed — This is the default option that will render an image as-is for both layout directions. For certain images, this may not suffice.
-
Left to Right, Mirrors — This will use the provided image for a LTR layout and mirror the image for an RTL layout. This works in most cases, provided the image is drawn from left to right.
-
Right to Left, Mirrors: If you have an image that’s drawn right to left and you want to use it for a LTR layout as well, choosing this option will ensure the image is rendered mirrored whenever the app is running on a device that uses a LTR layout, i.e. a LTR system language.
-
Both — Selecting this option allows you to provide two images, one for each layout direction. This is especially useful if the image you have, when mirrored, doesn’t work well for either of the layout directions and you create another image that’s more suitable for the other layout.
-
-
Size Class — The configuration for images specific to size classes itself is divided into two options:
-
Width Class — This lets you provide a set of two images — one for Compact width and one for Any if you choose the Any & Compact option. Otherwise, you can provide an image to be used when the layout is in Regular width class by selecting the Any & Regular option.
-
Height Class — The Height Class option works in the same way as the Width Class option, except the images are changed based on the Height Class.
You can combine these options to provide a specific set of images — for example, if you choose Any & Compact for both of the options above, you can provide four different images — one for Any Width, Any Height; one for Any Width, Compact Height; one for Compact Width, Compact Height; and one for Compact Width, Any Height. However, this is very detailed fine tuning, and most likely, you can get away with providing an image that’s one-size-fits-all by choosing Any for both classes above. Though if you ever need this fine tuning, it’s good to know that such customizations exist.
-
-
Scales — Above, there was a line mentioning that you can still provide images as per the device scales, which was what happened before the introduction of asset catalogs. This option enables that, and toggling Scales lets you provide images for 1x, 2x, and 3x scales. If you’ve enabled device-specific images, then you can provide images for 1x and 2x scales on iPad and then 1x, 2x, and 3x scaled images for iPhone. However, for Apple Vision, there’s only one scale, which is 2x.
Asset catalogs provide more options for images if you’d like even finer tuning. These features are considered niche, as you’d rarely come across a scenario where you’d use them:
-
Memory — This lets you provide images based on the device attribute of memory (RAM). You can select from a range of 1 GB to 16 GB of RAM. This can come in handy if you have a highly detailed image and loading that image on a device with lower memory can cause the device to run out of memory. You can opt to provide a slightly less detailed image for devices with lower memory.
-
Graphics — Nowadays, newer devices are shipped with newer and updated graphics processing unit (GPU) functionality. Newer versions will probably include a broader feature set that’s more suitable for the way you’ve generated a highly customized image. But, again, you may not want to use a fancy image for devices with older GPU and functionality. In such a case, you can provide images specific to those GPU versions. The options in this are the different Metal GPUs, as well as the GPU features that correspond to the Apple Ax chip.

Asset catalogs are further archived into an
Assets.carfile for optimization, which is included in the final build product.
Loading Images
The easiest part of all is loading the images. You don’t have to perform any extensive acrobatics in code to load different images based on the different device traits and configurations. Once you’ve supplied the images for the different configurations in an asset catalog, all you have to do is provide the image name to UIImage initializer:
// Recommendation: Better to provide the bundle to load the image from just in case your app is packaged with multiple bundles.
let bundle = Bundle(for: MyViewController.self)
let image = UIImage(named: "myImageName", in: bundle, compatibleWith: nil)
With Xcode 15, images and color assets are both backed by Swift symbols. These are generated immediately as you add an image. For this, you have to use the UIImage(resource:) initializer for UIKit and the Image(_ resource:) initializer in SwiftUI:
let image = UIImage(resource: .myImageName)

// For SwiftUI.
Image(.myImageName)
Any update to the image asset name updates the symbol almost instantaneously. If you have existing usage of the old symbol, Xcode will throw an error at build time stating that such a resource doesn’t exist, in turn prompting you to update the usage with the new name. So it becomes even easier to load an image, as you don’t have to rely on providing the image name string, a process that was error-prone.
Conclusion
In conclusion, asset catalogs provide plenty of customization options that can be set directly for image assets alone. This helps in reducing the boilerplate and conditional code for loading images based on device and system attributes.
Asset catalogs also provide other sets of similar rich features for colors and textures. If your app requires such resources, then play around with these options, as they can be incredibly useful in making things simple for the app code.

As a result of his fascination with computers, Nishant became an iOS engineer. Other than computers, he loves cricket, cars, coffee, cinemas, and chocolates! He also likes to read up on facts and stories from history.