Why I Chose Deno to Automate My Summary of the Day


At PSPDFKit, part of our culture includes posting a message on Slack at the end of our workday that shares the tasks we tackled. This has been part of our remote communication culture for a long time, and we like it a lot! It allows us to show the work we’ve accomplished, mention some blockers we’re facing, or even request additional help from a colleague if needed. We blogged about these Out for Today messages in the past, and I’d recommend you check out that blog post for additional Slack tips you can apply to your organization.
Each person at PSPDFKit has their own style for writing these messages. Some folks prefer to keep it as brief as possible, whereas others like to split their summary into sections and create a visual hierarchy to help navigate the kind of tasks tackled.
I used to change my style of messages from time to time, even from day to day. Some days I kept it very brief and simply cited the PRs I worked on, whereas on other occasions, I added an additional description of what went into each task at hand.
What I found a bit challenging about approaching the Out for Today message and end of my work day was actually remembering the variety of tasks involved. Some days, I spent my time entirely on a large new feature, but the next day I worked on fixing multiple small bugs. I regularly failed to keep notes of everything I worked on, so those messages ended not reflecting the entirety of my day.
Last year, the company began the process of adopting Notion as a centralized wiki and space to find documentation, write proposals, take meeting notes, etc. Notion has a cool feature that allows every user of a team to have their own private space for their own Notion pages.
So I created my own Notion database to manage my task list. It consists of a Status field, with possible values such as To-Do, In Progress, and Complete. Additionally, it has base properties to collect aspects such as the title of the task, some tags to categorize it, its priority, a link in the form of an optional URL, etc.
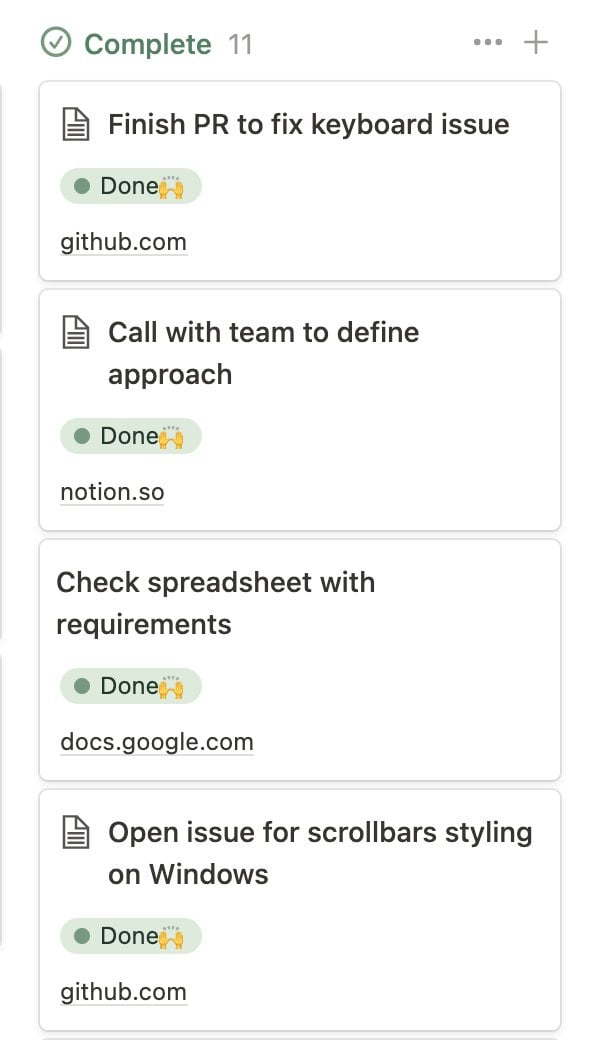
Doing this helped me tremendously — both as a way to manage my priorities and timebox my duties, and as a way to have a clear summary of what I accomplished at the end of the day.
But before long, I realized I could take things a step further and automate the process of generating my Out for Today message from my Done column in Notion.
Deno
I’d played with Deno in the past, and it held my interest for the longest time. And this little project of automating my Out for Today message was the perfect excuse for take it out for another spin.
Deno is a JavaScript runtime, and it’s an alternative to Node.js. As a matter of fact, it’s essentially a new offer by Node.js’ original creator, Ryan Dahl, to fix some design aspects of Node.js that he believed could be improved. If you take No-de and you flip the syllables around, you get De-no. 😉
Deno has matured a lot since Dahl’s now-famous talk at JSConf 2018. It now features a beautiful website and great documentation, and I’d highly recommend that you go and take a look to learn more about the project.
When I decided to use Deno for this project, these were the things that most appealed to me:
-
TypeScript support out of the box
-
Built-in formatter, test runner, and bundler
-
Alignment with web APIs
So I set off on a journey. 🚀
The first step was to install Deno. The documentation offers clear instructions for the most popular platforms.
Once Deno is in place, I started hacking around! I’m using Visual Studio Code, so I went ahead and installed the official vscode_deno extension.
After that, I manually created a new oft-gen directory and started Visual Studio Code from there. Then, I told the IDE that I’d be using Deno by running Deno: Initialize Workspace Configuration from the command palette.
Finally, I could start writing some Deno!
I have the entire project on GitHub, so if you’re interested in the full implementation, you’re more than welcome to check it out!

While working on this project, I learned a ton about Deno that I’d like to share with you. In the following sections, I’ll discuss some interesting aspects that stood out to me, given my experience with browsers and Node.js.
Some Basic Deno Conventions
Some Deno projects follow a convention of defining mod.ts as the main file. Here’s the link to the full mod.ts file. In my case, I trigger the full Out for Today message generation process from this file. You can see it in action in the last line of the file, in which generateMessage(); is executed.
As an aside: I can’t stress enough how awesome it is to start writing TypeScript code out of the box. Notice how there’s not even a
tsconfig.jsonfile.
Another usual convention is to group all external dependencies in a deps.ts file. You can refer to the documentation for more information about the reasons to have such a file.
For this script, there were only a few dependencies:
// deps.ts
export { Client } from 'npm:@notionhq/client@2.2.0';
export type {
	PageObjectResponse,
	QueryDatabaseResponse,
	TextRichTextItemResponse,
} from 'npm:@notionhq/client@2.2.0/build/src/api-endpoints.d.ts';
export { writeText as writeTextToClipboard } from 'https://deno.land/x/copy_paste@v1.1.3/mod.ts';
npm Specifiers
The first dependency specified in deps.ts is the official Notion client library from the npm registry. Pay attention to the special syntax used for the export statement:
// deps.ts
export { Client } from 'npm:@notionhq/client@2.2.0';
The specifier might look a bit “weird”: "npm:@notionhq/client@2.2.0". The npm: prefix isn’t standard, but it’s a fairly new way — stabilized in Deno v1.28 — to use npm modules directly in Deno. These modules are called npm specifiers.
This is important because Deno doesn’t have the concept of a package.json file like Node.js does. Deno tries to maximize using URL specifiers pointing to specific files as much as possible, since it’s an integral part of its design philosophy. Due to the lack of npm as a command-line interface to manage dependencies, there’s also no need for npm install. Instead, Deno can resolve these special specifiers, and it doesn’t need to introduce a node_modules folder in the project at all!
Third-Party CDNs
There’s another way to import modules from npm, which is the one that I used before npm specifiers were introduced in Deno:
export { Client } from 'https://esm.sh/@notionhq/client@2.2.0';
Here, the specifier is a regular URL. You can even try navigating to that URL from your browser, and it’ll work. It returns plain JavaScript source code, which works out of the box with Deno as well. When running your application for the first time, Deno will download the URLs defined and cache them locally.
That URL points to the esm.sh domain, which is a popular independent content delivery network (CDN) that provides native ECMAScript modules for packages in npm. Since the URLs point to the actual JavaScript source, it can also be used directly in the browser, in addition to Deno. That’s also another great advantage of Deno complying with browser standards.
CDN Provided by Deno
Let’s take a look at the last import from the deps.ts module:
export { writeText as writeTextToClipboard } from 'https://deno.land/x/copy_paste@v1.1.3/mod.ts';
Here, I’m also pointing to a module hosted in the deno.land domain itself. Deno has a lot of interesting articles about this topic, and I’d highly recommend checking out the following ones: Remote Import and Standard Library.
As a matter of fact, you can deploy your own packages into the deno.land/x CDN. Visit https://deno.land/x to learn more.
Using the Notion JavaScript API
Now, take a look at the notion.ts file. It’s an ES module importing other TypeScript source files directly (I can’t stress enough how awesome it is to have TypeScript as a first-class citizen in the runtime).
The Notion client for Node.js is well designed, and it works perfectly fine out of the box with Deno.
I won’t go into specific concerns here, since it’s all well-described in the Notion documentation. I simply want to highlight how impressed I was with it working out of the box with Deno, even though it wasn’t specifically designed for it.
File System Access
To be fair, I found the file system I/O API in Node.js was easy to use, and fortunately, that was also the case with Deno.
In this particular project, I’m reading a config.json file where users are supposed to add their Notion API token and database ID.
Here’s an abbreviated version of that function (full source code):
export function readLocalConfig(): { key: string; databaseId: string } {
	const config = Deno.readTextFileSync('./config.json');
	const parsedConfig = JSON.parse(config);

	return {
		key: parsedConfig.notion.key as string,
		databaseId: parsedConfig.notion.databaseId as string,
	};
}
In this code, the function reads a file containing the user’s Notion API token and database ID. The function returns an object with the key and databaseId properties, representing the Notion API token and the database ID, respectively. This enables the application to access the user’s Notion account and interact with their specified database.
Running Deno Code
Now here comes a controversial bit in regard to Deno: When I run my code, there’s no access to the underlying file system, network, or even environment variables, unless they’re explicitly enabled. While this may seem cumbersome and annoying, its purpose is to enhance security by limiting the potential vulnerabilities and ensuring that programs only utilize the resources they genuinely require.
Refer to the complete list of permission flags available with the
denocommand-line interface (CLI).
To run the script, I can do the following:
deno run --allow-env="NODE_DEBUG" --allow-net=api.notion.com --allow-read --allow-run="pbcopy" mod.ts
Here’s a basic breakdown of the command-line flags used when running the Deno script:
-
deno run— Run a certain script. -
--allow-env:"NODE_DEBUG"— Allow the script access to theNODE_DEBUGenvironment variable. -
--allow-net=api.notion.com— Allow network access, constrained to theapi.notion.comhostname. -
--allow-read— Allow read access to the file system. I can optionally specify a list of files to constrain the access more. -
--allow-run="pbcopy"— Allow Deno to run thepbcopysubprocess, which is used to copy content to the system clipboard.
Essentially, this gives me fine-grained control over which resources are available to the script, and I can effectively sandbox it and prevent security issues related to unrestricted access to the system resources.
Distributing Deno Apps
Deno offers a built-in way of compiling executables via the deno compile command. It produces a single self-contained executable file to ease distribution of apps made with Deno.
However, at the time of writing, this feature isn’t yet enabled for apps making use of npm specifiers, which I’m using. You can follow the progress of this via the npm specifiers roadmap GitHub issue.
On a related note, Deno also ships with its own built-in bundler via the deno bundle command. You can read more about it in the bundler documentation.
Conclusion
My experience with Deno has been overwhelmingly positive. I think it’s a valuable tool for building interesting projects, and it shows the attention the maintainers have put into its design. I believe it’s ready for production, and its ecosystem is growing at a good rate, with even some edge environments, such as Netlify Edge and Deno Deploy, being built on top of it. Using this Deno script to automate my Out for Today message made my task management more efficient and allowed me to explore Deno’s capabilities further. I look forward to discovering more ways to incorporate Deno into my work.