How to Digitally Sign a PDF Using a YubiKey

Many businesses today use digital signatures to guarantee the integrity and authenticity of PDF documents. However, storing your cryptographic assets in every computer you use is sometimes inconvenient and potentially a source of security problems. So, in this post, I’ll show how easy it is to sign a PDF with PSPDFKit for iOS and the help of a cryptographic hardware device, the YubiKey.
What’s a YubiKey?
The YubiKey is a hardware device manufactured by Yubico that supports public-key cryptography. It’s the size of a small USB drive, and it’s commonly used to protect access to computers, encrypt documents, and sign files. There are several YubiKey models on the market; some of them support a USB connection, and others support wireless connectivity via NFC (Near-Field Communication). The following sections will describe how easy it is to integrate an NFC YubiKey with PSPDFKit to sign PDFs wirelessly using an iPhone.
Step 1 — Prepare the YubiKey with the Required Certificates
Before writing any code, you first need to prepare the YubiKey and load the certificates and keys that will be used to sign the PDF documents. The simplest way to do this is to use the YubiKey Manager application, which you can download for free.
With your YubiKey inserted into your computer, open the YubiKey Manager application and go to Applications > PIV, click Configure Certificates > Digital Signature, and then click Import. Select the public/private key pair you want to use to sign PDFs, and click OK. The image below shows how the YubiKey Manager will look after you load the certificate.

Once you’ve prepared your YubiKey device, it’s time to create a Swift project that integrates the PDF signing capabilities of PSPDFKit with the YubiKey.
Step 2 — Create an iOS Project That Integrates the YubiKey SDK and the PSPDFKit PDF SDK
To integrate PSPDFKit in a blank iOS project, follow the instructions in our integration guides and you’ll have a project ready in no time. The sample project will need to communicate with the YubiKey; the easiest way to do this is to integrate the YubiKey SDK for iOS, YubiKit. You can download it from this repository. How to integrate YubiKit in an iOS project is outside the scope of this article, but for simplicity’s sake, we recommend using a package manager like Swift Package Manager.
The main class you need to add to the project is a view controller that inherits from PSPDFKit’s PDFViewController so that it can present PDF files:
private class YubiKeyPDFViewController: PDFViewController {
}
Inside YubiKeyPDFViewController, override the viewDidLoad: method to add a bar button item to sign the document:
private lazy var signBarButtonItem = UIBarButtonItem(
    image: UIImage(systemName: "signature"),
    style: .plain,
    target: self,
    action: #selector(signBarButtonItemPressed))

override func viewDidLoad() {
    super.viewDidLoad()
    navigationItem.setRightBarButtonItems([signBarButtonItem], for: .document, animated: false)
}
Here’s the implementation of the signBarButtonItemPressed: method that’s responsible for signing using the YubiKey:
@objc private func signBarButtonItemPressed(_ sender: UIBarButtonItem) {
    guard let document = self.document else {
        return
    }
    try! document.save()
    let signer = PDFSigner()
    let signCertificate = ... // Load the signing certificate from the YubiKey.

    // Start the signing process asynchronously and push a view controller with the signed document when finished.
    // If the signing process failed, show an error message instead.
    DispatchQueue.global(qos: .default).async(execute: {() -> Void in
        // Set a custom delegate and data source for this signer instance.
        let signerDelegate = YubiKeyDocumentSignerDelegate()
        withExtendedLifetime(signerDelegate) {
            signer.delegate = signerDelegate
            let documentSignerDataSource = YubiKeyDocumentSignerDataSource()
            withExtendedLifetime(documentSignerDataSource) {
                // Sign the first signature form element from the document.
                let signatureFormElement = document.annotations(at: 0, type: SignatureFormElement.self).first!
                let destinationFilePath = ... // The destination path where the signed document will be placed.
                signer.dataSource = documentSignerDataSource
                signer.sign(signatureFormElement!, withCertificate: signCertificate,
                            writeTo: destinationFilePath) { success, signedDocument, error -> Void in
                    if success {
                        DispatchQueue.main.async(execute: { () -> Void in
                           // Push `signedDocument` into the current view controller's navigation controller.
                        })
                    } else {
                        if let error = error {
                            DispatchQueue.main.async(execute: { () -> Void in
                                // Inform the user about why the document couldn't be signed.
                            })
                        }
                    }
                }
            }
        }
    })
}
The code above works as follows: First, save the document to make sure you’ll sign it with the latest changes. Next, create an instance of a PDFSigner — the class responsible for driving the signing process. To sign the document, the certificate needs to be extracted from the YubiKey. The key part is the implementation of the signing delegate, which is responsible for communicating with the YubiKey to actually sign the required data. Here’s the implementation of the signing delegate:
private class YubiKeyDocumentSignerDelegate: NSObject, PDFDocumentSignerDelegate {
    private let connection = YubiKeyConnection()

    private func connectToYubiKey(completion: @escaping (_ connection: YKFConnectionProtocol, _ completion: @escaping () -> Void) -> Void) {
        connection.connection { connection in
            let completionBlock = {
                if connection as? YKFNFCConnection != nil {
                    YubiKitManager.shared.stopNFCConnection()
                } else {
                    YubiKitManager.shared.stopAccessoryConnection()
                }
            }
            completion(connection, completionBlock)
        }
    }

    func documentSigner(_ signer: PDFSigner, sign data: Data, hashAlgorithm: PDFSignatureHashAlgorithm, completion: @escaping PSPDFDocumentSignDataCompletionBlock) {
        connectToYubiKey { connection, yubiKeyCompletion in
            connection.authenticatedPivTestSession { session in
                // A production app should not use the default PIN!
                session.verifyPin("123456") { retries, error in
                    session.signWithKey(in: .signature, type: .ECCP384, algorithm: .ecdsaSignatureMessageX962SHA512, message: data) { signature, error in
                        guard let signature = signature else {
                            yubiKeyCompletion()
                            completion(false, nil)
                            return
                        }
                        yubiKeyCompletion()
                        completion(true, signature)
                    }
                }
            }
        }
    }
}
In the code above, the custom delegate overrides the main method that receives the PDF data that needs to be signed. The first step is to prepare the YubiKey connection in connectToYubiKey. It opens an NFC connection using an iOS 13+ API. After the NFC connection is established, the YubiKey session is authenticated using the PIN (for security reasons, the PIN should be provided by the user and not hardcoded in the code). Then, the data is signed using the ECC public/private key stored in the YubiKey device.
Here’s a possible implementation of the YubiKeyConnection class, which encapsulates access to YubiKit’s accessory and NFC connectivity APIs:
class YubiKeyConnection: NSObject {
    var accessoryConnection: YKFAccessoryConnection?
    var nfcConnection: YKFNFCConnection?
    var connectionCallback: ((_ connection: YKFConnectionProtocol) -> Void)?

    override init() {
        super.init()
        YubiKitManager.shared.delegate = self
        YubiKitManager.shared.startAccessoryConnection()
    }

    func connection(completion: @escaping (_ connection: YKFConnectionProtocol) -> Void) {
        if let connection = accessoryConnection {
            completion(connection)
        } else {
            connectionCallback = completion
            YubiKitManager.shared.startNFCConnection()
        }
    }
}
Here’s the extension to the YKFConnectionProtocol that authenticates the YubiKey Personal Identity Verification (PIV) session:
extension YKFConnectionProtocol {
    func pivTestSession(completion: @escaping (_ session: YKFPIVSession) -> Void) {
        self.pivSession { session, error in
            guard let session = session else { return }
            completion(session)
        }
    }

    func authenticatedPivTestSession(completion: @escaping (_ session: YKFPIVSession) -> Void) {
        self.pivTestSession { session in
            // As mentioned at https://developers.yubico.com/yubico-piv-tool/YubiKey_PIV_introduction.html, the default management key is 010203040506070801020304050607080102030405060708. In a real application, you should change this default management key first!
            let defaultManagementKey = Data([0x01, 0x02, 0x03, 0x04, 0x05, 0x06, 0x07, 0x08, 0x01, 0x02, 0x03, 0x04, 0x05, 0x06, 0x07, 0x08, 0x01, 0x02, 0x03, 0x04, 0x05, 0x06, 0x07, 0x08])
            session.authenticate(withManagementKey: defaultManagementKey, type: .tripleDES()) { error in
                guard error == nil else { return }
                completion(session)
            }
        }
    }
}
Finally, you need to implement YKFManagerDelegate so that you can handle connect/disconnect events from NFC:
extension YubiKeyConnection: YKFManagerDelegate {
    func didConnectNFC(_ connection: YKFNFCConnection) {
        nfcConnection = connection
        if let callback = connectionCallback {
            callback(connection)
        }
    }

    func didDisconnectNFC(_ connection: YKFNFCConnection, error: Error?) {
        nfcConnection = nil
    }

    func didConnectAccessory(_ connection: YKFAccessoryConnection) {
        accessoryConnection = connection
    }

    func didDisconnectAccessory(_ connection: YKFAccessoryConnection, error: Error?) {
        accessoryConnection = nil
    }
}
If you run this application on iPhone 7 or newer, after you tap the icon to sign a PDF, you’ll see the prompt shown below.
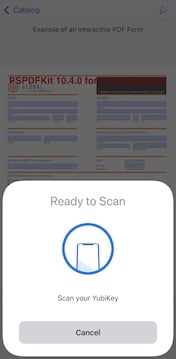
Place the YubiKey near the iPhone, and after a few seconds, a signed PDF will be presented on the screen.
Conclusion
Signing PDFs on iPhone using PSPDFKit has never been easier, thanks to the help of YubiKey. This hardware device stores your certificate and private key, and it’s the size of a small USB key, so you can always carry it with you. The integration of PSPDFKit and the YubiKey is seamless, and this blog post showed how you can create a simple project where you can sign a PDF on iPhone using a YubiKey via NFC.
Are you interested in the PDF signing capabilities of PSPDFKit? Feel free to contact us to learn more about our products.

Daniel is part of the Core Team at PSPDFKit and has worked on multiple topics, ranging from cryptography and text systems, to file format support and JavaScript engines. Outside of work, he likes spending time with his family, football, reading books, and watching films.