Using Metal to Apply Image Filters
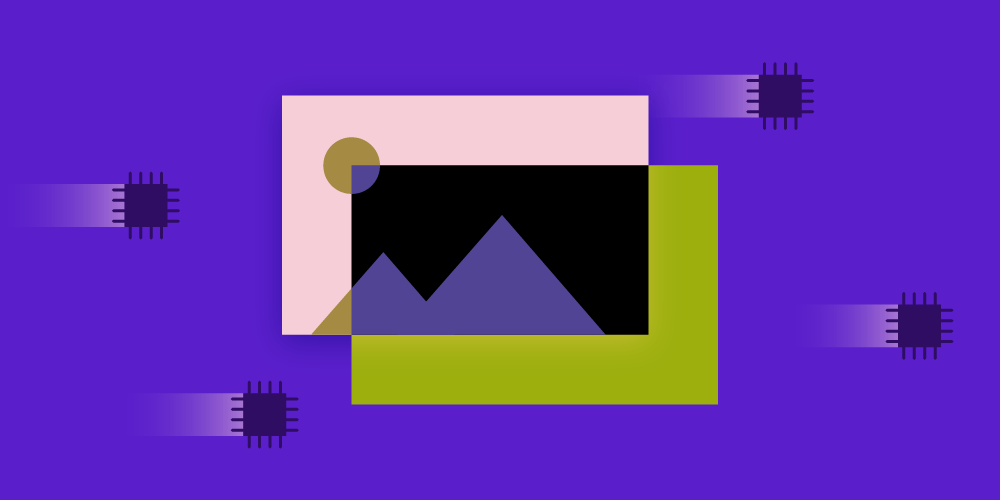
“A picture is worth a thousand words” is a popular adage in the English language, and rightly so. We use images for many reasons, but one of them is to share information. Furthermore, many people apply filters to images to enhance an image or remove noise from it. Filters are even sometimes used simply for fun or to add a tinge of dramatic effect before sharing an image.
On iOS, there are a handful of system-provided and open source ways of applying filters to an image, the most common of which are Core Graphics, Core Image, GPUImage, and Metal. Among these, the first three have been around for quite a while now, but Metal is relatively new. It was introduced at WWDC 2014, alongside iOS 8.
The exciting thing about Metal is that it allows us to use the GPU directly to perform compute and graphics operations. In doing so, we also free up the CPU so that it is available for other operations. These operations can be used to perform complex math computations, process images, and run neural networks.
Another advantage of using the GPU is that its architecture is optimized for highly parallel workflows, and it can perform graphics tasks faster and more efficiently than a CPU. A few Apple frameworks, including Core Image, use Metal under the hood to delegate graphic workloads to the GPU, while Core ML uses Metal for performing its low-level operations on the GPU.
Image Filtering
Today we will use Metal to apply a filter to an image. Our filter will perform a simple color inversion operation on the input image. The code for it will be written in a file with a .metal extension, using the Metal Shading Language (MSL), which is derived from C++. This piece of code runs on the GPU and is referred to as a shader.
Before we dive into the code, we need to understand how Metal executes a function written in MSL. Shader functions are executed in a grid whose dimensions can range from 1 to 3. A new instance (or thread) of the shader function is created for each point in the grid. The two-dimensional image we will be using will be represented as a 2D grid, each point on the grid will correspond to a pixel of the image, and each pixel will be processed individually by a thread. These threads can also be grouped to be executed together and to share a common block of memory. They are referred to as threadgroups.
Color Inversion MSL Function
Now let’s dive into the code. Afterward, we’ll discuss the performance, along with important things to keep in mind before opting for the use of Metal in our apps:
/// ImageFilter.metal
#include <metal_stdlib>
using namespace metal;

// Invert colors.
half4 invertColor(half4 color) {
    return half4((1.0 - color.rgb), color.a);
}

kernel void drawWithInvertedColor(texture2d<half, access::read> inTexture [[ texture (0) ]],
                               texture2d<half, access::read_write> outTexture [[ texture (1) ]],
                               uint2 gid [[ thread_position_in_grid ]]) {
    half4 color = inTexture.read(gid).rgba;
    half4 invertedColor = invertColor(color);
    outTexture.write(invertedColor, gid);
}
In the above piece of code, we have two functions: invertColor and drawWithInvertedColor.
invertColor performs the simple task of taking a color that is represented using half4 — which is a four-component vector with 16-bit floating-point values — and inverting its RGB values but keeping its opacity intact.
drawWithInvertedColor is a function that can look a little overwhelming, even if it is only a few lines of code. It has two parameters in the form of a two-dimensional texture (inTexture and outTexture). It has a third parameter in the form of an integer. The function only has read access to the inTexture, since the image we want to apply the filter to will be rendered onto this texture. We can then use the invertColor function to invert the RGB values of the color and write (draw) that color in the same pixel position on the outTexture. This outTexture will be used to create a UIImage object that we can use in our UI.
Creating a Compute Pipeline
We know Metal will spawn threads (new instances of the drawWithInvertedColor function) for each pixel. The third parameter of the drawWithInvertedColor function, gid, is a vector that can store points of a 2D coordinate system. We are using the thread_position_in_grid attribute qualifier for the gid parameter so that its value corresponds to a pixel position in the grid. Each instance of the drawWithInvertedColor function is responsible for processing the particular pixel in the grid specified by the gid parameter.
Moving on, a compute pipeline (or pipeline for short) is a set of instructions to be executed on the GPU in the Metal framework. The above function that we wrote will be compiled into a pipeline and then executed. A pipeline is created using an MTLFunction object, which itself is retrieved from the Metal library. A Metal library consists of all the functions written using the MSL. We need the current device’s Metal object to get access to the Metal Library object (MTLLibrary).
Let’s create a class that will perform these operations and ultimately apply the filter to the image:
class MetalImageFilter {
    private let device: MTLDevice
    private let library: MTLLibrary

    init?() {
        guard let _device = MTLCreateSystemDefaultDevice() else {
            return nil
        }
        device = _device

        do {
            let bundle = Bundle(for: MetalImageFilter.self)
            library = try device.makeDefaultLibrary(bundle: bundle)
        } catch {
            return nil
        }
    }
}
The device variable of our class holds the reference to the default Metal object of the device (MTLDevice), which is assigned during initialization of a MetalImageFilter object. We hold a reference to device so that we don’t have to fetch it every time an image is being filtered, and also because it is highly unlikely to change. Similarly, the function library is not going to be updated either, so we create an MTLLibrary object and assign it our library variable.
We still need to create a pipeline for executing our shaders (Metal code) and apply a filter to the image. We will add all of this code into a method in our MetalImageFilter class, like so:
public func imageInvertColors(of image: UIImage) -> UIImage
The first step toward applying a filter to the image received in our above method is to extract the drawWithInvertedColor function into an MTLFunction object from the library. We then use the function to create a compute pipeline. Each pipeline is used to run a single function. The compiling of a pipeline is done synchronously, so you should be mindful of how and when you are creating it while writing performant code. However, our use is trivial at the moment, so we will continue with the synchronous creation:
let function = library.makeFunction(name: "drawWithInvertedColor")!
let computePipeline = try! device.makeComputePipelineState(function: function)
The drawWithInvertedColor function takes two parameters: inTexture and outTexture. So we need to create two MTLTexture objects to send to the shader to perform the filtering. The image we received needs be rendered on the inTexture for the shader function. For this purpose, we’ll use MTKTextureLoader, which allows us to create a new texture from a CGImage object. The MTKTextureLoader is part of the MetalKit framework, so we will also have to import the MetalKit framework at the top:
let textureLoader = MTKTextureLoader(device: device)
let inputTexture = try! textureLoader.newTexture(cgImage: image.cgImage!)

let width = inputTexture.width
let height = inputTexture.height
Coming back to the outTexture parameter, it has to be a plain writable texture of the same size so that the result of the filtered color can be drawn onto it. The MTLTextureDescriptor class will come into play here. This is used to create new texture objects. We will use this class to create an MTLTextureDescriptor object that is configured for creating a blank writeable texture that is of the same size as the input texture we created and that uses components in RGBA order. The final outTexture will be generated by the device object using the aforementioned descriptor:
let textureDescriptor = MTLTextureDescriptor.texture2DDescriptor(pixelFormat: .rgba8Unorm_srgb, width: width, height: height, mipmapped: false)
textureDescriptor.usage = [.shaderRead, .shaderWrite]
let outputTexture = device.makeTexture(descriptor: textureDescriptor)!
Executing a Compute Pipeline
We have the pipeline set up now, but we still need to carry out a few more steps to have it executed by the GPU. The pipeline has to be encoded into the buffer of a command queue so that Metal can send it to the GPU to be executed. We do this by creating a command queue (the MTLCommandQueue object) for our default Metal device (the device variable). Then we create a command buffer (the MTLCommandBuffer object), which will store the encoded commands of our shaders that need to be executed by the GPU. To encode the commands, we need a command encoder (the MTLComputeCommandEncoder object) that encodes and writes the commands into the buffer:
let commandQueue = device.makeCommandQueue()!
let commandBuffer = commandQueue.makeCommandBuffer()!
let commandEncoder = commandBuffer.makeComputeCommandEncoder()!
We still need to set up the commandEncoder to encode our commands to be run on the GPU. First, we set the function represented by the computePipeline object as the compute pipeline state object of our encoder. Then, we inform the encoder about the data it needs to work with, i.e. declaring that the inTexture and outTexture created above will be sent as the first and second parameters, respective to our compute function. The command encoding is carried by specifying the thread details for the compute command. The thread details consist of the number of threadgroups we want for our image grid in each dimension and how many threads each threadgroup should create.
The size of the grid (output image) is calculated by multiplying the threadgroups and the number of threads in each threadgroup. We are arbitrarily assigning 16 threads per threadgroup in each dimension, and we want the size of the grid to be the same as the size of the original image. We will have to calculate the number of threadgroups per grid for each dimension, dividing the height and width of the original image by the corresponding number of threads per threadgroup.
The last step is to inform the encoder that encoding is finished:
commandEncoder.setComputePipelineState(computePipline)
commandEncoder.setTexture(inputTexture, index: 0)
commandEncoder.setTexture(outputTexture, index: 1)

let threadsPerThreadGroup = MTLSize(width: 16, height: 16, depth: 1)
let threadgroupsPerGrid = MTLSize(width: width/16 + 1, height: height/16 + 1, depth: 1)
commandEncoder.dispatchThreadgroups(threadgroupsPerGrid, threadsPerThreadgroup: threadsPerThreadGroup)

commandEncoder.endEncoding()
Once the commands are encoded into the buffer, the command buffer needs to commit them for execution. We can add a completion handler, which Metal can call after the GPU has finished encoding. However, to keep things simple for the purpose of this blog post, we will wait, blocking the current thread until the execution is finished. Again, for a non-trivial use case, the best approach is to not be synchronous and to add a completion handler:
commandBuffer.commit()
commandBuffer.waitUntilCompleted()
Creating a UIImage from Texture
Once the command execution has finished, outTexture will contain the filtered image. We need to create a CIImage object using the outTexture, and then we need to use the same CIImage object to create a UIImage to return to the caller. There’s an interesting thing that happens here: When the CIImage is created, it is mirrored and flipped upside down, but upon inspecting the texture, it still renders the CIImage as expected. Nevertheless, we can fix this by simply transforming the CIImage with the downMirrored orientation. We are not applying the transformation while creating the UIImage object because we want the UIImage.imageOrientation to state up:
let ciImg = CIImage(mtlTexture: outputTexture)!.oriented(.downMirrored)
let invertedImage = UIImage(ciImage: ciImg)
return invertedImage
Benchmarking and Comparison
Next, let’s find out for ourselves if using Metal has any performance difference at all when compared to the more widely used approach of Core Image. For this, we will write a couple of straightforward performance tests. We have the Metal image filter we wrote above, so we can make use of that:
func testImageColorInversionUsingMetal() throws {
    let imageFilter = try XCTUnwrap(MetalImageFilter())
    let image = try XCTUnwrap(UIImage(named: "myImage"))

    measure {
        for _ in 0...20 {
            _ = imageFilter.imageInvertColors(of: image)
        }
    }
}
Testing the performance of the Core Image CIFilter API can be done in a handful of lines of code, so we will be writing that directly in our performance measure block below:
func testImageColorInversionUsingCoreImage() throws {
    let image = try XCTUnwrap(UIImage(named: "myImage"))

    measure {
        for _ in 0...20 {
            let ciImage = CoreImage.CIImage(cgImage: image.cgImage!)
            let filter = CIFilter(name: "CIColorInvert")!
            filter.setDefaults()
            filter.setValue(ciImage, forKey: kCIInputImageKey)

            _ = UIImage(ciImage: filter.outputImage!)
        }
    }
}
Now for the moment of truth: Let’s run the test a few times on different devices, and then we can calculate the mean time for both approaches.
| Metal Test Results | Core Image Test Results |
|---|---|
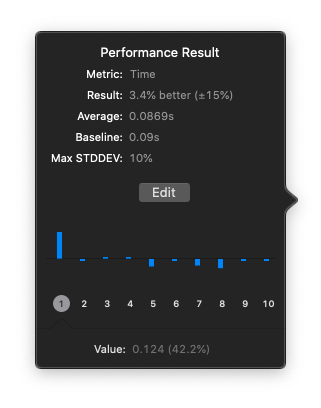 |
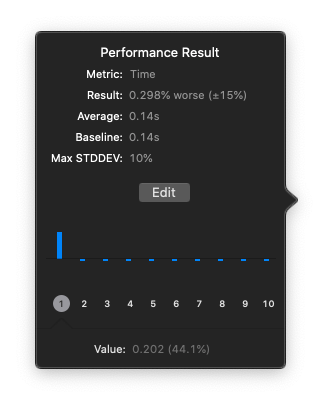 |
In our tests, 20 iterations of applying a filter to a 1000x1000 image took ~9 milliseconds on average when using Metal, versus ~14 milliseconds on average when using Core Image. This performance increase is quite impressive. However, this can vary based on the GPU capabilities and also on the operation you are performing using Metal. For example, a more complex image filter, such as CIStarShineGenerator, can be even more performant as a whole in an app using Metal than a simple conversion can be. This is because of the GPU’s ability to carry out these operations dedicatedly. In comparison, the CPU is used for traditional approaches, and it has to make context switches to process the user inputs of the UI, which slows down the filter operation.
Metal Support
After jumping through all these hoops, we finally have a function that can invert an image. But we are not completely done just yet. There is one tricky bit about Metal: It uses the hardware directly with a very thin layer of software over it. Apple has a bunch of GPU families and they are updated every year, but not all of them support the same features. The GPU, along with the Metal API version, determines which functionality is supported on a particular device.
So, for example, if you are using the above approach of rendering by writing to a texture using a GPU, it is only supported by a set of GPU families on iOS and Mac. If your app supports older iOS versions, then it is likely that your user is using a device that doesn’t support writing output to textures. The Metal Feature Set Tables article contains a full list of details about limits, features, and supported pixel formats. However, Metal supports detecting GPU features and Metal software versions, so you can still use the new set of features on supported hardware and fall back to using traditional methods on non-supported hardware.
Conclusion
Metal has a lot of potential for a variety of uses, and what we did above is barely scratching the surface. Metal is performant, as it communicates directly with the GPU. This performance gain is indeed very enticing for us to go ahead and make use of Metal wherever possible. However, it does add complexity to an existing codebase. As we can see above, traditional approaches provide easier methods for carrying out similar actions in just a few lines of code.
Additionally, there could be compatibility problems, as certain functions are supported by only a certain set of GPUs. That said, Core Image and Core Graphics are very efficient and in no way slow. For basic use cases, they do a good job. For example, we haven’t seen any bottlenecks in our appearance mode component where this could have been used. This is why we decided against using Metal for image filtering in the PSPDFKit SDK. But if we start seeing performance issues in the future, we will revisit and reconsider using Metal for that component in the SDK.
One has to be careful while deciding to use Metal in their app or SDK for the same reasons. For certain problems pertaining to graphics, the ideal solution is to use Metal. In the end, it depends on your preference. If you feel like spelunking, by all means go ahead.

As a result of his fascination with computers, Nishant became an iOS engineer. Other than computers, he loves cricket, cars, coffee, cinemas, and chocolates! He also likes to read up on facts and stories from history.