Understanding the Gradle Build System


Gradle is a build automation tool based on Groovy and Kotlin. It’s open source and flexible enough to build almost any type of software. It also supports both the automatic download of dependencies and many repositories, including Maven and Ivy.
When Do I Need Gradle (or a Similar Build System)?
You may be wondering if you need Gradle or a similar build system. Simply put: Whenever a project is slightly more complex than the canonical Hello World print, you need Gradle.
Let’s imagine for a moment that we have some very simple Java code that can be compiled and executed from the command line without any building tools:
javac myClass.java && java myClass
Now imagine we decide to include and use an external library in our newly created project. As a result, the new command to build the project would be:
javac -cp ".:/path-to-jar/library.jar;" myClass.java && java -cp ".:/path-to-jar/library.jar;" myClass
And if the external library relies on libraries other than itself, we must add them:
javac -cp ".:/path-to-jar/library.jar:path-to-other-jar/library2.jar;" myClass.java && java -cp ".:/path-to-jar/library.jar:path-to-other-jar/library2.jar;" myClass
The process is starting to become verbose, but it’s not over: Managing the dependencies is a delicate process, as sometimes debug builds require dependencies that release builds don’t.
Before this gets out of control, let’s look at how to build a Gradle-based project:
./gradlew build
That’s it! Gradle takes care of the dependencies in a configuration file called build.gradle, downloads them when required, and caches them to speed up the building process.
Before Gradle for Android
Before Gradle, the Android community relied upon two different building tools: Maven and Ant.
Maven
Maven, from a Yiddish word meaning accumulator of knowledge, was famous for its project object model (POM), or pom.xml, files. In this format, a file consisted of a long list of tags, and it was rather difficult to read. Building with Maven was the way to go before the release of the Android Gradle plugin by Google in 2013.
Ant
Ant is a Java library and command-line tool that’s older than Maven. In theory, it is kind of like Make, but with the full portability of pure Java code. According to Ant’s original author, James Duncan Davidson, the name is an acronym for Another Neat Tool.
Basic Concepts of Gradle Builds
The two main entities in Gradle are projects and tasks. Every Gradle build is composed of at least one project (e.g. a library JAR, a Java application, a web application). Each project is made up of one or more tasks. A task represents some atomic piece of work that a build performs. Each task can depend on one or more additional tasks, and this works by stacking multiple operations one after another. In this way, it’s easy to achieve a long sequence of operations while still keeping the complexity under control.
As mentioned earlier, a Gradle build can be easily run by typing the following:
./gradlew build
Gradle will always look for a build.gradle file that is called build script. This file will be modified when adding a new task.
As an example, we’ll add a simple task that prints the almighty Hello World!; let’s add the following lines of code to the build script:
task hello {
    doLast {
        println 'Hello world!'
    }
}
Now we execute the task by typing:
./gradlew -q hello
The output will be:
Hello World!
Setting Up the Project
The way to set up a Gradle project varies depending on the type of the project, but a great starting point that covers many project types is the Gradle Tutorials and Guides section from the official Gradle website.
Right now, we’re going to tinker with a Java application project: from the command line and from inside a new directory, run the init task and select the java-application project when asked.
The outcome will be similar to the following:
$ gradle init

Select type of project to generate:
  1: basic
  2: cpp-application
  3: cpp-library
  4: groovy-application
  5: groovy-library
  6: java-application
  7: java-library
  8: kotlin-application
  9: kotlin-library
  10: scala-library
Enter selection (default: basic) [1..10] 6

Select build script DSL:
  1: groovy
  2: kotlin
Enter selection (default: groovy) [1..2]

Select test framework:
  1: junit
  2: testng
  3: spock
Enter selection (default: junit) [1..3]

Project name (default: demo):

Source package (default: demo):


BUILD SUCCESSFUL in 1s
2 actionable tasks: 2 executed
The init task will run the wrapper task first, generating the gradlew and gradlew.bat wrapper scripts, and then it will create a new project with the following structure:
├── build.gradle
├── gradle
│   └── wrapper
│       ├── gradle-wrapper.jar
│       └── gradle-wrapper.properties
├── gradlew
├── gradlew.bat
├── settings.gradle
└── src
    ├── main
    │   ├── java
    │   │   └── demo
    │   │       └── App.java
    │   └── resources
    └── test
        ├── java
        │   └── demo
        │       └── AppTest.java
        └── resources
Gradle Builds and Android Studio
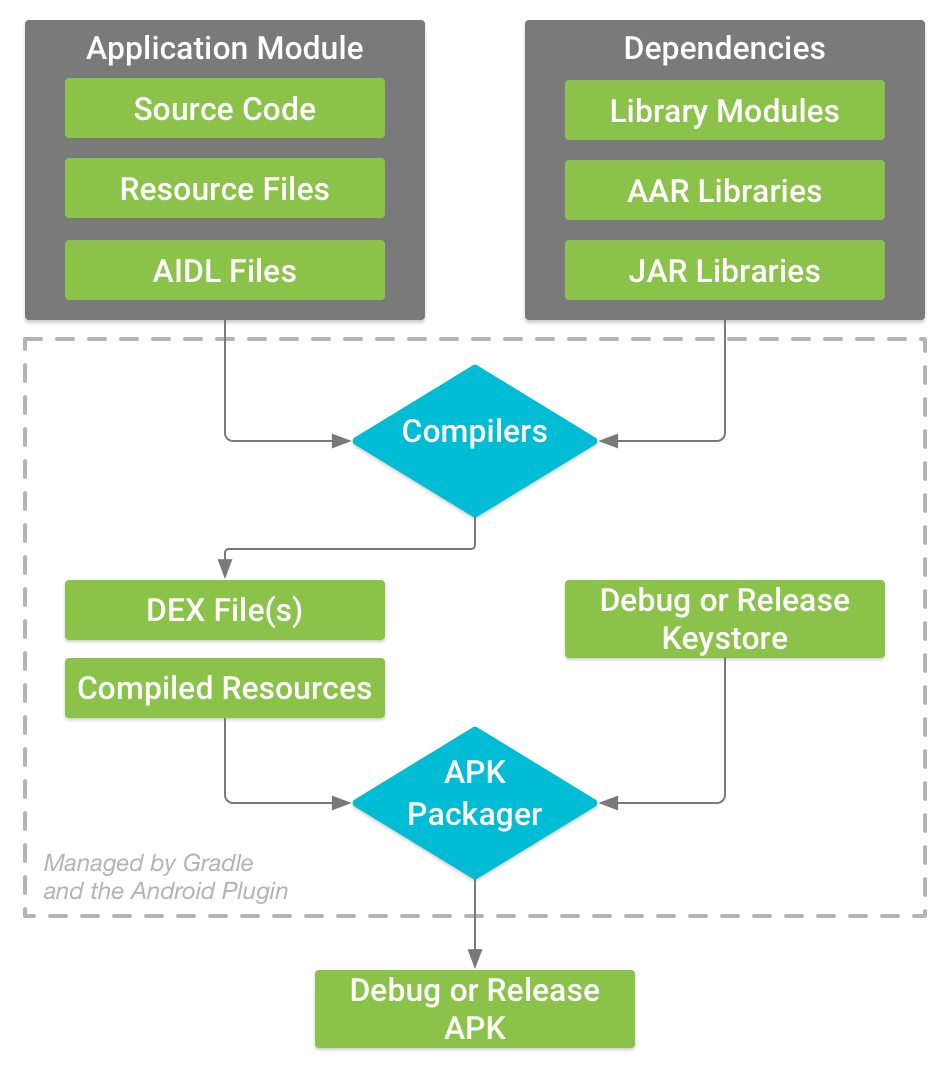
Android Studio supports Gradle as its build automation system out of the box. The Android build system compiles app resources and source code and packages them into APKs that you can test, deploy, sign, and distribute. The build system allows you to define flexible custom build configurations. Each build configuration can define its own set of code and resources while reusing the parts that are common to all versions of your app. Gradle and the Android plugin run independent of Android Studio. This means that you can build your Android apps from within Android Studio, from the command line on your machine, or on machines where Android Studio is not installed.
You can use the sourceSets block in the module-level build.gradle file to change where Gradle looks to gather files for each component of a source set:
android {
  ...
  sourceSets {
    // Encapsulates configurations for the main source set.
    main {
      // Changes the directory for Java sources. The default directory is
      // 'src/main/java'.
      java.srcDirs = ['other/java']

      // When you list multiple directories, Gradle uses all of them to collect
      // sources. You should avoid specifying a directory that is a parent to one
      // or more other directories you specify.
      res.srcDirs = ['other/res1', 'other/res2']

      // For each source set, you can specify only one Android manifest.
      // The following points Gradle to a different manifest for this source set.
      manifest.srcFile 'other/AndroidManifest.xml'
      ...
    }

    // Create additional blocks to configure other source sets.
    androidTest {

      // If all the files for a source set are located under a single root
      // directory, you can specify that directory using the `setRoot` property.
      // When gathering sources for the source set, Gradle looks only in locations
      // relative to the root directory you specify. For example, after applying
      // the configuration below for the `androidTest` source set, Gradle looks for
      // Java sources only in the `src/tests/java/` directory.
      setRoot 'src/tests'
      ...
    }
  }
}
...
The build process involves many tools and processes that convert your project into an Android Application Package. Here is an image taken from the official Android documentation that summarizes what’s happening under the hood.
Conclusion
Gradle is a build automation tool with loads of features that take time to learn and master, but luckily there is plenty of material and support available that will help you grasp the concepts behind it, and hopefully this post has served as a good primer. If you’re interested in learning more, the two best starting places are the Gradle User Manual from the official Gradle website and the Android Developer website that features the Configure your build section and the more advanced Gradle tips and recipes section.