Using Paths to Draw Shapes with Borders
The Android Canvas API provides drawing operations for standard primitive shapes like lines or rectangles, but it’s generally easier to use more flexible Path primitives for drawing complex shapes. In this blog post, we’ll demonstrate how to use the path API in exactly this way. This is just a basic example, but it could be interesting if you want to build your own custom views that require irregular filled shapes with borders.
What Is Path?
The Path class represents a compound geometric path that can be drawn to Canvas. A path can include multiple straight lines, quadratic or cubic curves, or simple geometric shapes like arcs, circles, and rectangles. It can be drawn via Canvas#drawPath() in custom views, in drawables, or to bitmaps (if the canvas was backed by one). A path can also be drawn either filled or stroked, depending on the style of the paint used for drawing.
Drawing Simple Shapes
Before we get to the example of drawing complex shapes, let’s start with simple ones. You can easily draw simple shapes with borders by first drawing a shape filled with a border color. Then draw a shape with a smaller border width and filled with a fill color on top of the first shape. As an example, here’s how to draw a rounded rectangle with a border.
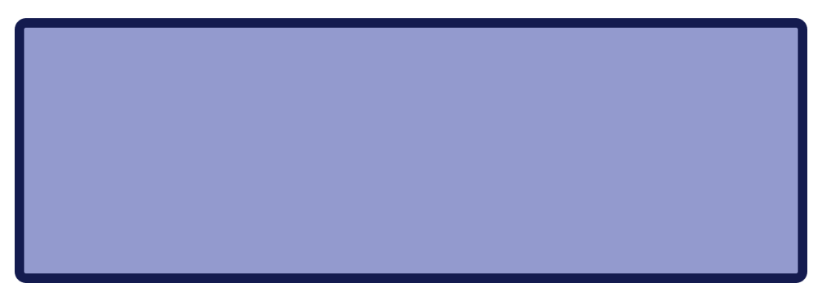
The most straightforward approach to drawing rounded rectangles with filled borders is to use Canvas#drawRoundRect:
// Prepare paints beforehand to prevent allocations when drawing.
val borderPaint = Paint()
borderPaint.setStyle(Paint.Style.FILL)
borderPaint.setColor(borderColor)
borderPaint.setAntiAlias(true)
borderPaint.setDither(true)

val fillPaint = Paint()
fillPaint.setStyle(Paint.Style.FILL)
fillPaint.setColor(fillColor)
fillPaint.setAntiAlias(true)
fillPaint.setDither(true)

...

// Draw a rounded rectangle with a dark color that will serve as the border.
canvas.drawRoundRect(rect, cornerRadius, cornerRadius, borderPaint)

// Then draw a smaller rounded rectangle with a lighter color that will serve as the background.
rect.inset(borderWidth, borderWidth)
if (rect.width() > 0 && rect.height() > 0) {
    canvas.drawRoundRect(rect, cornerRadius, cornerRadius, fillPaint)
}
// Prepare paints beforehand to prevent allocations when drawing.
final Paint borderPaint = new Paint();
borderPaint.setStyle(Paint.Style.FILL);
borderPaint.setColor(borderColor);
borderPaint.setAntiAlias(true);
borderPaint.setDither(true);

final Paint fillPaint = new Paint();
fillPaint.setStyle(Paint.Style.FILL);
fillPaint.setColor(fillColor);
fillPaint.setAntiAlias(true);
fillPaint.setDither(true);

...

// Draw a rounded rectangle with a dark color that will serve as the border.
canvas.drawRoundRect(rect, cornerRadius, cornerRadius, borderPaint);

// Then draw a smaller rounded rectangle with a lighter color that will serve as the background.
rect.inset(borderWidth, borderWidth);
if (rect.width() > 0 && rect.height() > 0) {
    canvas.drawRoundRect(rect, cornerRadius, cornerRadius, fillPaint);
}
Drawing with Paths
Now we’ll show how to achieve the same thing by using paths with rounded rectangle data. First, we’ll draw the path fill:
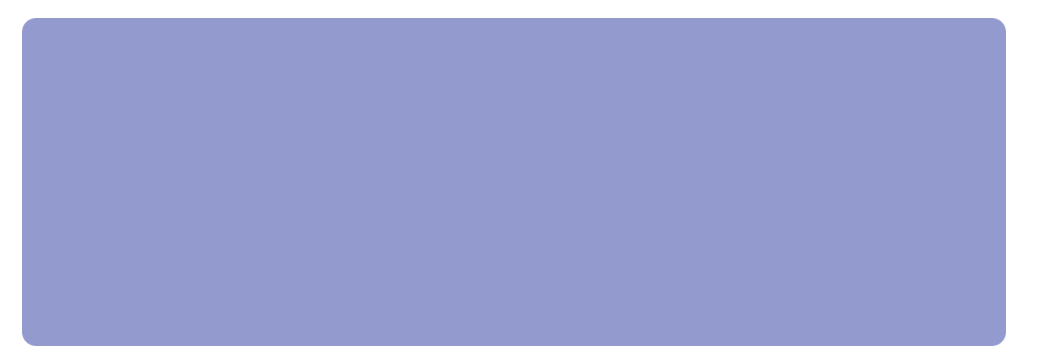
// Prepare fill path.
val fillPath = Path()
fillPath.addRoundRect(rect, cornerRadius, cornerRadius, Path.Direction.CW)

...

// Draw path to canvas.
canvas.drawPath(fillPath, fillPaint)
// Prepare fill path.
Path fillPath = new Path();
fillPath.addRoundRect(rect, cornerRadius, cornerRadius, Path.Direction.CW);

...

// Draw path to canvas.
canvas.drawPath(fillPath, fillPaint);
Next, we’ll draw the path outline on top:
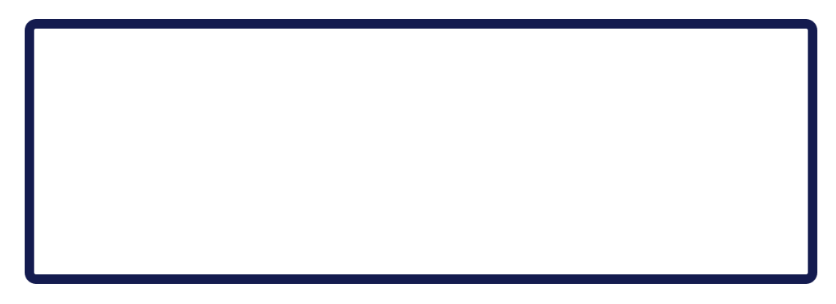
We combine two rounded rectangle paths here. The first one represents the outer rounder rectangle, and the second one represents its inner path. We then set path’s fill type to FillType#EVEN_ODD. This tells Canvas drawing routines that we want to fill inside of our path with the paint’s color:
// Prepare the border path.
val borderPath = Path()

// Add the outer rounded rectangle.
borderPath.addRoundRect(rect, cornerRadius, cornerRadius, Path.Direction.CW)

// Add the inner rounded rectangle.
val innerRect = RectF(rect)
innerRect.inset(borderWidth, borderWidth)
if (innerRect.width() > 0 && innerRect.height() > 0) {
    borderPath.addRoundRect(innerRect, cornerRadius, cornerRadius, Path.Direction.CW)
}

// Using the EVEN_ODD fill type will result in a filled space between the two rounded rectangles we created.
borderPath.setFillType(Path.FillType.EVEN_ODD)

...

// Draw the path to canvas.
canvas.drawPath(borderPath, borderPaint)
// Prepare the border path.
Path borderPath = new Path();

// Add the outer rounded rectangle.
borderPath.addRoundRect(rect, cornerRadius, cornerRadius, Path.Direction.CW);

// Add the inner rounded rectangle.
final RectF innerRect = new RectF(rect);
innerRect.inset(borderWidth, borderWidth);
if (innerRect.width() > 0 && innerRect.height() > 0) {
    borderPath.addRoundRect(innerRect, cornerRadius, cornerRadius, Path.Direction.CW);
}

// Using the EVEN_ODD fill type will result in a filled space between the two rounded rectangles we created.
borderPath.setFillType(Path.FillType.EVEN_ODD);

...

// Draw the path to canvas.
canvas.drawPath(borderPath, borderPaint);
Note: You should always prepare path and paint objects beforehand to prevent excessive allocations while drawing.
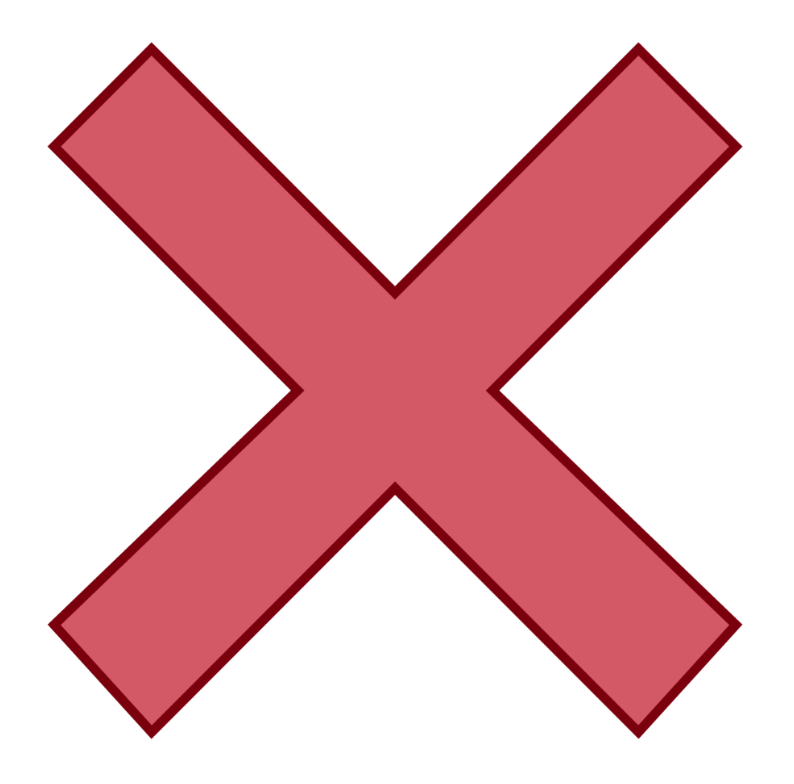
Drawing Complex Shapes
Using the rectangle drawing commands of Canvas was much simpler than using paths, but I included this example for illustrative purposes. We’ll now extend the concept to drawing more complex filled paths with borders.
In this example, we’ll use the following path data:
val vectorPath = Path()
vectorPath.moveTo(6.5f, 79.99f)
vectorPath.lineTo(37.21f, 50.5f)
vectorPath.lineTo(6.5f, 19.79f)
vectorPath.lineTo(18.79f, 7.5f)
vectorPath.lineTo(49.5f, 38.21f)
vectorPath.lineTo(80.21f, 7.5f)
vectorPath.lineTo(92.5f, 19.79f)
vectorPath.lineTo(61.79f, 50.5f)
vectorPath.lineTo(92.5f, 79.99f)
vectorPath.lineTo(80.21f, 93.5f)
vectorPath.lineTo(49.5f, 62.79f)
vectorPath.lineTo(18.79f, 93.5f)
vectorPath.close()
Path vectorPath = new Path();
vectorPath.moveTo(6.5f, 79.99f);
vectorPath.lineTo(37.21f, 50.5f);
vectorPath.lineTo(6.5f, 19.79f);
vectorPath.lineTo(18.79f, 7.5f);
vectorPath.lineTo(49.5f, 38.21f);
vectorPath.lineTo(80.21f, 7.5f);
vectorPath.lineTo(92.5f, 19.79f);
vectorPath.lineTo(61.79f, 50.5f);
vectorPath.lineTo(92.5f, 79.99f);
vectorPath.lineTo(80.21f, 93.5f);
vectorPath.lineTo(49.5f, 62.79f);
vectorPath.lineTo(18.79f, 93.5f);
vectorPath.close();
This data is in a [0, 0, 100, 100] coordinate space. We’ll transform the data to fit the required bounds:
val width = bounds.width()
val height = bounds.height()

// Calculate a transformation scale between [0, 0, 100, 100] and [0, 0, width, height].
val scaleX = width / 100.0f
val scaleY = height / 100.0f

// Create the transformation matrix.
val drawMatrix = Matrix()
drawMatrix.setScale(scaleX, scaleY)

// Now transform the vector path.
vectorPath.transform(drawMatrix)
int width = bounds.width();
int height = bounds.height();

// Calculate a transformation scale between [0, 0, 100, 100] and [0, 0, width, height].
float scaleX = width / 100.0f;
float scaleY = height / 100.0f;

// Create the transformation matrix.
final Matrix drawMatrix = new Matrix();
drawMatrix.setScale(scaleX, scaleY);

// Now transform the vector path.
vectorPath.transform(drawMatrix);
Next, we’ll need to create proper paints for drawing the filled path and path outline:
val fillPaint = Paint()
fillPaint.style = Paint.Style.FILL
fillPaint.color = fillColor
fillPaint.isAntiAlias = true
fillPaint.isDither = true

val borderPaint = Paint()
borderPaint.style = Paint.Style.STROKE
borderPaint.strokeWidth = borderWidth
borderPaint.color = borderColor
borderPaint.isAntiAlias = true
borderPaint.isDither = true
Paint fillPaint = new Paint();
fillPaint.setStyle(Paint.Style.FILL);
fillPaint.setColor(fillColor);
fillPaint.setAntiAlias(true);
fillPaint.setDither(true);

Paint borderPaint = new Paint();
borderPaint.setStyle(Paint.Style.STROKE);
borderPaint.setStrokeWidth(borderWidth);
borderPaint.setColor(borderColor);
borderPaint.setAntiAlias(true);
borderPaint.setDither(true);
Finally, we can draw the final path:
// First draw the fill path.
canvas.drawPath(fillPath, fillPaint)
// Then overlap this with the border path.
canvas.drawPath(borderPath, borderPaint)
// First draw the fill path.
canvas.drawPath(fillPath, fillPaint);
// Then overlap this with the border path.
canvas.drawPath(borderPath, borderPaint);
Conclusion
We’ve shown how to use paths on Android to draw complex shapes programatically. As you can see, the Path class exposes a flexible way of drawing complex geometric shapes. Hopefully this article will be useful for you when working on custom views or drawables that require complex shape drawing.

Tomáš has a deep interest in building (and breaking) stuff both in the digital and physical world. In his spare time, you’ll find him relaxing off the grid, cooking good food, playing board games, and discussing science and philosophy.