RxJava for Multi-Level Data Retrieval
 Reinhard Hafenscher
RxJava can be useful for many things, and in this post, we’ll have a look at how to use it to add offline support to your app.
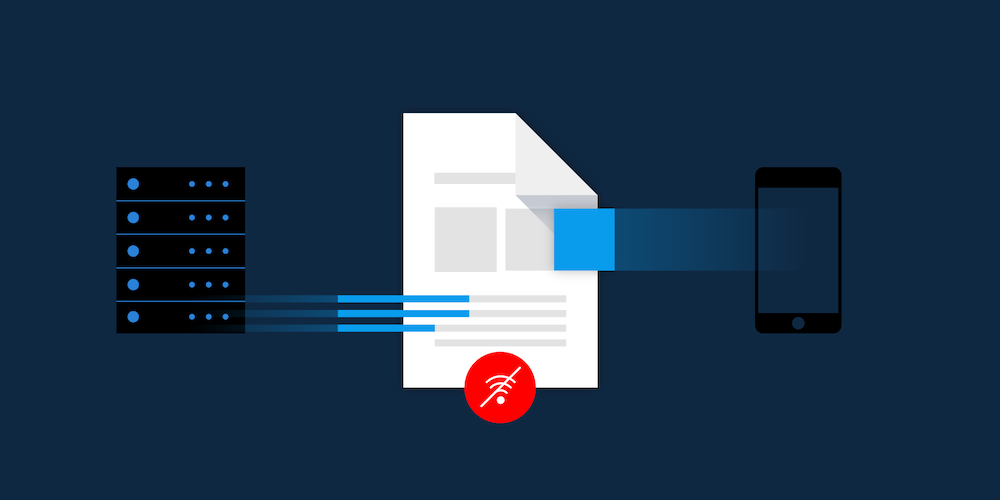
What does offline support mean? It means that our UI needs to get its data from the server as well as some kind of local cache. Grabbing data from the server and caching it on its own isn’t all that complicated, but putting it together in a way that makes sense isn’t necessarily straightforward. In this post, I’ll demonstrate how we did it.
Simple Beginnings
Let’s start with the basic components we’ll use throughout the post, our RemoteDataProvider and our DataCacher:
/** Provides access to data on the server. */
interface RemoteDataProvider {

    /** Queries the server for data. */
    fun getData() : Single<Data>
}

/** Allows you to store and retrieve data from our local cache. */
interface DataCache {

    /** Gets the latest data from our cache. */
    fun getData(): Single<Data>

    /** Puts the data into our cache. */
    fun cacheData(data: Data): Completable
}
Exactly how the interfaces are implemented doesn’t matter, but what does matter is that they are using RxJava to return their data. With the implementation details out of the way, we can take a look at the most straightforward way to use the interfaces:
// DemoActitivity.kt

var currentData: Data = null

private fun fetchData() {
    // Fetch the cached data.
    dataCache.getData()
        .subscribeOn(Schedulers.io())
        .observeOn(AndroidSchedulers.mainThread())
        .subscribeBy(onSuccess = {
            if (currentData == null) {
                // We only want to display the cached data when we have no remote data.
                displayData(it)
            }
        })
    // Fetch the remote data.
    remoteDataProvider
        .getData()
        .subscribeOn(Schedulers.io())
        .observeOn(AndroidSchedulers.mainThread())
        .flatMap {
            // When the request is successful, we want to cache the result.
            dataCache
                .cacheData(it)
                .andThen(Single.just(it))
        }
        .subscribeBy(onSuccess = {
            displayData(it)
        }, onError = {
            displayError(it)
        })
}
As you can see, there’s a lot going on here. We need to query the data from two different sources, we need to make sure that our new data gets put into the cache, we have to worry about the order of the data coming in, and worst of all, we have to do this for every screen in our app.
Stringing Things Together
The next step would be to wrap all the logic from the above code sample in its own class. We can use the ReactiveX concat operator to emit the items of our two sources in a sequence. So let’s create our CachedRemoteDataProvider:
class CachedRemoteDataProvider(private val remoteDataProvider: RemoteDataProvider,
                               private val dataCache: DataCache) {
    // Will return the cached data if it's available. Otherwise, it will perform the network request and then return the data.
    fun getData(): Single<Data> = dataCache.getData()
        .concatWith(remoteDataProvider.getData()
            .flatMap {
                // When the request is successful, we want to cache the result.
                dataCache
                    .cacheData(it)
                    .andThen(Single.just(it))
            })
        .firstOrError()
}
This is simple enough. We use concatWith to chain our sources together, and we call firstOrError so that we finish after we have any data. This emits the cached data, and if that isn’t available, we perform our network request as usual, cache the result, and then return it. Using it in our DemoActivity also couldn’t be simpler:
// DemoActitivity.kt
private fun fetchData() {
    fetchDisposable = CompositeDisposable()
    // Fetch the remote data.
    cachedRemoteDataProvider.getData()
        .subscribeOn(Schedulers.io())
        .observeOn(AndroidSchedulers.mainThread())
        .subscribeBy(onSuccess = {
            displayData(it)
        }, onError = {
            displayError(it)
        })
        .addTo(fetchDisposable)
}
Now our fetchData method only needs to call one method to get the data. It also no longer needs to worry about the order in which the data comes in, as concatWith already ensures that our cache is hit first. The only remaining problem with this solution is that the cached data — and not any updated data — will be returned if we call cachedRemoteDataProvider.getData() again.
Observable to the Rescue
To fix this, let’s make our CachedRemoteDataProvider return an Observable that emits both the cached and the current remote data. That way, we still get the benefit of having our UI instantly show the cached data without losing the ability to fetch the newest data if possible. With that in mind, let’s update our CachedRemoteDataProvider:
// Will return the cached data and then the remote data.
fun getData(): Observable<Data> = dataCache.getData()
    .concatWith(remoteDataProvider.getData()
        .flatMap {
            // When the request is successful, we want to cache the result.
            dataCache
                .cacheData(it)
                .andThen(Single.just(it))
        })
    .toObservable()
We just replaced our call to firstOrError with a call to toObservable, so now instead of completing after the first source emits data, we’ll actually emit the data of all our sources.
We’ll also have to update our DemoActivity one last time. There’s one very important thing you need to change or the call to getData won’t actually work when you are offline — even if it seems to work perfectly while you have a connection. I’ll show you the changed code and we’ll see if you notice it:
private fun fetchData() {
    fetchDisposable = CompositeDisposable()
    // Fetch the remote data.
    cachedRemoteDataProvider.getData()
        .subscribeOn(Schedulers.io())
        .observeOn(AndroidSchedulers.mainThread(), true)
        .subscribeBy(onComplete = {
            // Hide your progress indicator.
        }, onNext = {
            displayData(it)
        }, onError = {
            displayError(it)
        })
        .addTo(fetchDisposable)
}
Did you notice it? No, I’m not talking about the change to our subscribeBy call. Much more important than that: We added a true to our observeOn call. Now you may be asking what this does. To quote the official Javadoc:
delayError - indicates if the onError notification may not cut ahead of onNext notification on the other side of the scheduling boundary. If true a sequence ending in onError will be replayed in the same order as was received from upstream
That’s quite a mouthful, so let me explain what this means in our case. By default, delayError is false. This means that if our RemoteDataProvider threw an error, even if our DataCache had the data already, we wouldn’t get a call to onNext. Instead, only onError would be called — or at least that would happen most of the time, since, depending on the timing of everything, it could also work perfectly sometimes.
Now let’s go through what happens when delayError is true. Just like before, DataCache and RemoteDataProvider get called sequentially on the background IO thread. Where this differs is at the point where the data moves from the background IO thread to our main thread. By setting delayError to true, we disable the default behavior in which any error gets to cut in line. Instead, onNext and onError are called in exactly the same order as they were on our background thread. This ensures that our cached data is always reported to our activity, even when the network request fails.
Closing Thoughts
In this post, I demonstrated how we went from our naive first implementation to an implementation that could be shipped in your next app. I talked about the reasoning behind each iteration, along with pitfalls to be aware of. While you can use this for implementing offline caching, it could also prove useful whenever you have multiple sources that provide the same data with different levels of recency.