Sign a PDF with a Certificate Using JavaScript
In the add a signature field guide, you learned how to create a signature field. In this section, you’ll sign the field using the certificates you generated when preparing the certificates for signing.
Approval and Certification Signatures
PDF documents mainly support two types of digital signatures: approval signatures, and certification signatures. Approval signatures are used to indicate that a signer agrees with or acknowledges the contents of a document. A single document can contain multiple approval signatures. Meanwhile, certification signatures restrict the kind of changes that can be applied to a document once it’s signed. A PDF document only allows one certification signature. PSPDFKit provides support for approval signatures. For certification signatures, contact us on Support.
The remainder of this document will guide you in signing a PDF with an approval signature.
Signing a PDF
To sign a PDF, call the PSPDFKit.Instance#signDocument method. The first argument should be an object instance of SignaturePreparationData, which provides important information about the signature. In this object, you can provide a formFieldName parameter, which should be the fully qualified name of a form field. The signDocument method can create a visible or invisible signature form field and sign it in one step if you set the formFieldName parameter to null or to a form field name that doesn’t exist in the document. To create a visual digital signature, set the position property to the desired position and size of the new signature field. The appearance property allows you to configure the appearance of the signed field, including the name, date, and signature reason, or a custom company logotype (see how to configure the visual appearance of a digital signature for more information).
The signingData field of type SigningData contains other important information about the digital signature. If you pass more than one certificate in the certificates field, they must form a certificate chain. It’s recommended to include a certificate chain to a trusted root. This ensures that the digital signature is automatically trusted without needing to trust additional certificates (see how to view and validate a digital signature for more information).
By default, the signDocument method will create a CAdES signature if certificates are provided. Otherwise, the method will create a basic digital signature (CMS). You can set the signatureType field of the signingData field of the SignaturePreparationData argument like this:
instance.signDocument({
        signingData: {
            signatureType: PSPDFKit.SignatureType.CAdES
        }
    },
    ...)
The second argument of signDocument is a callback that receives an object that contains a fileContents, an ArrayBuffer of the contents of the document, a dataToBeSigned, and an ArrayBuffer of the contents from the document to sign (see PSPDFKit.TwoStepSignatureCallback). The callback must return a Promise that either resolves with a DER-encoded PKCS#7 ArrayBuffer to use for signing the document, or is rejected if a user-side error happens. You’re free to implement this callback in any way you want, but you’d typically use the private key that corresponds to the signing certificate to sign dataToBeSigned. The following code snippet implements the callback by using the web cryptography browser API:
async function signData({ fileContents, dataToBeSigned }) {
  const privateKeyPromise = fetch(
    "/static/private-key.pem"
  ).then((response) => response.text());
  const privateKeyPem = await privateKeyPromise;

  const signAlgorithm = {
    name: "RSASSA-PKCS1-v1_5",
    hash: {
      name: "SHA-256"
    },
    modulusLength: 2048,
    extractable: false,
    publicExponent: new Uint8Array([1, 0, 1])
  };
  const importedPrivateKey = await window.crypto.subtle.importKey(
    "pkcs8",
    convertPemToBinary(privateKeyPem),
    signAlgorithm,
    true,
    ["sign"]
  );

  return window.crypto.subtle.sign(
    signAlgorithm,
    importedPrivateKey,
    dataToBeSigned
  );
}
Note that, for the sake of simplicity, the private key is stored locally in PEM format. This is insecure and shouldn’t be used in production applications. The latest standards for qualified signatures require that the private key is stored on a secure hardware device. To access secure smart cards and hardware security modules (HSMs) using PKCS#11, you’ll need to use the SDK provided by the smart card vendor and integrate it. PSPDFKit does not provide direct support for PKCS#11.
Timestamping
Timestamping involves securely maintaining a record of a digital signature to ensure that, as long as the timestamp’s integrity remains intact, no one, not even the document’s owner, can alter it.
To sign a PDF with a timestamp, you need to provide information about the timestamp authority to the signingData fields’ timestamp property. Providing a valid URL of a timestamp authority is required, while providing a username and password is optional and depends on whether the timestamp authority requires this. The following code snippet shows how to sign a PDF with a timestamp:
instance.signDocument({
		  signingData: {
        		timestamp: {
              url: "some url",
              username: "",
              password: ""
            }
		  }
   },
	...)
It’s worth noting that since the timestamping authority is being called from within the browser, the timestamping authority must support CORS. If the timestamping authority doesn’t support CORS, you can use a proxy server to call the timestamping authority.
Long-Term Validation (LTV)
Long-term validation (LTV) is a feature in digital signatures that ensures the longevity of a signature’s validity. This is achieved by incorporating additional information into the signature at the time of signing. This additional information allows any future validator to verify the status of the certificate at the time of signing, thereby ensuring the signature’s validity over an extended period.
LTV information can be added to a signature in two ways:
-
By adding LTV information to a signature when it’s created.
-
By refreshing or adding LTV information to an existing signature.
Sometimes the person who signs a document doesn’t have access to the internet at the time of signing, or the recipient of a signed document wants to preserve the document for a long time. In either of these cases, the signature can be created without LTV information, and the LTV information can be added later.
For LTV information to be added to the signature, the trusted keystore must contain the trust anchor certificate of the signing certificate chain. If the trust anchor certificate isn’t present in the keystore, the signature will be created without LTV information. To add the trust anchor certificate to the keystore, you need to call the PSPDFKit.Configuration#trustedCAsCallback method.
Adding LTV-Enabled Signatures
Since a certificate chain is already required to create a CAdES signature, to add LTV information to a signature when it’s created, you need to set the ltv property of the signingData field. The following code snippet shows how to add LTV information to a signature when it’s created:
instance.signDocument({
		  signingData: {
		  		ltv: true
		  }
	},
	...)
Refreshing or Adding LTV to an Existing Signature
To refresh or add LTV information to an existing signature, you need to call the PSPDFKit.Instance#setSignaturesLTV method. The method takes an optional array of certificates as an argument. This is a list of certificates needed for long-term validation, and it mainly includes signing certificates, along with the timestamp certificate chain, if the signature was timestamped. If the certificate chain isn’t passed, PSPDFKit searches the document for every signed signature field and tries to extract the signing certificate from it. The following code snippet shows how to refresh or add LTV information to an existing signature:
instance.setSignaturesLTV(certificate);
It’s worth noting for both use cases that since the OCSP responder is being called from within the browser, it must support CORS. Unfortunately, a proxy server can’t be used to call the OCSP responder in case it doesn’t support CORS, as the OCSP responder URL is embedded in the certificate.
Signing a PDF Multiple Times
One of the prominent features of digital signatures in PDFs is the possibility for an unlimited number of signers. This feature is especially useful for multi-party contracts, legal documents, and other formal agreements where more than two parties are involved. Each of these parties can append their signature to a document, ensuring it carries the approvals needed to make it legally binding.
Each time a signature is added to a PDF, an extra layer of security is included with the document. This increases the integrity of the document up to the point of each signature, a feature known as “non-repudiation.” In simpler terms, non-repudiation ensures that a party involved in a contract or agreement cannot deny the authenticity of their electronic signature, as it serves as a proof of consent or approval.
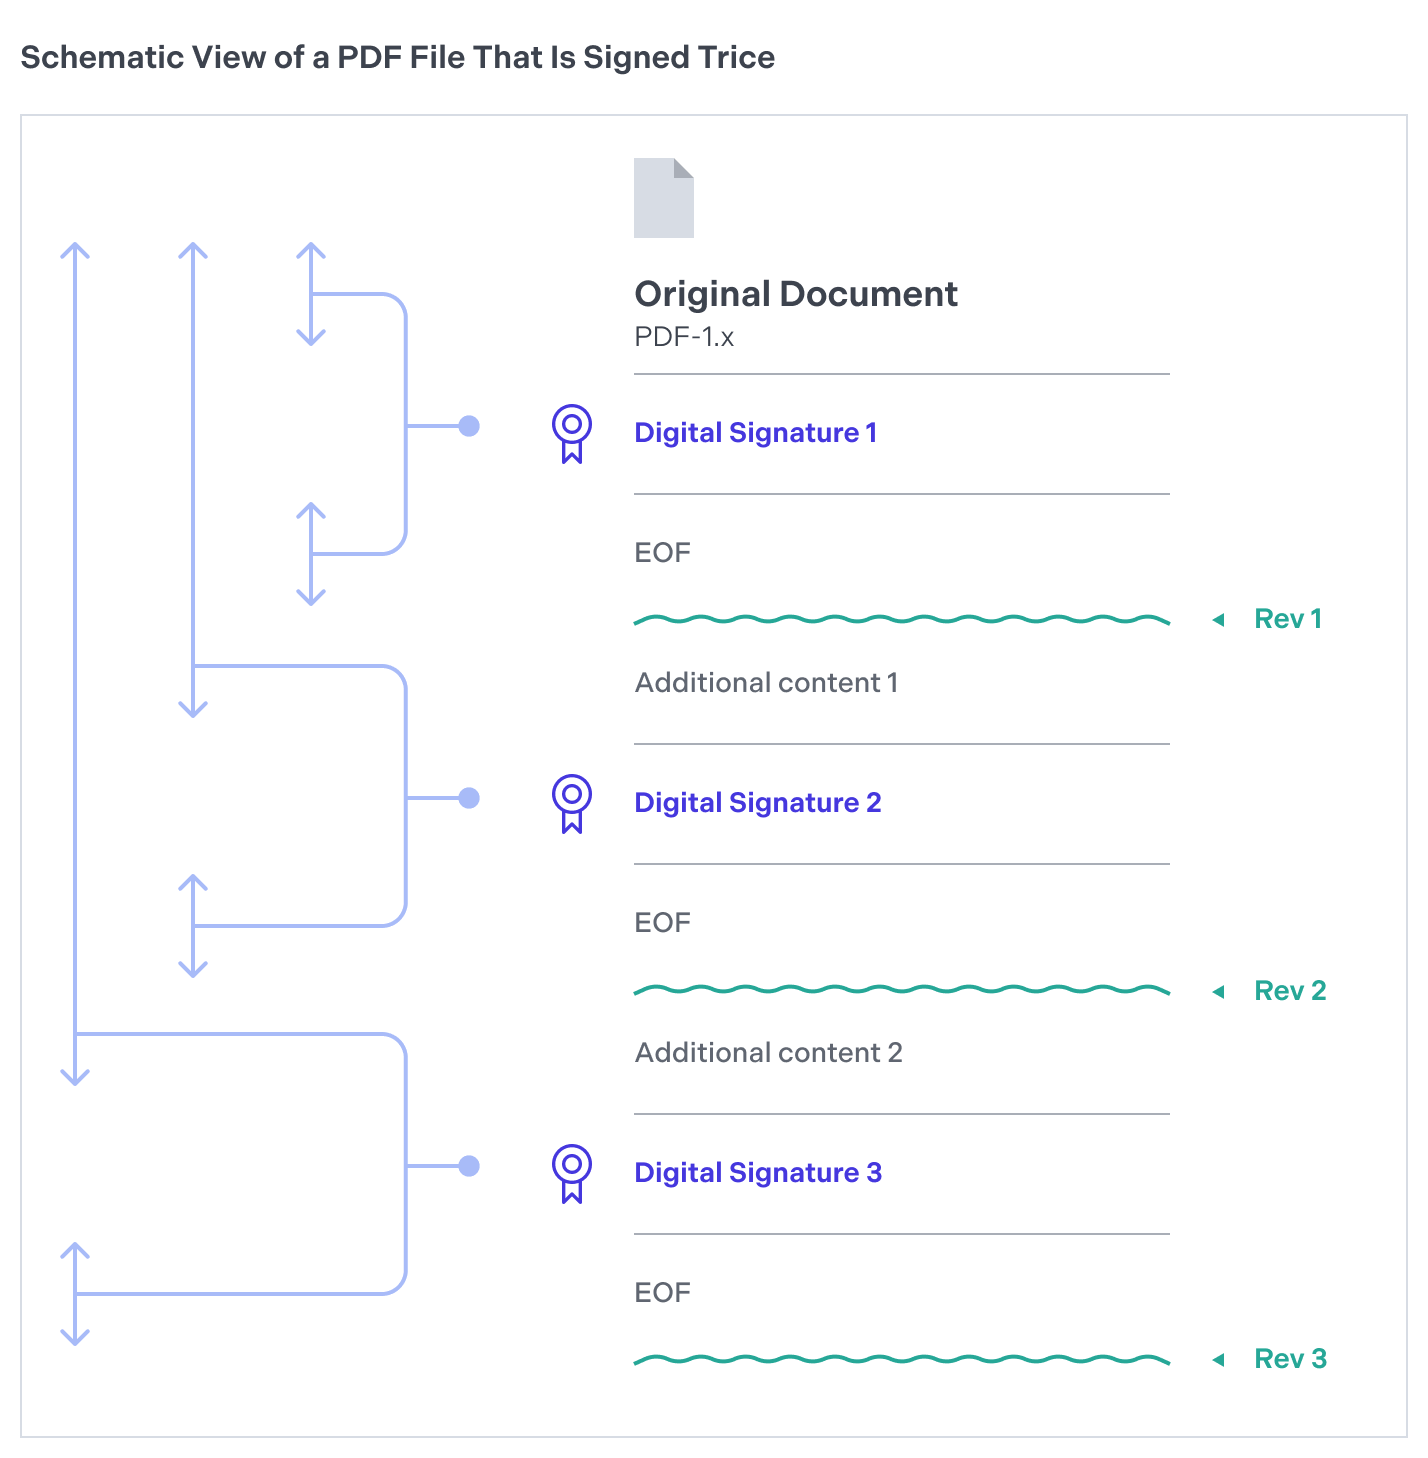
Each digital signature generates a version, or revision, of the document. Hence, a document can house multiple revisions if it has been signed repeatedly with approval signatures (see Approval and Certification Signatures). When third-party software such as Adobe Acrobat verifies a document with several digital signatures, it ensures each revision only includes specific permissible modifications. Typically, new revisions allow the addition of notes, filling out form fields, or placing subsequent signatures on the document. However, alterations like page modifications will invalidate the digital signature.
Here’s a diagram that shows how revisions work in a PDF document.
Digital PDF signatures, which can include time stamps, (refer to Timestamping for more information) provide a comprehensive audit trail detailing when each party reviewed and consented to the document’s content. This chronological record is particularly beneficial in compliance scenarios, as it presents an irrefutable timeline of when approvals were procured.
If you wish to sign a document again after executing permissible changes (e.g. filling in a form), add a new signature form field by following the steps outlined in the Add a Signature Field section, and then complete the signing process by following the guidelines provided in the Signing a PDF section.
Note that each signature added will slightly increase the file size. This can impact storage and sharing capabilities of the document, especially when there are a large number of signatures appended. However, considering the security that digital signatures provide, it’s usually considered a small price to pay.