How to Add a Signature Pad Using JavaScript
In this blog post, you’ll learn how to add a signature pad to your PDF using JavaScript. In the first part, you’ll use the Signature Pad library, and in the second part, you’ll use PSPDFKit for Web to add a signature pad to a PDF document.
A signature pad is a type of graphical user interface (GUI) that can be incorporated into documents requiring user signatures. With the help of a mouse, electronic pens, or specialized signing devices, users can create their signatures on a document. Additionally, the signature pad allows signatures to be saved as images and converted back into their original format.
Signature Pad Library
Signature Pad is a popular JavaScript library that allows users to draw signatures on an HTML5 canvas element. It provides an easy-to-use interface for capturing signatures, which can then be saved as image files or incorporated into PDF documents. Signature Pad has several configuration options and supports a wide range of devices, including mobile and desktop devices with touch and mouse input. It’s commonly used in web applications that require signatures, such as contract management, digital forms, and document signing.
Using the Signature Pad Library
-
Include the Signature Pad library in your project by adding the following script tag to your HTML file:
<script src="https://cdn.jsdelivr.net/npm/signature_pad@4.0.0/dist/signature_pad.umd.min.js"></script>-
Add a canvas element to your HTML file where the signature will be drawn:
<canvas id="signatureCanvas" width="400" height="200"></canvas>
-
Create a new
SignaturePadinstance in your JavaScript file by selecting the canvas element and passing it as an argument:
const canvas = document.querySelector('#signatureCanvas');
const signaturePad = new SignaturePad(canvas);
-
Add a button element to your HTML file that will trigger the signature save process:
<button id="saveButton">Save</button>-
Add an event listener to the save button that will save the signature as a PDF file when clicked:
const saveButton = document.querySelector('#saveButton');
saveButton.addEventListener('click', function () {});
-
Call the
toDataURL()method on theSignaturePadinstance to save the signature as an image file:
// Get the signature image as a Base64-encoded data URL.
const signatureImage = signaturePad.toDataURL();

// Check if the signature pad is empty and display an error message if it is.
if (signaturePad.isEmpty()) {
	alert('Please provide a signature.');
	return;
}
-
Use a PDF generation library such as jsPDF to save the signature image as a PDF file. Include the jsPDF library in your project by adding the following script tag to your HTML file:
<script src="https://cdnjs.cloudflare.com/ajax/libs/jspdf/2.5.1/jspdf.umd.min.js"></script>-
Import the jsPDF library:
const { jsPDF } = window.jspdf;-
Inside your event listener function for the save button, create a new instance of the jsPDF object and use its
addImage()method to add the signature image to the PDF document. Set theimageTypeparameter to PNG, and adjust thex,y,width, andheightparameters as desired to position and size the image on the page:
// Create a new PDF document and add the signature image to it.
const doc = new jsPDF();
doc.addImage(signatureImage, 'PNG', 10, 10, 100, 50);
-
Use the
save()method of the jsPDF object to save the PDF document with the signature image added:
// Save the PDF document with the signature added.
doc.save('signed_document.pdf');
Check out How to Convert HTML to PDF Using React for more information on using jsPDF.
-
Test the signature pad by drawing a signature, clicking the Save button, and verifying that a PDF document with the signature image is downloaded to your device.
-
Optional: Customize the appearance of the canvas element and save button with CSS:
.signature-canvas {
	border: 2px solid #000;
	margin-bottom: 10px;
}

.save-button {
	background-color: #4caf50;
	color: white;
	padding: 10px;
	border: none;
	border-radius: 4px;
	cursor: pointer;
}-
Optional: Add additional functionality to the signature pad, such as the ability to clear or undo the signature, change the pen color, or save the signature as a PNG, JPEG, or SVG file. See the Signature Pad documentation for more information.
PSPDFKit for Web JavaScript Library
We at PSPDFKit work on the next generation of PDF viewers for the web. We offer a commercial JavaScript PDF viewer library that can easily be integrated into your web application. It comes with 30+ features that let you view, annotate, edit, and sign documents directly in your browser.
- A prebuilt and polished UI
- 15+ annotation tools
- Support for multiple file types
- Dedicated support from engineers
Requirements
-
Node.js installed on your computer.
-
A code editor of your choice.
-
A package manager compatible with npm.
Adding PSPDFKit to Your Project
-
Install the
pspdfkitpackage fromnpm. If you prefer, you can also download PSPDFKit for Web manually:
npm install pspdfkit
-
For PSPDFKit for Web to work, it’s necessary to copy the directory containing all the required library files (artifacts) to the
assetsfolder. Use the following command to do this:
cp -R ./node_modules/pspdfkit/dist/ ./assets/
Make sure your assets directory contains the pspdfkit.js file and a pspdfkit-lib directory with the library assets.
Integrating into Your Project
-
Add the PDF document you want to display to your project’s directory. You can use our demo document as an example.
-
Add an empty
<div>element with a defined height to where PSPDFKit will be mounted:
<div id="pspdfkit" style="height: 100vh;"></div>
-
Include
pspdfkit.jsin your HTML page:
<script src="assets/pspdfkit.js"></script>-
Initialize PSPDFKit for Web in JavaScript by calling
PSPDFKit.load():
<script>
	async function loadPSPDFKit() {
	  try {
	    const instance = await PSPDFKit.load({
	      container: '#pspdfkit',
	      document: 'document.pdf',
	    });

	    console.log('PSPDFKit loaded', instance);
	  } catch (error) {
	    console.error(error.message);
	  }
	}

	loadPSPDFKit();
</script>
You can see the full index.html file below:
<!DOCTYPE html>
<html>
	<head>
		<title>My App</title>
		<!-- Provide proper viewport information so that the layout works on mobile devices. -->
		<meta
			name="viewport"
			content="width=device-width, initial-scale=1.0, minimum-scale=1.0, maximum-scale=1.0, user-scalable=no"
		/>
	</head>
	<body>
		<!-- Element where PSPDFKit will be mounted. -->
		<div id="pspdfkit" style="height: 100vh;"></div>

		<script src="assets/pspdfkit.js"></script>

		<script>
			async function loadPSPDFKit() {
				try {
					const instance = await PSPDFKit.load({
						container: '#pspdfkit',
						document: 'document.pdf',
					});

					console.log('PSPDFKit loaded', instance);
				} catch (error) {
					console.error(error.message);
				}
			}

			loadPSPDFKit();
		</script>
	</body>
</html>
Serving Your Website
-
Make sure to copy a PDF file into the folder and rename it to
document.pdf. -
Install the
servepackage:
npm install --global serve
-
Serve the contents of the current directory:
serve -l 8080 .
-
Navigate to http://localhost:8080 to view the website.

If you want to download PSPDFKit manually or integrate it as a module, you can check out our JavaScript getting started guide.
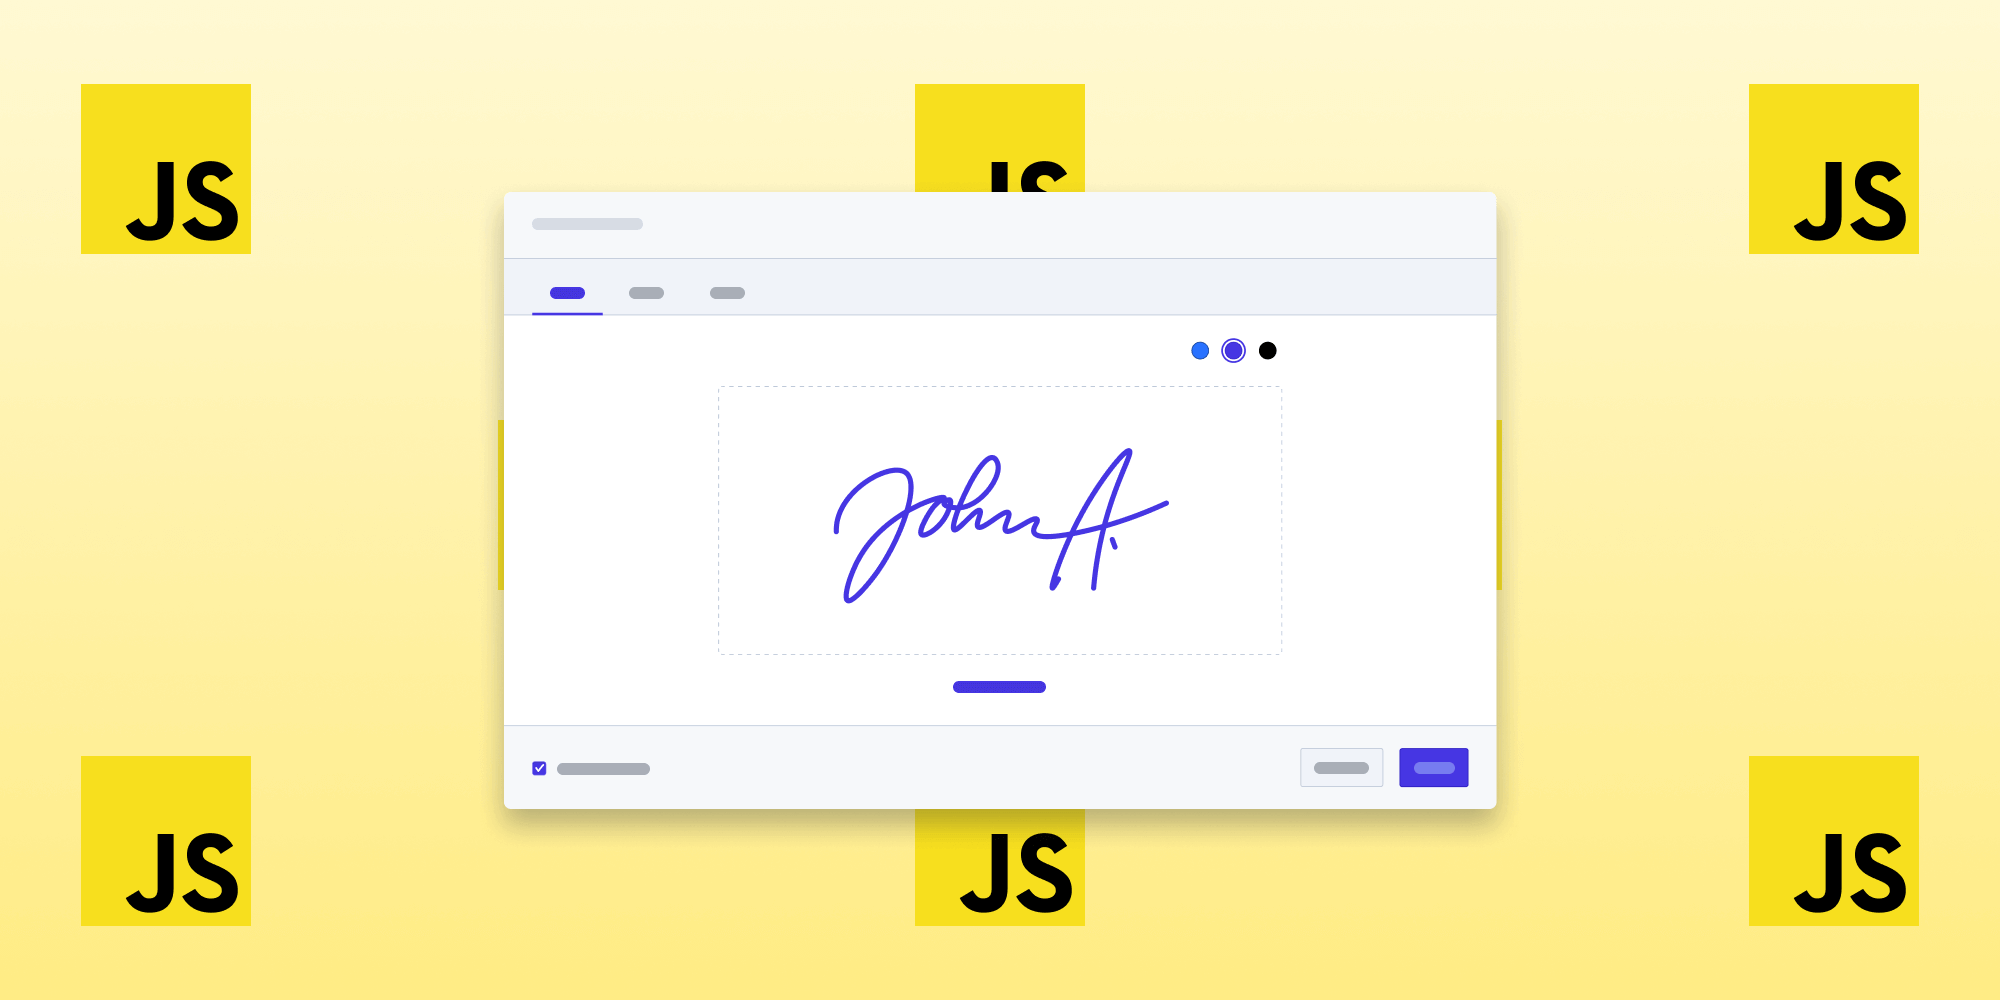
Adding eSignatures via the PSPDFKit UI
In this section, you’ll learn how to sign PDF documents using PSPDFKit’s intuitive user interface (UI). First, open the demo and locate the sign icon. Clicking it will prompt a dialog box where you can sign your name. PSPDFKit offers various options to customize your signature, such as selecting the color of your pen and inserting an image or text as your signature. You can also resize and reposition your signature for optimal placement.
In the following sections, you’ll learn how to programmatically add ink and image signatures to PDF documents using JavaScript.
Adding eSignatures Programmatically in JavaScript
PSPDFKit offers two distinct types of signatures that can be added to PDF documents: ink and image signatures. In this section, you’ll learn how to create these signature types programmatically and add them to PDF documents.
Adding Ink Signatures Programmatically
Ink signatures are similar to traditional pen and paper signatures and can be drawn on a signature pad provided by PSPDFKit.
To add an ink signature programmatically, open the index.html file and modify the PSPDFKit.load() function as follows:
// Create Ink Annotation
const inkAnnotation = new PSPDFKit.Annotations.InkAnnotation({
	pageIndex: 0,
	isSignature: true,
	lines: PSPDFKit.Immutable.List([
		PSPDFKit.Immutable.List([
			new PSPDFKit.Geometry.DrawingPoint({ x: 5, y: 5 }),
			new PSPDFKit.Geometry.DrawingPoint({ x: 95, y: 95 }),
		]),
		PSPDFKit.Immutable.List([
			new PSPDFKit.Geometry.DrawingPoint({ x: 95, y: 5 }),
			new PSPDFKit.Geometry.DrawingPoint({ x: 5, y: 95 }),
		]),
	]),
	boundingBox: new PSPDFKit.Geometry.Rect({
		left: 0,
		top: 0,
		width: 100,
		height: 100,
	}),
});
await instance.create(inkAnnotation);
console.log('Ink annotation created successfully.');
The PSPDFKit.load() function initializes the PSPDFKit instance, and PSPDFKit.Annotations.InkAnnotation creates freehand drawings for ink signatures, with the isSignature property set to true. The lines and boundingBox parameters should remain unchanged, while PSPDFKit.Geometry.DrawingPoint inserts the ink signature, with boundingBox determining its position and size.

Adding Image Signatures Programmatically
An image annotation is a type of annotation in PSPDFKit that allows you to add an image to a PDF document. The image can be fetched from a URL or from a file on the user’s device.
Open the index.html file and update the PSPDFKit.load() function:
// Create Image Annotation
const request = await fetch('image.png');
const blob = await request.blob();
const attachmentId = await instance.createAttachment(blob);

const imageAnnotation = new PSPDFKit.Annotations.ImageAnnotation({
	pageIndex: 0,
	contentType: 'image/jpeg',
	imageAttachmentId: attachmentId,
	description: 'Image Description',
	boundingBox: new PSPDFKit.Geometry.Rect({
		left: 30,
		top: 20,
		width: 300,
		height: 150,
	}),
});

await instance.create(imageAnnotation);
console.log('Image annotation created successfully.');
In the code snippet, PSPDFKit.Annotations.ImageAnnotation is created by passing several properties — such as pageIndex, contentType, imageAttachmentId, description, and boundingBox — which are defined below:
-
pageIndexspecifies the page number on which the image annotation is added. -
contentTypespecifies the MIME type of the image file. -
imageAttachmentIdspecifies the ID of the attachment that contains the image data. -
descriptionis an optional property that provides a description for the image. -
boundingBoxspecifies the position and size of the image on the PDF document.
Once the image annotation is created, it can be added to the PDF document using the instance.create() method.
To be able to see the image, upload an image file named image.png to the root directory of your project.

Creating Signature Fields in PDF Documents
With PSPDFKit, you can easily create signature fields in your PDF documents to add signatures. Update the PSPDFKit.load() function in the index.html file:
// Create Signature Form Field
const widget = new PSPDFKit.Annotations.WidgetAnnotation({
	pageIndex: 0,
	boundingBox: new PSPDFKit.Geometry.Rect({
		left: 200,
		top: 200,
		width: 250,
		height: 150,
	}),
	formFieldName: 'My signature form field',
	id: PSPDFKit.generateInstantId(),
});

const formField = new PSPDFKit.FormFields.SignatureFormField({
	name: 'My signature form field',
	annotationIds: PSPDFKit.Immutable.List([widget.id]),
});

await instance.create([widget, formField]);
console.log('Signature form field created successfully.');
In the code snippet above, you can create a new signature field that allows users to sign within that specific field. The PSPDFKit.Annotations.WidgetAnnotation function is used to define the properties of the signature field, such as its page index, bounding box dimensions, and form field name. The PSPDFKit.FormFields.SignatureFormField function is used to specify the name and IDs of the annotations associated with the signature field. Finally, the instance.create() function is used to create the signature field and add it to the PDF document.
Conclusion
Adding a signature pad to your PDF can save time and increase efficiency when it comes to signing electronic documents. Whether you choose to use a signature pad library or PSPDFKit for Web, the process is straightforward and easy to follow. By following the steps outlined in this blog post, you’ll be able to sign PDF documents electronically in no time.
PSPDFKit is a powerful PDF editing and annotation tool that provides many more features beyond adding a signature pad. With PSPDFKit, you can customize your PDF document with annotations, highlight text, and even add custom forms.
To see a list of all web frameworks, you can contact our Sales team. Or, launch our demo to see our viewer in action.

Hulya is a frontend web developer and technical writer at PSPDFKit who enjoys creating responsive, scalable, and maintainable web experiences. She’s passionate about open source, web accessibility, cybersecurity privacy, and blockchain.


