SharePoint PDF Viewer: Integrating Web Parts with PSPDFKit
 Hulya Karakaya
In this post, you’ll learn how to build a SharePoint PDF viewer by integrating PSPDFKit for Web into SharePoint Online pages using a web part. By the end of this post, you’ll be able to use a web browser to directly open PDF documents stored in SharePoint, as well as display, edit, and save them back to SharePoint.
SharePoint is one of the most popular collaboration platforms worldwide. According to Microsoft, it’s used by more than 200,000 organizations and 190 million people.
SharePoint Framework (or SPFx) comes in two flavors: cloud (online) and on-premises. It’s built on modern web technologies like TypeScript, npm, Yeoman, and Sass. It’s also unopinionated, so you can use any framework — like React, Handlebars, Angular, or Vue.js.
SharePoint Online is a platform used to create customizable websites where users and their teams can collaborate on documents, work on projects, and create their own applications.
SharePoint Online Web Parts Integration with PSPDFKit
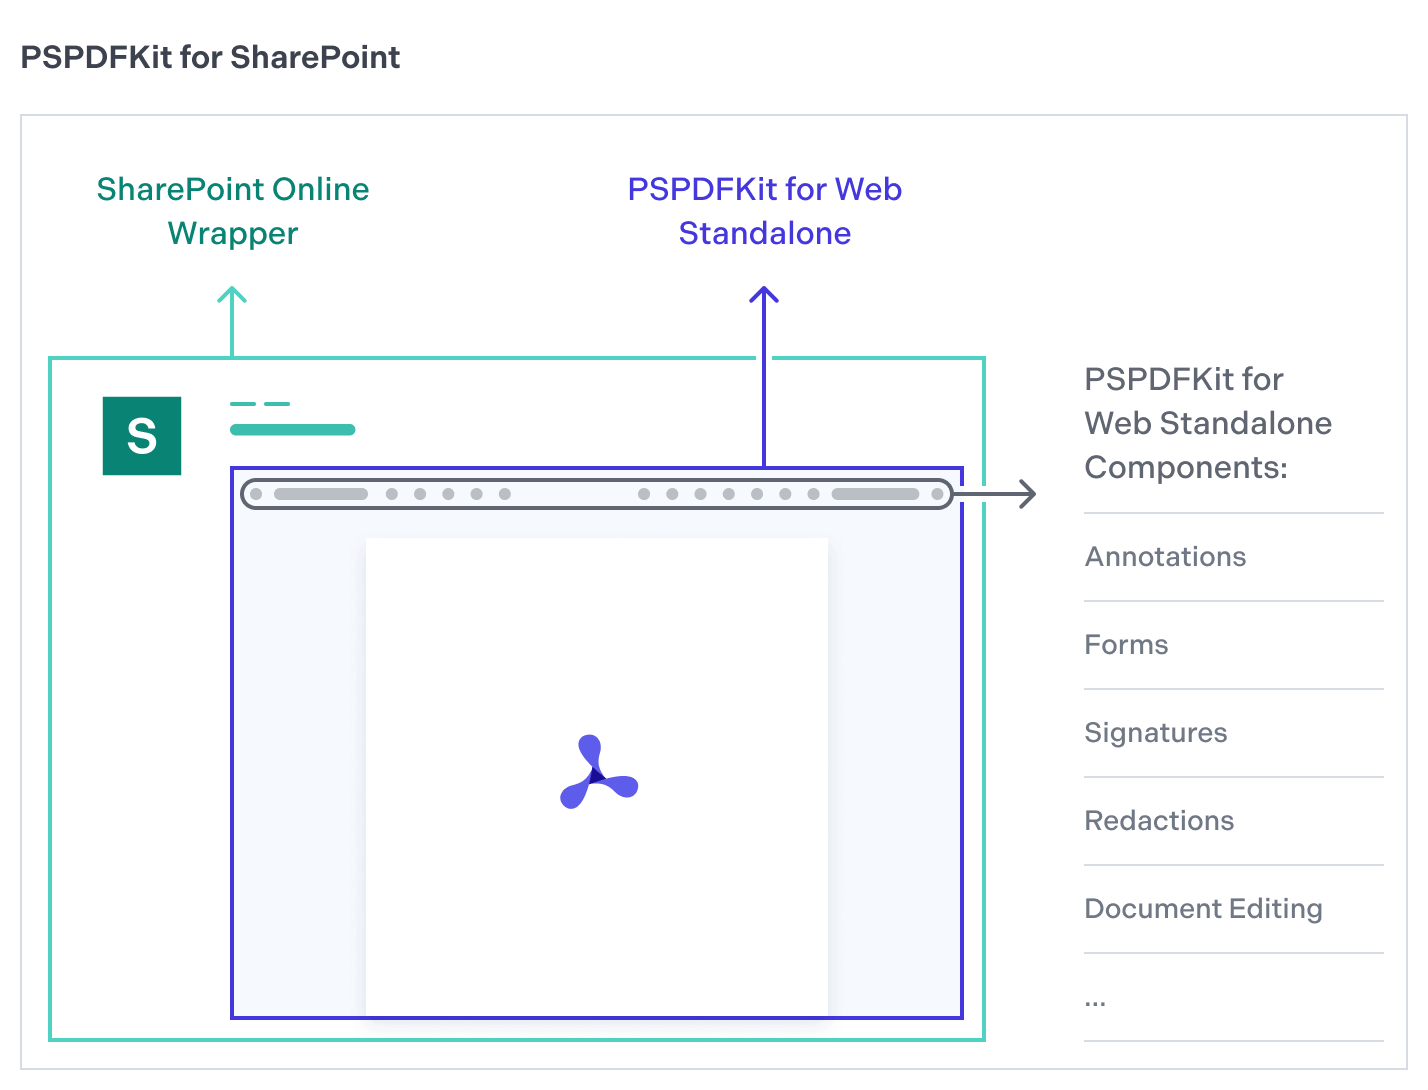
PSPDFKit for SharePoint is a wrapper on top of PSPDFKit for Web Standalone, which is a client-side JavaScript library for viewing and editing PDF files directly in a web browser.
PSPDFKit for SharePoint shares the same APIs as PSPDFKit for Web Standalone, so please use the web documentation when customizing your SharePoint application.
Requirements
To get started, you’ll need:
-
A Microsoft 365 tenant (you can set up a Microsoft 365 tenant for free when you join the Microsoft 365 Developer Program)
-
A GitHub account (for cloning the PSPDFKit for SharePoint repository)
Setup
-
Clone the
pspdfkit-sp-online-webpartrepository from GitHub.
Navigate to the directory where you want to place the SharePoint integration, and type the following command in your command line/terminal:
git clone https://github.com/PSPDFKit/pspdfkit-sp-online-webpart.git
Alternatively, you can download the project as a .zip file without cloning the project.
-
Navigate to admin.microsoft.com and sign in to your tenant account.
To make the SharePoint catalog available, click Show All… in the side navigation, and find Admin centers > SharePoint. This will direct you to SharePoint Admin portal.
Follow along with this tutorial from Microsoft to configure your SharePoint tenant and create your new team site.
-
To configure your URL, go to the
config/serve.jsonfile in yourpspdfkit-sp-online-webpartproject and changeenter-your-SharePoint-siteto the URL of your SharePoint site:
"initialPage": "https://enter-your-SharePoint-site/_layouts/workbench.aspx",-
Now, set up your development environment to build a client-side web part.
Don’t forget to execute gulp trust-dev-cert from the root of your project to trust the self-signed developer certificate.
-
Change your directory into the
pspdfkit-sp-online-webpartdirectory:
cd pspdfkit-sp-online-webpart
-
Open the project in your preferred code editor and check which version of Node.js you’re using:
node --version

Make sure you have Node.js version 16.19.0 installed. If you’re using a different version of Node, switch to Node.js version 16.19.0 via nvm (node version manager) or asdf.
💡 Tip: If you’re using
asdf, you can switch the Node version locally for this project. First, install Node.js 16.19.0 using the following command:
asdf install nodejs 16.19.0
Now, run asdf local nodejs 16.19.0 to switch to the Node.js version you just installed. This will create a .tool-versions file in the root of your project with Node version 16.19.0. If you encounter any issues, check out the asdf documentation.
💡 Tip: If you’re using
nvm, you can switch to Node.js 16.19.0 by typing the following command:
nvm use 16.19.0
-
Install the dependencies:
npm install
-
To serve the project, type:
npm run serve
The browser will open a new tab with your SharePoint account.
To configure your URL, go to the config/serve.json file in your pspdfkit-sp-online-webpart project and change the initialPage property to the URL of your SharePoint site.
Integrating PSPDFKit into SharePoint
PSPDFKit can be added to your project as a widget.
Refer to the following video for information on how to integrate the PSPDFKit widget into your project, or continue with the instructions.
-
On your Home page, in the upper right-hand corner, find the Edit button.
-
Click the Edit button. This will open the Editing interface.
-
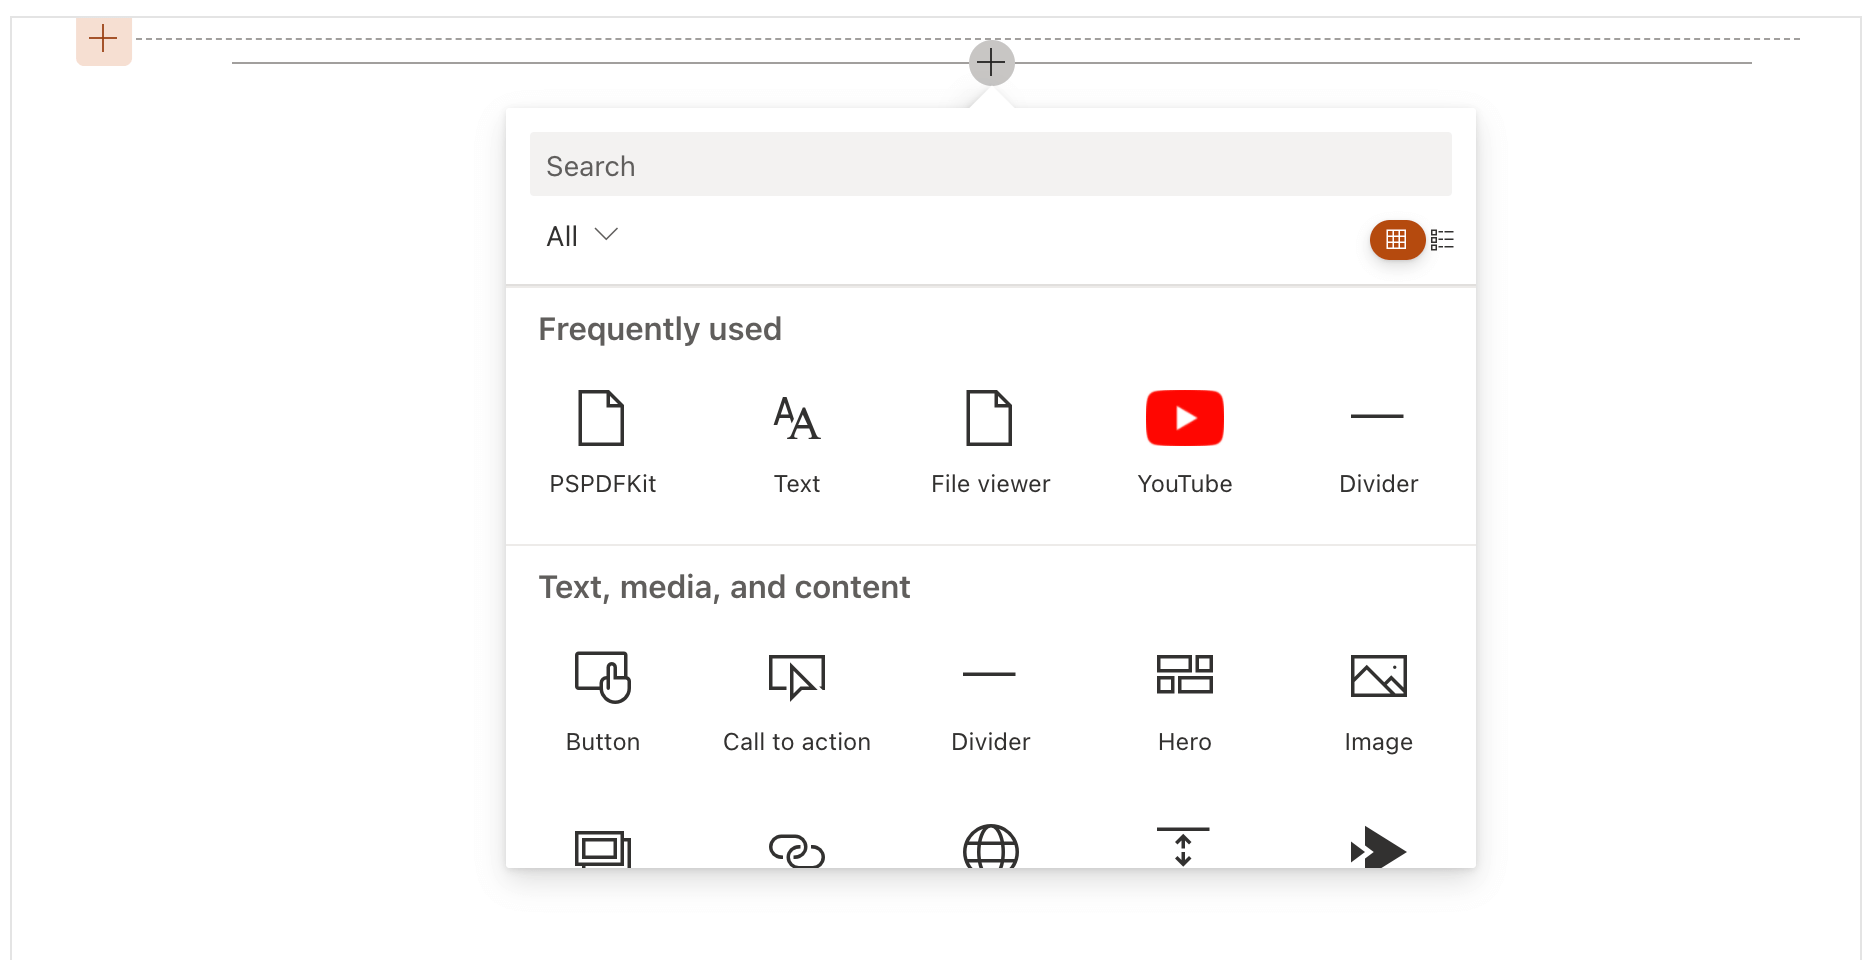
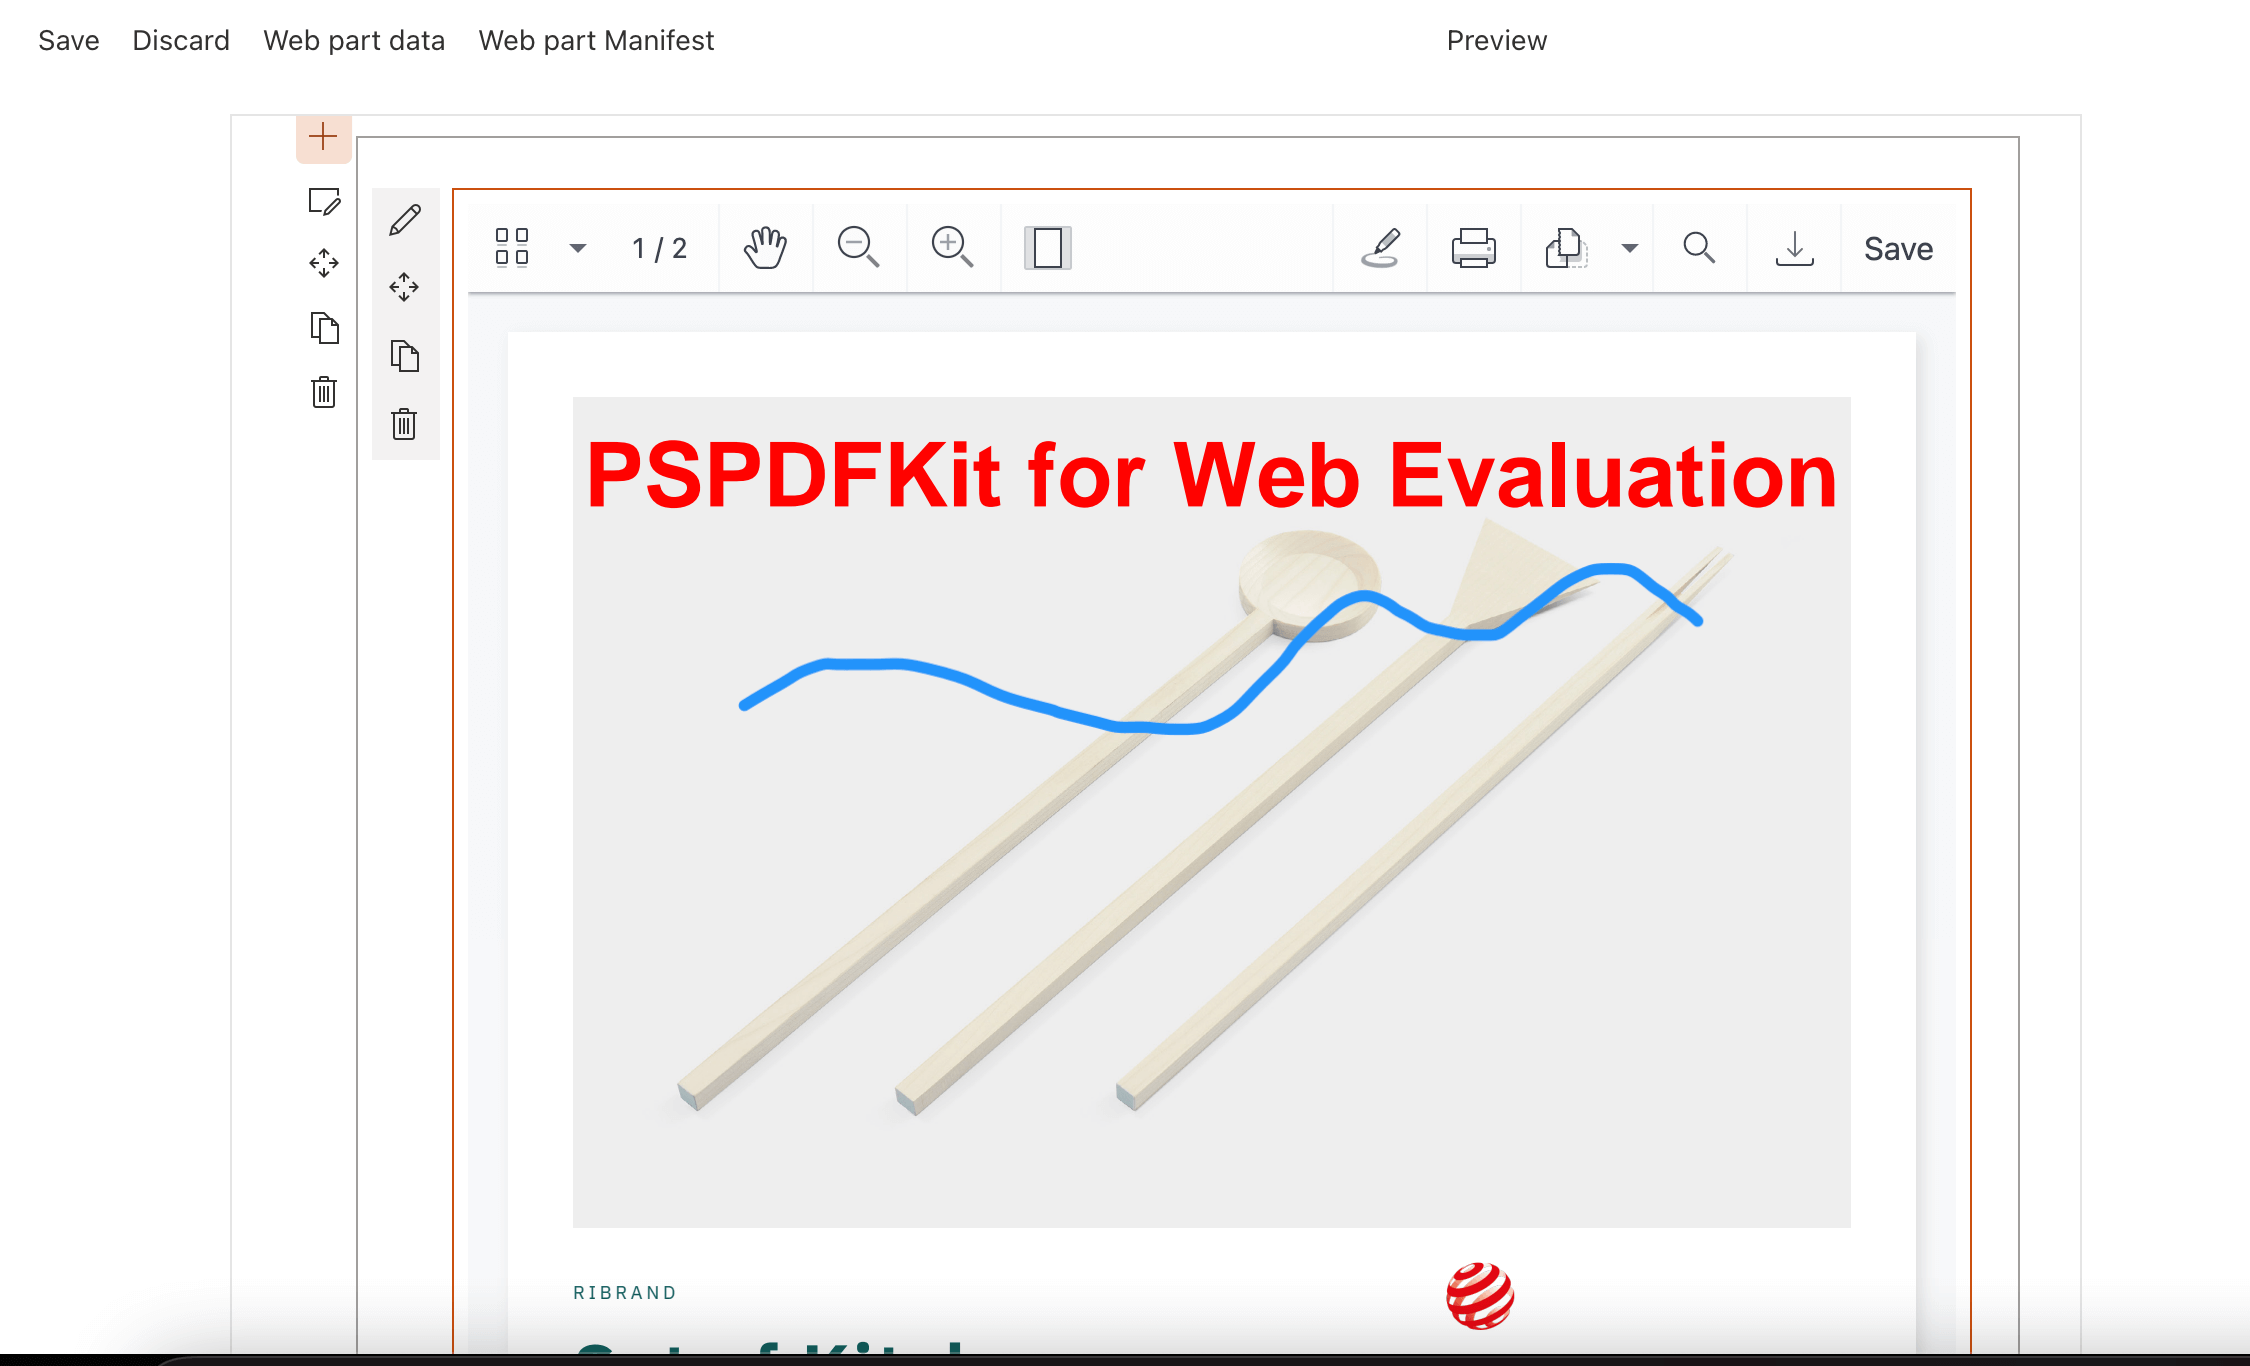
To add the PSPDFKit widget, hover over where you want to place it. This will display a plus icon. When you click the plus icon, it’ll open a dialog box with the possible web parts you can incorporate into your project.
-
Search for the PSPDFKit widget and click on it.
-
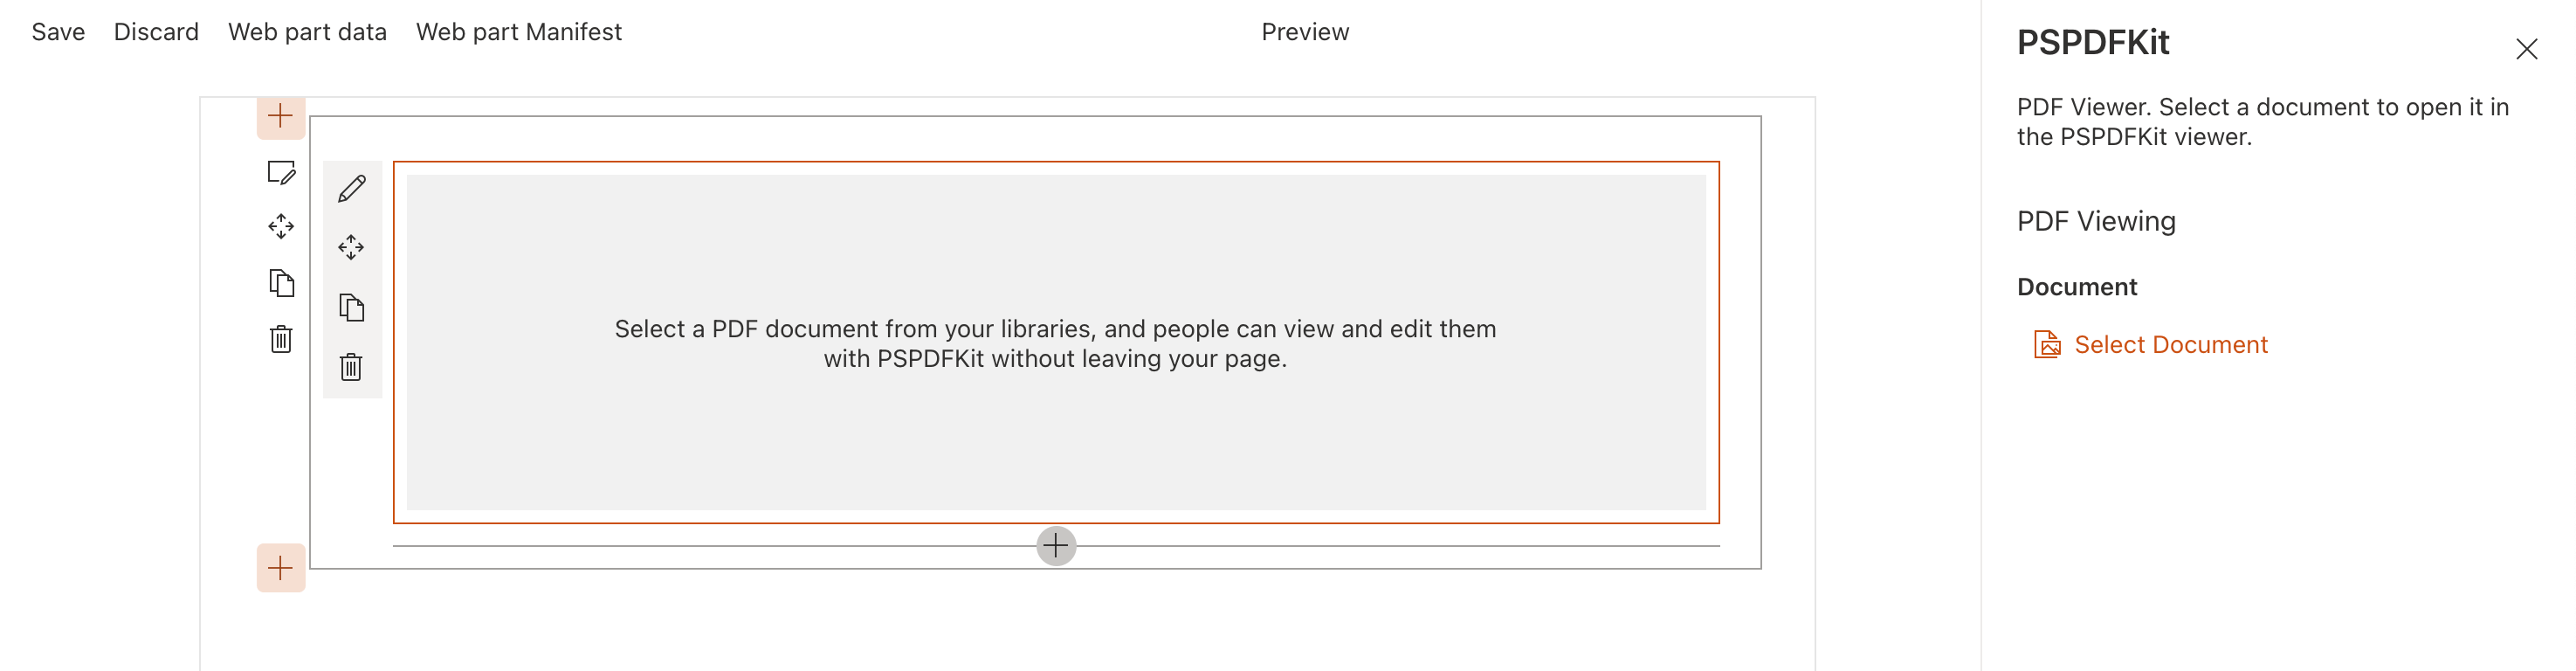
Find the edit button with the pencil icon, and click Select Document from the open panel.
-
Choose your document and click Open. Now you’ll be able to see the PSPDFKit widget in your project like in the video above.
Using for Production
For production, you need to follow these steps to deploy into your SharePoint environment.
-
Run
npm run bundleand thennpm run package. -
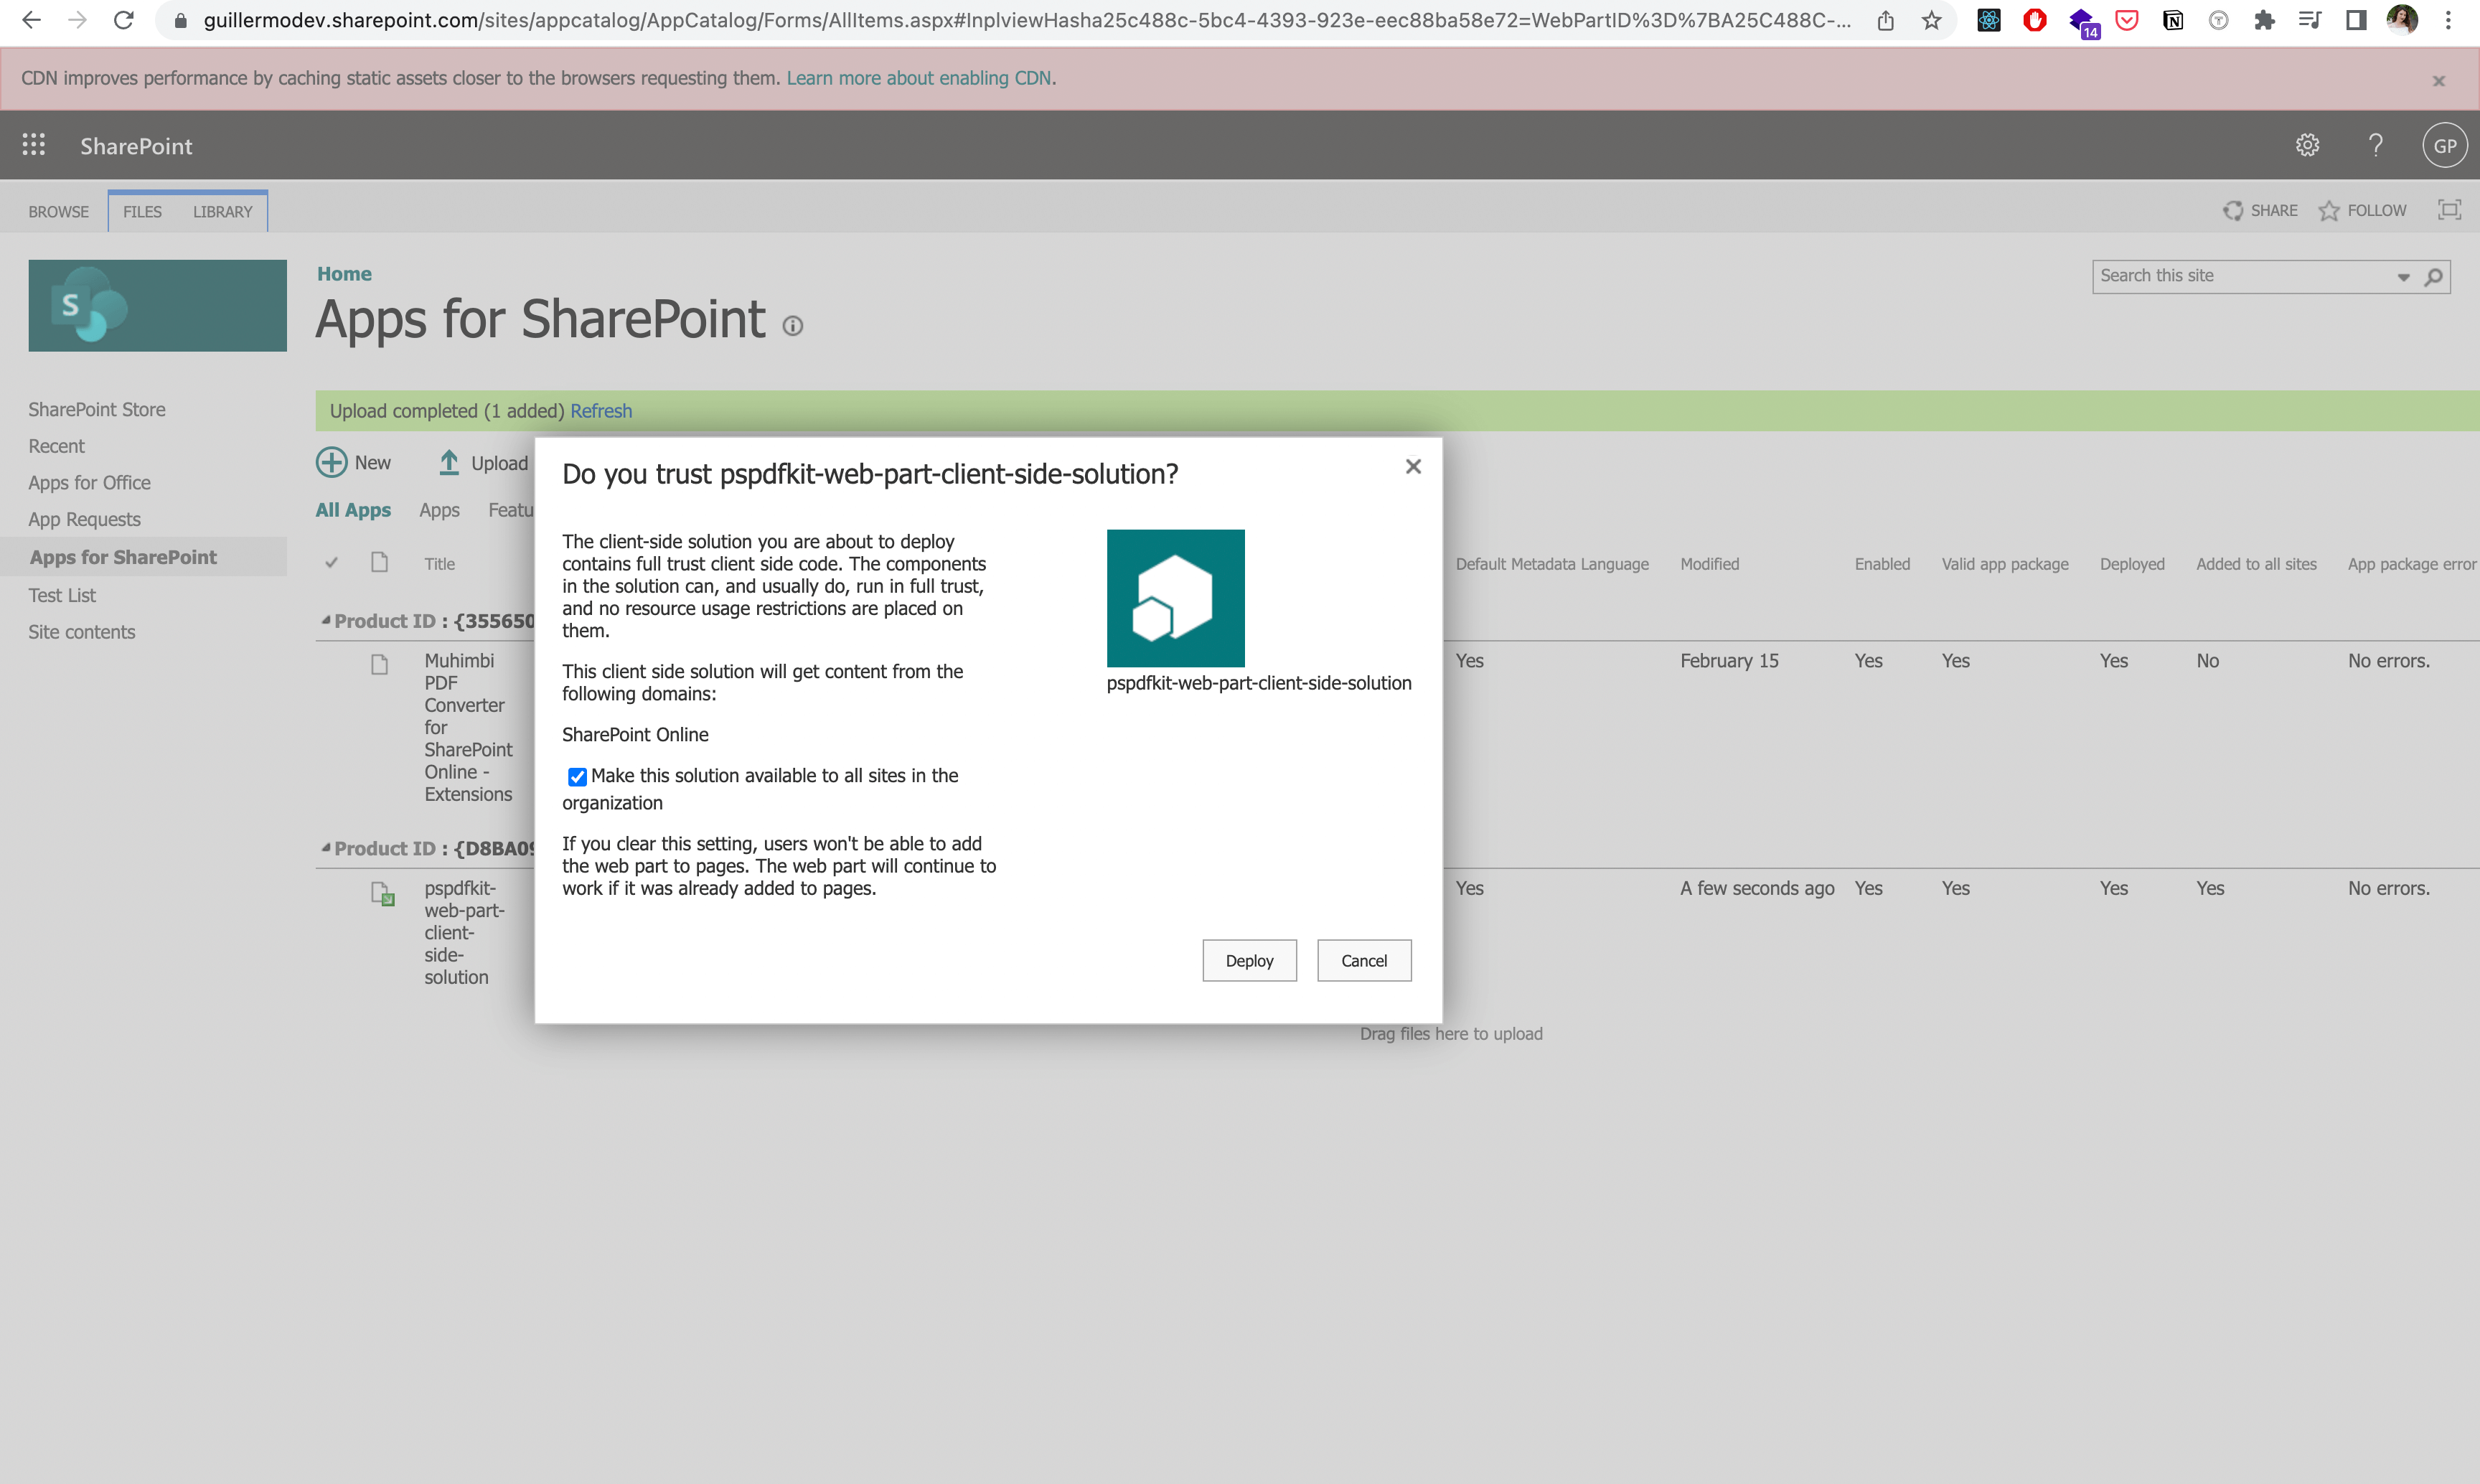
Then, follow the steps outlined in this SharePoint guide for packaging and deploying your web part. If a previous installation already exists, it’s recommended to remove it before proceeding.
Please make sure to select Make this solution available to all sites in the organization. This appears in the confirmation dialog you’ll see after dragging the package.
-
To make the web part available in Microsoft Teams, synchronize your solution with Teams.
-
Navigate to the workbench of one of your SharePoint sites and add the PSPDFKit web part there.
-
There’s an issue getting SharePoint to bundle the static assets of PSPDFKit for Web under the correct subdirectory when using the SharePoint file system itself as your CDN instead of a custom one (you can specify a custom URL for the static assets under
write-manifests.json), so you might see a network error when requesting one of the chunks for the PSPDFKit library.
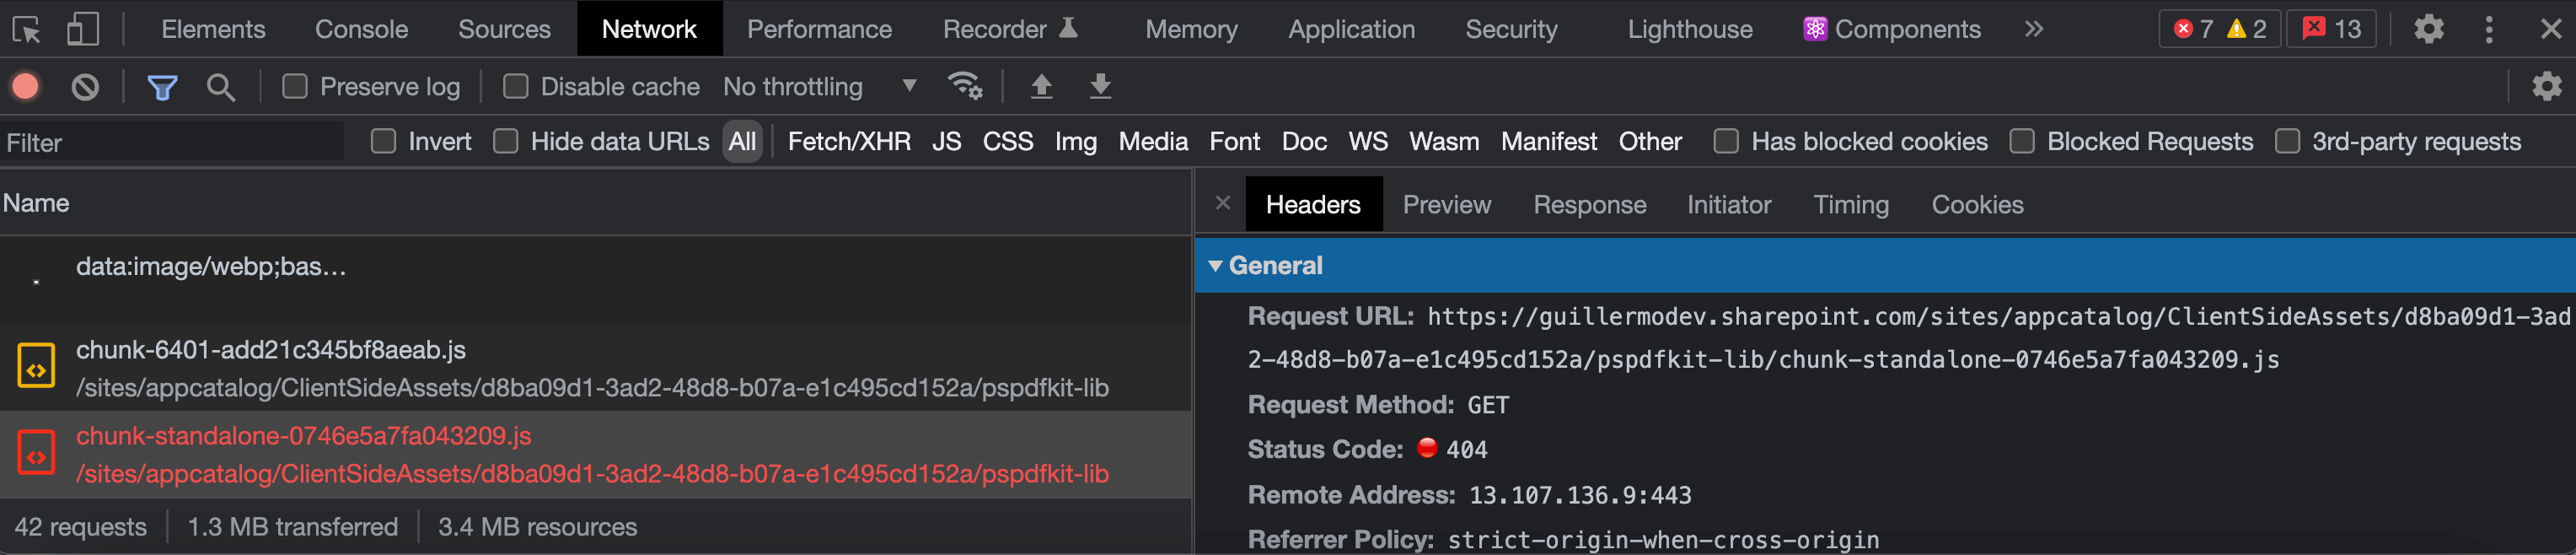
If this happens, it’s because the pspdfkit-lib subdirectory hasn’t been created by SharePoint. To fix this, navigate to the erroring URL but trim its path before the pspdfkit-lib segment (i.e. https://<your-sharepoint-site>/sites/appcatalog/ClientSideAssets/<some-hash>) and create a pspdfkit-lib folder.
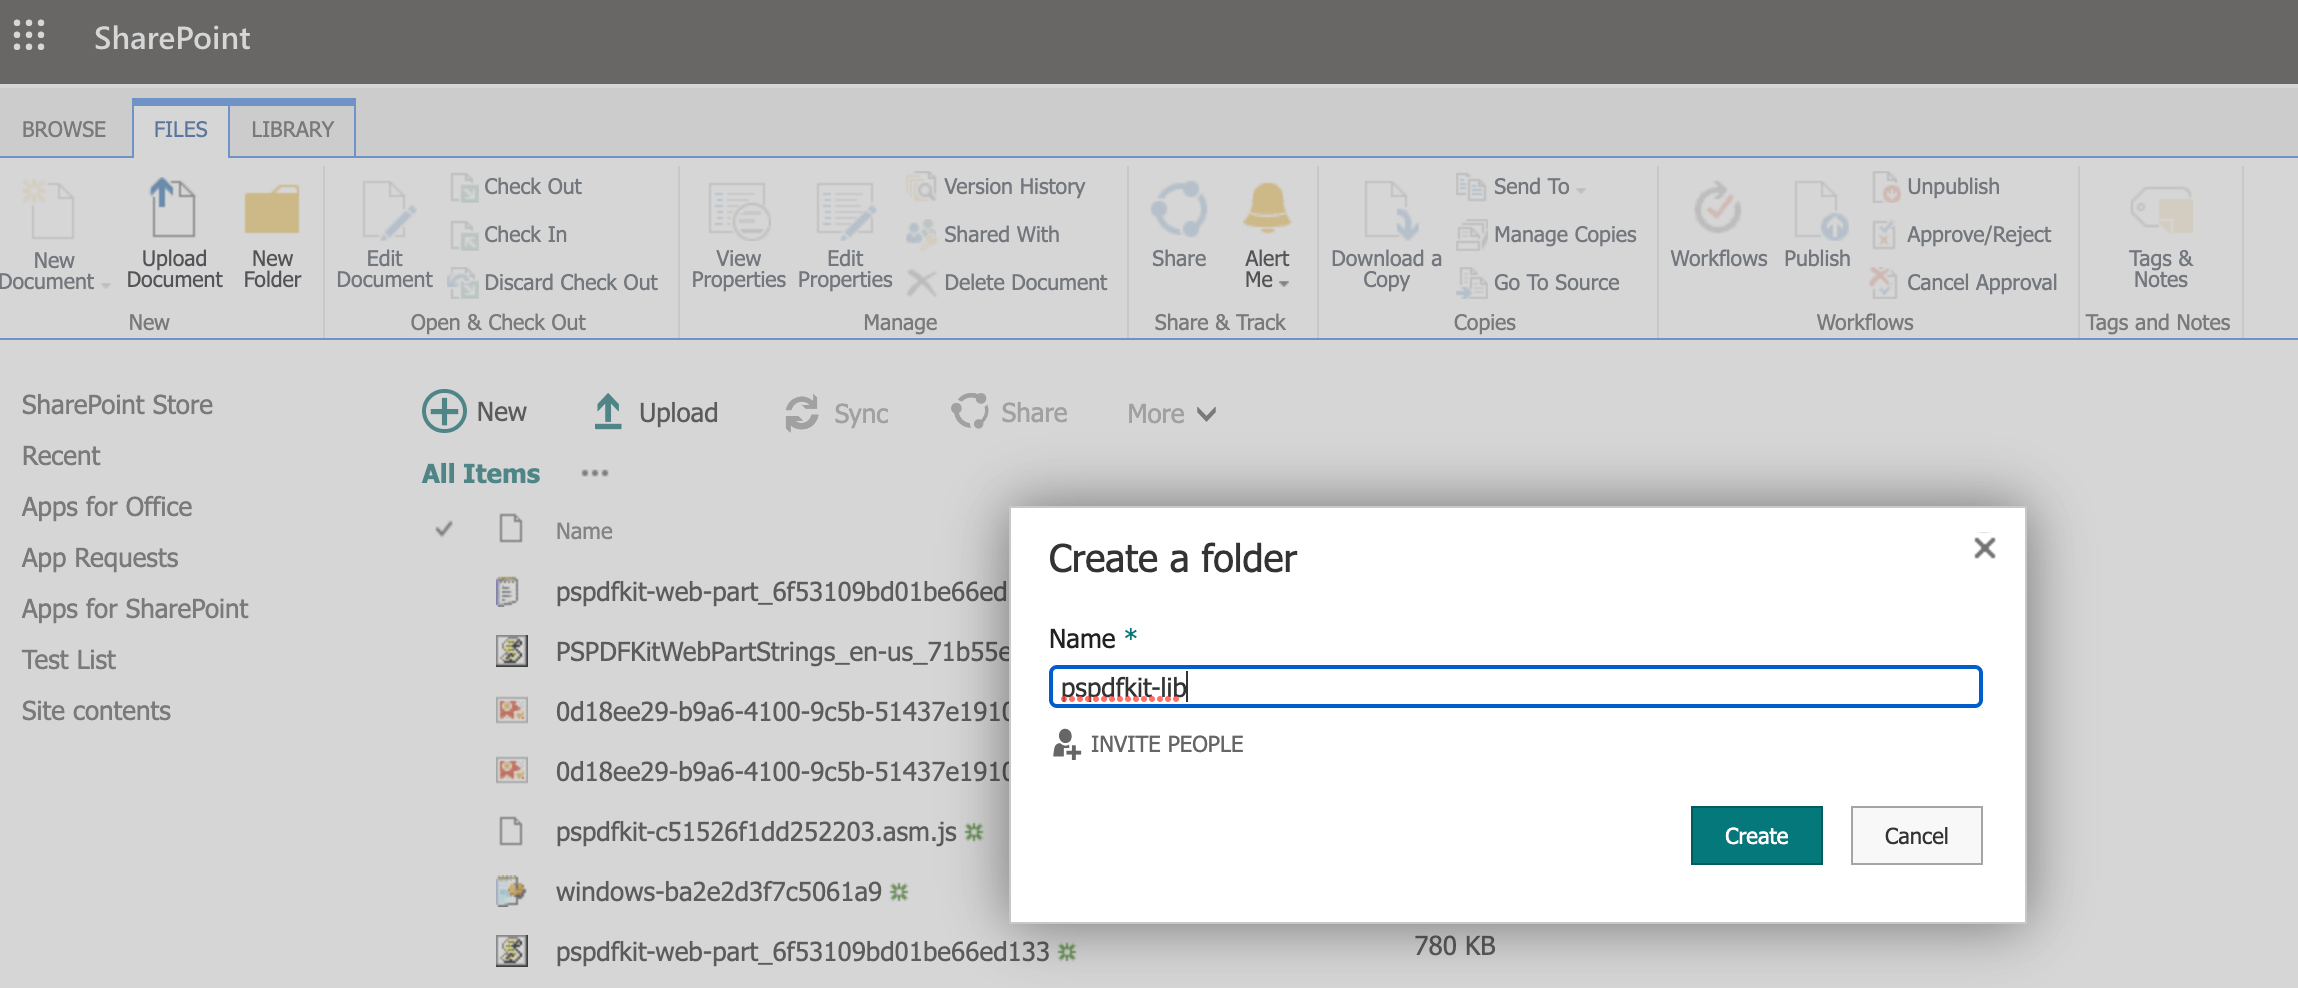
Then, you can copy the contents from ./sharepoint/solution/debug/ClientSideAssets/pspdfkit-lib to the newly created folder.
Make sure you have the latest version of PSPDFKit inside the pspdfkit-lib folder.
ℹ️ Note: As an alternative to this step, consider hosting the assets in a CDN and set it in the
write-manifests.jsonfile.
-
Your PSPDFKit instance should now work. Try opening your workbench and check if the PSPDFKit web part appears as part of the list of available web parts to add.
Adding Even More Capabilities
Once you’ve deployed your viewer, you can start customizing it to meet your specific requirements or easily add more capabilities. To help you get started, here are some of our most popular SharePoint guides:
Conclusion
You should now have our SharePoint Online web parts integration up and running. If you hit any snags, don’t hesitate to reach out to our support team for help.
You can also use our vanilla JavaScript PDF viewer to build a Microsoft OneDrive PDF viewer or a Microsoft Teams PDF viewer.
To see a list of all web frameworks, start your free trial. Or, launch our demo to see our viewer in action.
Hulya is a frontend web developer and technical writer at PSPDFKit who enjoys creating responsive, scalable, and maintainable web experiences. She’s passionate about open source, web accessibility, cybersecurity privacy, and blockchain.


