Swift Render Tests in Practice — Part III
 Daniel Demiss

In the first two articles of this series on Swift render tests, we discussed what render tests are; when it makes sense to use them; when not to use them; how to implement them; and how to use the trifecta of XCTAttachment, XCTContext, and .xcresult bundles to extract meaningful information from your CI system when tests fail. In the last article of our mini series, we’ll focus on visually calling out differences in more complex drawings and look into generating the reference images programmatically. For this purpose, we’ll show you how to programmatically add a test method at runtime to make sure it runs after all other tests have finished.
Visualizing Image Differences
In our last article, we attached the reference image and actual rendering of a failed render test next to the failure in the test log. This allows toggling between the two and lets us spot all the obvious differences without much effort.
For more subtle differences, this still won’t be good enough: Spotting a one-pixel misalignment in a 500×500-pixel image is certainly not one of my superpowers, and this will be true for many, if not most, other people. Thankfully, there are awesome tools on the market to help with this: Kaleidoscope, for example, offers a powerful visual image comparison with different modes. It even integrates with Xcode so that you can send images there from the debugger!
Unfortunately, that doesn’t help with test attachments: The test report in Xcode doesn’t implement drag and drop. So while it lets you save attachments and then drag and drop them into Kaleidoscope to get a rich visual diff, it isn’t a smooth process.
While, on our own, we don’t have access to all the bells and whistles a dedicated app offers, generating an image that does nothing but highlighting the differences between two images isn’t too complicated in code. In fact, UIGraphicsImageRenderer and some knowledge of blend modes makes this so simple that we can integrate it into last week’s test function, like so:
// Same as before:
func assert(
    image imageProducer: @autoclosure () -> UIImage,
    matches reference: UIImage,
    requiredAccuracy: Double,
    comparisonName: String,
    file: StaticString = #file,
    line: UInt = #line) {
    let image = imageProducer()
    do {
        try image.ensureMatches(reference: reference, requiredAccuracy: requiredAccuracy)
    } catch let ImageComparisonError.imageMismatch(
        pixelCount: totalPixels,
        acceptableMismatchCount: acceptable,
        actualMismatchCount: actual
    ) {
        XCTContext.runActivity(named: comparisonName) { activity in
            let imageAttachment = XCTAttachment(image: image)
            imageAttachment.name = "Actual render"
            activity.add(imageAttachment)

            let referenceAttachment = XCTAttachment(image: reference)
            referenceAttachment.name = "Reference image"
            activity.add(referenceAttachment)

            // New: Generate the difference image and attach it.
            let fullFrame = CGRect(origin: .zero, size: reference.size)
            let renderer = UIGraphicsImageRenderer(size: fullFrame.size)
            let difference = renderer.image { context in
                // Produce black pixels wherever things are the same.
                reference.draw(in: fullFrame)
                image.draw(in: fullFrame, blendMode: .difference, alpha: 1)

                // Highlight everything not black — aka the differences — in red.
                // This step is optional, but I’ve found it to be helpful in some cases,
                // e.g. where the differences are subtle and tinted themselves.
                UIColor.red.withAlphaComponent(0.5).setFill()
                context.fill(fullFrame, blendMode: .colorDodge)
            }

            let differenceAttachment = XCTAttachment(image: difference)
            differenceAttachment.name = "Diff image"
            activity.add(differenceAttachment)
            // That’s it.

            XCTFail(
                "Image with \(totalPixels) pixels differed from reference by \(actual) pixels (allowed: \(acceptable)",
                file: file,
                line: line
            )
        }
    }
}
Since a picture is worth a thousand words, here’s a visual example of what this gives you in the case of a tiny detail. The following two images show the same text, in the same position — but there’s a typo in the second one.
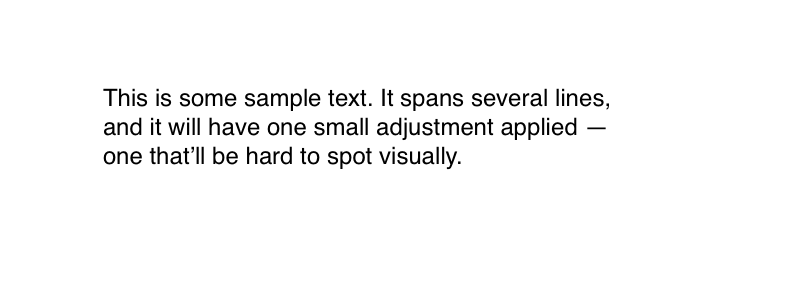

The eagle-eyed among you will have spotted the difference. For the rest of us, here’s what the code I’ve shown you produces with the first of these two images as reference and the second as image:

In the second image, I’ve exchanged the first lowercase letter “l” in “that’ll” with a capital letter “I.” And in Helvetica, those shapes are extremely similar! They have the same height, but they occupy a different amount of line space, and they differ ever so slightly in width.
If you’re sighted, the difference between the two images is now strikingly obvious. Even if the difference isn’t as pronounced as in this example, the difference drawing at least highlights the region of interest. And in most cases, we found that this was all it took to troubleshoot regressions when we were unifying how we render annotations.
So, if you’ve come to the conclusion that render tests would be a useful addition to your testing infrastructure, and you’ve identified where you want to start using them, you’re left with one task that might seem herculean.
While there are times when it makes sense to compare two freshly generated images — for example, before and after the state change of a UI component to ensure the two states can be visually distinguished from another, most of the time, you’ll want to prevent unintended changes in behavior over refactorings and feature additions. For the latter cases, the reference images will be loaded from files and then compared to the current rendering. And that means generating images. Potentially a lot of them. And because the exact output of the same drawing code can vary over time too (anti-aliasing, for example, often changes between different iOS versions) you’ll have to regenerate these images every now and then.
So let’s automate that in a way that requires no more than a single-line commit, and that still works when Xcode launches multiple simulators concurrently to run your tests, and that randomizes the order in which tests are run on each!
Observing and Modifying Test Execution
To generate and archive our reference images, we’re interested in the following things.
-
We need to run some code before any test is invoked to set up some infrastructure that lets us capture images.
-
Instead of loading any image from disk, we want to record the actual image with the file name it’ll have as a reference image.
-
We need to run some code after all tests have finished executing to take the recorded images, bundle them up in an archive under the names, and add that archive as an attachment.
“But Daniel,” you may say, “why not just add the individual images as an XCTAttachment and call it a day?”
Well, that will work! If you have only a handful of images, this will be the simplest solution. But at the time of writing, we had a total of 2,263 PNGs in our test assets directory. While a lot of those won’t be relevant for our iOS tests, several hundred of them are. And because the structure of the .xcresult bundle is undocumented, and because Xcode doesn’t support dragging and dropping attachments, you have to click on a lot of buttons to manually extract the files you need.
So for us, that option was off the table. Thankfully, the XCTest framework offers several hooks to let us observe the status of a test run and various events during test execution. In addition, you can also add your own tests and even entire test suites at runtime. This is what, for example, GoogleTest uses to integrate with Xcode.
The thing that lets us run some code before any test is invoked is XCTestObservationCenter. You can add an instance of a class that conforms to the XCTestObservation protocol as a test observer and then react to the various events you’ll be informed of.
One of these events is the start of the test suite. To install some code that’s guaranteed to run after all other tests have run, we’ll add a new test to this suite programmatically. And because the simplest way to do that works based on NSInvocation — a class that’s unavailable in Swift — we’ll move away from our regularly scheduled programming and use a bit of good old Objective-C. 😱
We’ll start with the basics: declaring a class that conforms to <XCTestObservation> and that will allow storing/retrieving generated assets:
#import <XCTest/XCTest.h>

NS_ASSUME_NONNULL_BEGIN
@interface PSPDFTestImageCoordinator : NSObject <XCTestObservation>

/// The singleton instance of this class for use in other parts of the code.
@property (nonatomic, class, readonly) PSPDFTestImageCoordinator *sharedCoordinator NS_SWIFT_NAME(shared);

/// Whether we should be storing new reference images.
@property (nonatomic, readonly) BOOL shouldStoreNewImages;

/// Stores an image under the given name in a subdirectory of the generated assets directory.
- (void)saveReferenceImage:(UIImage *)image withName:(NSString *)assetName inSubdirectory:(NSString *)subdirectory;

/// Retrieves a previously stored reference image for a given name from a subdirectory of the test asset directory.
- (nullable UIImage *)referenceImageForName:(NSString *)imageName inSubdirectory:(NSString *)subdirectory error:(NSError **)error;

@end
NS_ASSUME_NONNULL_END
With this API, we can extend our test function from earlier to either save the actual image or load one from disk, like so:
func assert(
    image imageProducer: @autoclosure () -> UIImage,
    matchesAssetNamed assetName: String,
    fromDirectory directory: String,
    requiredAccuracy: Double,
    comparisonName: String,
    file: StaticString = #file,
    line: UInt = #line) throws {
    let coordinator = PSPDFTestImageCoordinator.shared
    if coordinator.shouldStoreNewImages {
        return coordinator.saveReferenceImage(
             imageProducer(),
             withName: assetName,
             inSubdirectory: directory
        )
    }

    let reference = try coordinator.referenceImage(forName: assetName, inSubdirectory: directory
    assert(
        image: imageProducer,
        matches: reference,
        requiredAccuracy: requiredAccuracy,
        comparisonName: comparisonName,
        file: file,
        line: line
    )
}
Let’s implement the Objective-C class that lets us do that! We start with some boilerplate: the code for setting up and accessing the singleton instance of this class. We use the opportunity of setting up the singleton instance to also generate a unique directory name and figure out whether we should do anything at all:
@implementation PSPDFTestImageCoordinator

static PSPDFTestImageCoordinator *sharedInstance;
static NSURL *generatedAssetsDirectory;
static NSBundle *testsBundle;
+ (void)load {
    static dispatch_once_t onceToken;
    dispatch_once(&onceToken, ^{
        sharedInstance = [self new];
        NSURL *temporaryDirectory = [NSURL fileURLWithPath:NSTemporaryDirectory() isDirectory:YES];
        NSString *uniqueString = NSProcessInfo.processInfo.globallyUniqueString;
        generatedAssetsDirectory = [temporaryDirectory URLByAppendingPathComponent:uniqueString isDirectory:YES];
        [XCTestObservationCenter.sharedTestObservationCenter addTestObserver:sharedInstance];
        testsBundle = [NSBundle bundleForClass:self];
    });
}

+ (PSPDFTestImageCoordinator *)sharedCoordinator {
    return sharedInstance;
}

- (BOOL)shouldStoreNewImages {
#if defined(PSPDF_IMAGE_GENERATION_MODE) && PSPDF_IMAGE_GENERATION_MODE > 0
    return YES;
#else
    return NO;
#endif
}

// More to come …
Running Code after All Tests Finish
As soon as we have the PSPDF_IMAGE_GENERATION_MODE=1 preprocessor flag in our build settings, we’ll say that we want to store new images. Setting or changing this #define will be the one-line commit you can push to have your CI setup regenerate all assets.
But so far, we haven’t done any of the actual work. That will happen before the first test executes. In our implementation of -[<XCTestObservation> testSuiteWillStart:], we check whether there’s anything we need to do, and if so, we create a new directory in which we can store the generated images. We then add a dynamically created test case that does nothing but add a teardown block. And in that teardown block, we trigger zipping the assets folder.
As we said above, we’ll use NSInvocation to programmatically add a test case instead of instantiating a traditional XCTestCase subclass and adding it. But why?
By default, XCTest uses runtime introspection to discover test classes, and then it randomizes the order in which the classes are processed, and then it randomizes the order in which individual test cases — typically all instance methods of a test class whose names begin with test and that have a () -> Void or () throws -> Void signature — are executed.
Because we need our fake test to run at the end of the entire test suite (regardless of the way the test suite began), but only when the appropriate preprocessor flag has been toggled, adding the test programmatically in this way acts as a safeguard against accidental automatic invocation:
- (void)testSuiteWillStart:(XCTestSuite *)testSuite {
    static BOOL didAddAssetGrabber = NO;
    if (didAddAssetGrabber || self.shouldStoreNewImages == NO) {
        return;
    }

    // Create a directory that generated images can be written into.
    NSError *error;
    didAddAssetGrabber = [NSFileManager.defaultManager createDirectoryAtURL:generatedAssetsDirectory withIntermediateDirectories:YES attributes:nil error:&error];
    if (didAddAssetGrabber == NO) {
        NSLog(@"Failed to create asset directory: %@", error);

        return;
    }

    // Dynamically add a test case that runs after all other tests have executed to
    // zip the generated images directory.
    // Careful: The invocation will be called with the test instance as the target!
    // We therefore have to use a method that already exists in `XCTestCase`.
    // `addTeardownBlock:` allows running arbitrary code _after_ the test body
    // finished, so we use that, and we set a block as the argument to be passed. This
    // is a tad less hacky than creating a subclass at runtime.
    SEL addTeardownBlock = @selector(addTeardownBlock:);
    NSInvocation *invocation = [NSInvocation invocationWithMethodSignature:[XCTestCase instanceMethodSignatureForSelector:addTeardownBlock]];
    invocation.selector = addTeardownBlock;
    __block XCTestCase *pseudoTest = [XCTestCase testCaseWithInvocation:invocation];
    dispatch_block_t storeAssets = ^{
        [PSPDFTestImageCoordinator.sharedCoordinator attachGeneratedAssetsToTest:pseudoTest];
        // Break the strong reference cycle between the test and its teardown block.
        pseudoTest = nil;
    };
    // Because an invocation needs to be able to store any type of parameter — object types
    // as well as primitives — you cannot pass the value directly, but you can pass a pointer
    // to that value. Because the invocation was instantiated with a method signature, which
    // includes the type encoding, it knows how to properly dereference the pointer and how
    // to treat the value behind it.
    // In Objective-C, the first two arguments of any method call are `self` and `_cmd` (the
    // method name). So the block is the third argument to `-addTeardownBlock:`.
    [invocation setArgument:(void *)&storeAssets atIndex:2];
    // Because invocations can be extremely short lived, they don't strongly reference
    // (or "retain") object-type arguments by default. Instead, the caller has to explicitly
    // opt in to this behavior if the invocation is supposed to be long lived.
    // Blocks are objects, so we need to retain the block we want to execute to still be
    // valid at the time the test has finished running.
    [invocation retainArguments];

    // Now that we’ve set up the test invocation, we can instantiate and add the test case
    // for it.
    [testSuite addTest:pseudoTest];
}

// More to come.
There are more events that we could handle if we needed to, but we don’t: We’ve now ensured that -attachGeneratedAssetsToTest: is called after all tests — including the one we instantiated and added programmatically — have finished running.
Zipping and Attaching the Generated Files
On macOS, what follows now would be a handful of lines that I’d have just included directly in the block. There, we have +[XCTAttachment attachmentWithCompressedContentsOfDirectoryAtURL:] at our disposal. For reasons beyond my understanding, this method is missing on other platforms, so we’ll need to do this manually.
Interestingly, NSFileCoordinator offers the functionality to zip a directory through a very obscure interaction with NSFileManager:
- (void)attachGeneratedAssetsToTest:(XCTestCase *)pseudoTest { NSLog(@"Bundling up generated assets in %@ …", generatedAssetsDirectory); NSFileManager *defaultManager = NSFileManager.defaultManager; NSURL *zipURL = [generatedAssetsDirectory URLByAppendingPathExtension:@"zip"]; // Make sure there's nothing where we want to create our archive: [defaultManager removeItemAtURL:zipURL error:NULL]; // Use `NSFileCoordinator` to compress the test assets. // Courtesy of https://stackoverflow.com/a/32723162/3318984 NSError *compressingError; NSfileCoordinator *fileCoordinator = [[NSFileCoordinator alloc] init]; __block BOOL didCopy = NO; __block BOOL didFailToRun = YES; [fileCoordinator coordinateReadingItemAtURL:generatedAssetsDirectory options:NSFileCoordinatorReadingForUploading error:&compressingError byAccessor:^(NSURL *assetURL) { didFailToRun = NO; NSError *copyError; didCopy = [defaultManager copyItemAtURL:assetURL toURL:zipURL error:©Error]; if (!didCopy) { NSLog(@"Failed to copy the assets for compressing. Error: %@", copyError.localizedDescription ?: @"N/A"); } }]; if (didFailToRun) { NSLog(@"Failed to zip contents of %@: %@", generatedAssetsDirectory, compressingError); } if (didCopy == NO) { return; } XCTAttachment *generatedAsset = [XCTAttachment attachmentWithContentsOfFileAtURL:zipURL]; generatedAsset.name = @"Generated Images"; // The pseudo test consists of only adding this block as a teardown block — // so it’s going to succeed! Because, by default, attachments are only // preserved for failed tests, we need to adjust the lifetime. generatedAsset.lifetime = XCTAttachmentLifetimeKeepAlways; NSLog(@"Attaching %@ to test %@", generatedAsset, pseudoTest); [pseudoTest addAttachment:generatedAsset]; // As a final step, we can now remove the directory, which is no longer needed. [fileCoordinator coordinateWritingItemAtURL:generatedAssetsDirectory options:NSFileCoordinatorWritingForDeleting error:NULL byAccessor:^(NSURL *directoryURL) { [defaultManager removeItemAtURL:directoryURL error:NULL]; }]; } /// More to come.
If the #define PSPDF_IMAGE_GENERATION_MODE 1 preprocessor definition is set, your test run will now bundle up all generated images in a ZIP file. Sweet! Except that I didn’t show you the code to store the images in the first place or how to retrieve the stored assets later.
Let’s fix that and look at -saveReferenceImage:withName:inSubdirectory: and -referenceImageForName:inSubdirectory:error: — the missing parts of the implementation:
- (void)saveReferenceImage:(UIImage *)image withName:(NSString *)assetName inSubdirectory:(NSString *)subdirectory {
    // Don't do anything if we're not supposed to save images.
    if (self.shouldStoreNewImages == NO) {
        return;
    }

    // JPEG has compression artifacts, so we only allow PNGs here.
    NSAssert([assetName.pathExtension.lowercaseString isEqualToString:@"png", @"Only PNGs are supported.");
    NSData *pngData = UIImagePNGRepresentation(image);
    NSAssert(pngData != nil, @"Failed to obtain PNG data for %@", image);

    // Ensure we have a directory to write into.
    NSURL *destinationDirectory = [generatedAssetsDirectory URLByAppendingPathComponent:subdirectory isDirectory:YES];
    NSError *error;
    BOOL didCreateDestinationDirectory = [NSFileManager.defaultManager createDirectoryAtURL:destinationDirectory withIntermediateDirectories:YES attributes:nil error:error];
    // If the destination directory already exists, `NSFileManager` will not complain: It achieved
    // the desired outcome, so all failure cases mean something in our setup is horribly broken.
    NSAssert(didCreateDestinationDirectory, @"Could not create directory: %@", error);

    NSURL *destinationFile = [destinationDirectory URLByAppendingPathComponent:assetName isDirectory:NO];
    BOOL didWritePNG = [pngData writeToURL:destinationFile options:0 error:&error];
    NSAssert(didWritePNG, @"Could not store image data: %@", error);
}

- (nullable UIImage *)referenceImageForName:(NSString *)imageName inSubDirectory:(NSString *)subdirectory error:(NSError *__autoreleasing*)error {
    NSString *imagePath = [testsBundle pathForResource:imageName.stringByDeletingPathExtension withExtension:image.pathExtension subdirectory:subdirectory];
    if (imagePath == nil) {
        // Providing an appropriate error is left to the reader as an exercise.
        return nil;
    }

    UIImage *image = [UIImage imageWithContentsOfFile:imagePath];
    if (image == nil) {
        // Providing an appropriate error is left to the reader as an exercise.
        return nil;
    }

    return image;
}

@end
Recovering Generated Images
By default, Xcode will run tests in parallel. And that actually works well with this setup.
Because we created the test that bundles up the generated assets dynamically when the test run on a machine starts, and because we use a unique directory to store the generated assets, multiple simulators running at the same time won’t step on each other’s toes. Instead, each simulator will add such a test and then attach the ZIP file of all the images it generated. So once the test run completes, all that we need to do is open the .xcresult bundle, save the attached ZIP files, and merge their contents together.
While we cannot automate the part where we’re saving the ZIP files, we can automate the part where we’re merging them together. As a matter of fact, we don’t even have to write a script for this ourselves! This task is so common that every Mac ships with a tool to do this: ditto.
ditto -x -k zip-file-1 zip-file-2 … destination_directory
This command will assume that everything between -k and destination_directory will be the path of a ZIP file that should be extracted, and whose contents should be copied into destination_directory. Nested directories will be created as needed, and if a file is already present, it’ll be replaced if and only if the one in the archive is newer than the one that would be replaced.
Conclusion
In our third and final article, we’ve shown how to make sure your failing render tests clearly show what changed, even in more complex drawings. For that, we complemented the reference image and actual render we attached to a failure in the last article with a simple visual diff of the two. Lastly, we demonstrated how you can leverage XCTestObservationCenter to add a test that runs before or after all other tests, in order to — for example — capture generated assets that should be used as reference data in future test runs.
Even if you knew most of the things we discussed in this mini series, we hope that there were some tidbits you previously were unaware of. Xcode is a complex beast, and even after spending many hours over the last 10 years getting paid for poking at it, there’s still always something new for me to discover.
Please let us know if you (dis)liked this format or the content in this series, or if you have ideas of other things we should be writing about.