Exporting Images from PDF with PSPDFKit for macOS
PSPDFKit for macOS brings our powerful PDF parsing and rendering technology to the desktop. You can use it not only for Mac apps, but also for automation by calling PSPDFKit from Swift scripts.
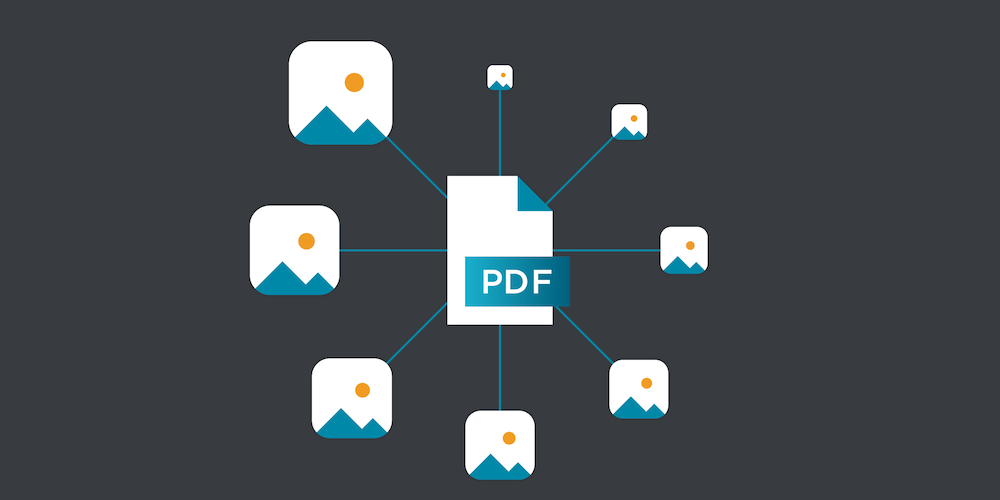
In this post, we’ll see how to use a simple Swift script and PSPDFKit for macOS to export images from a PDF. We’ll use an iOS app icon as an example, but it will work for any image assets needed by your website or app. Your designer can create a vector version of the artwork and export it once as a PDF. Then PSPDFKit can be used to create PNG or JPEG images in all the required sizes.
In line with our agile approach to design, this reduces the workload of the designer, as only one asset needs exporting. It also saves on communication overhead where the developer would need to tell the designer all the required sizes, who would then export these and then send them back.
Getting PSPDFKit
To get started, request a demo of PSPDFKit for macOS. Make sure you select the macOS checkbox. When you get to our Try the PSPDFKit Demo guide, look for the link to download the framework. This gives you the demo disk image, and inside you’ll find PSPDFKit.framework.
Creating a Runnable Project
PSPDFKit is a dynamic framework, which means when the Swift script is compiled, it needs to link with the framework, and PSPDFKit needs to be available to call into when the script runs. The easiest way to manage this is to package the script as a Mac app (an .app bundle).
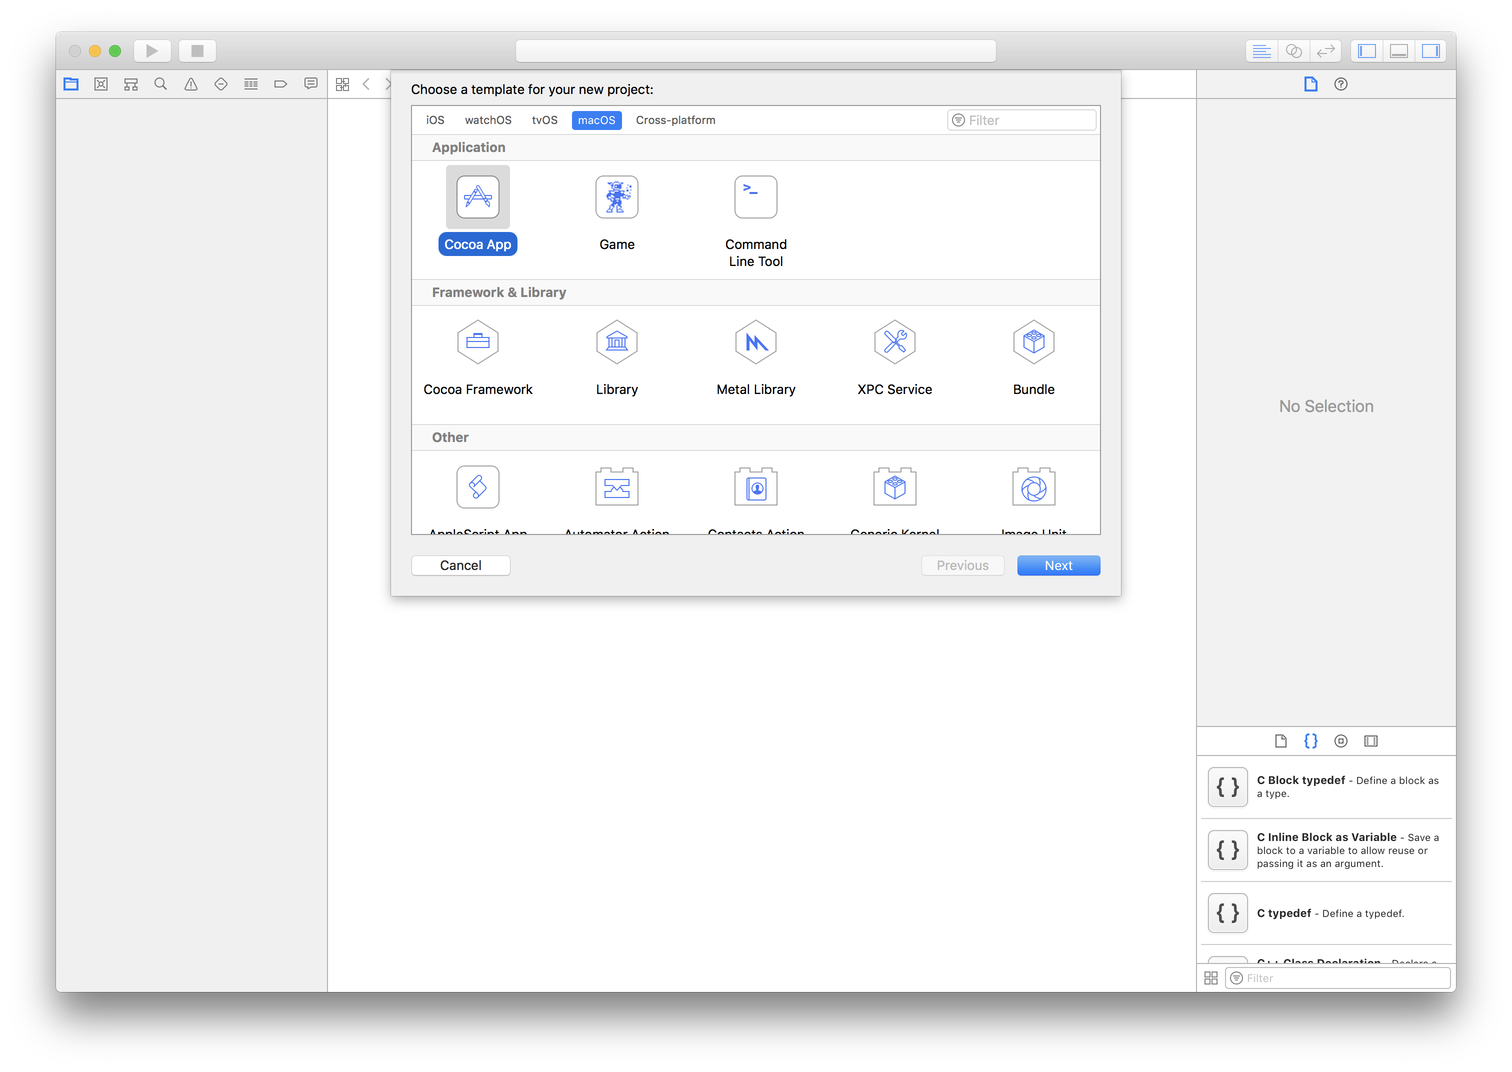
First create a new project in Xcode. Select the macOS tab at the top, and then select the Cocoa App template (not Command Line Tool). This will set up the target to be able to use embedded frameworks.
Drag PSPDFKit.framework into your Xcode project. Don’t add it to the target at this stage, because Xcode will only link it without embedding the framework.
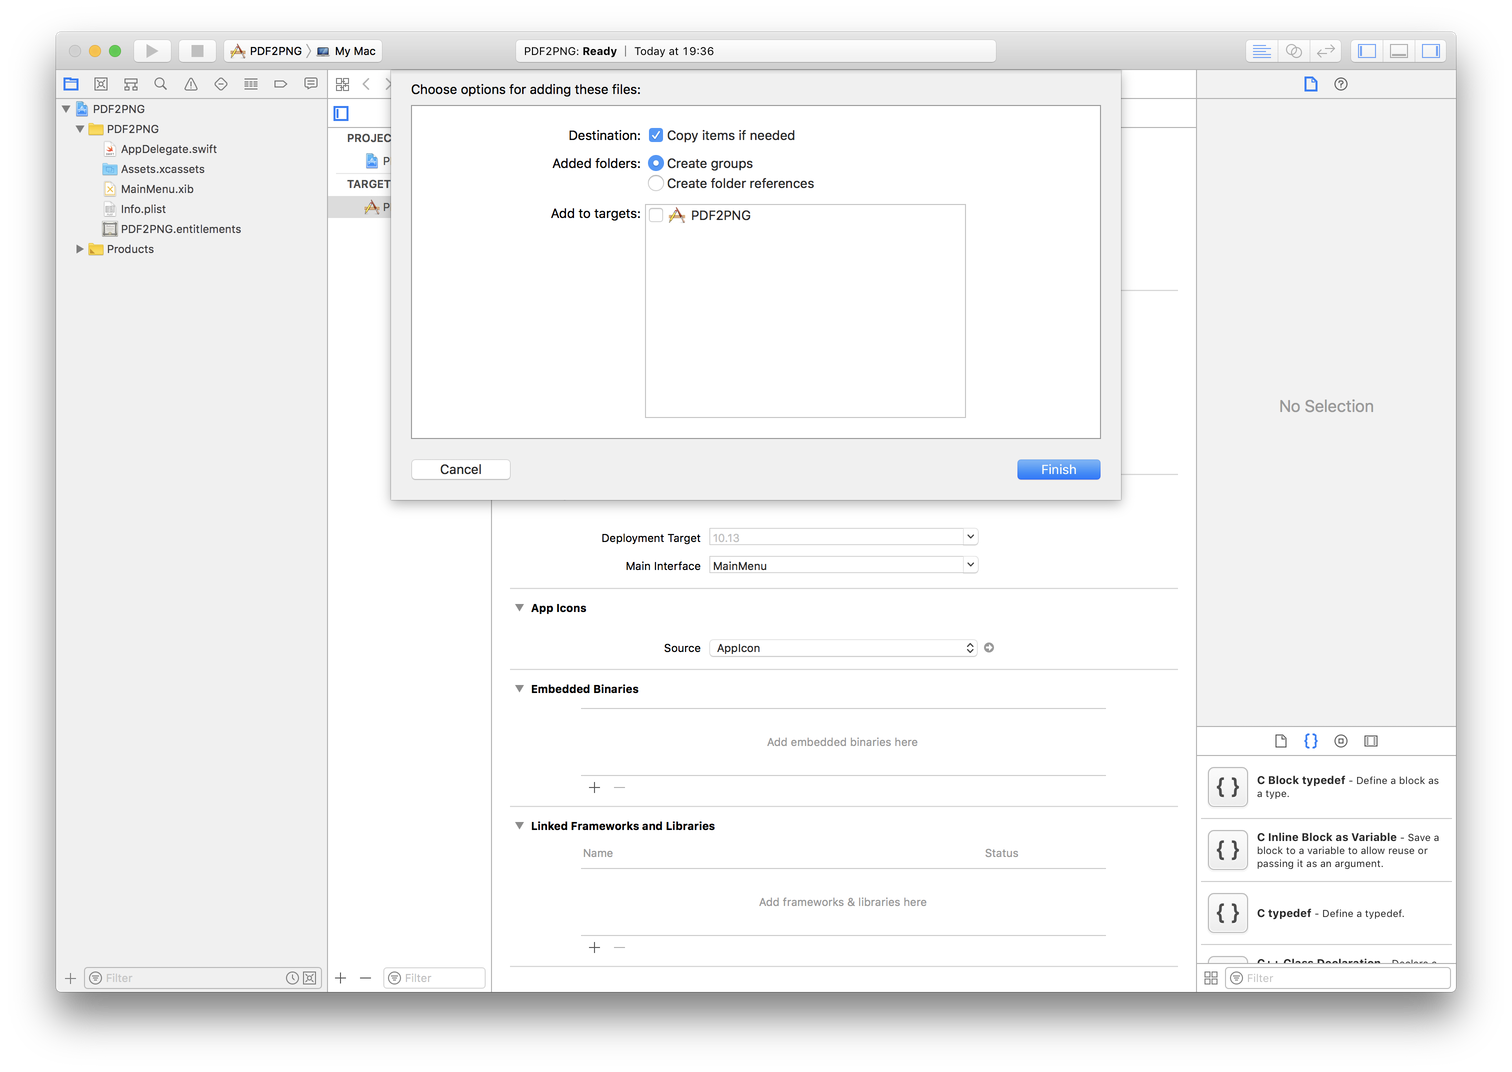
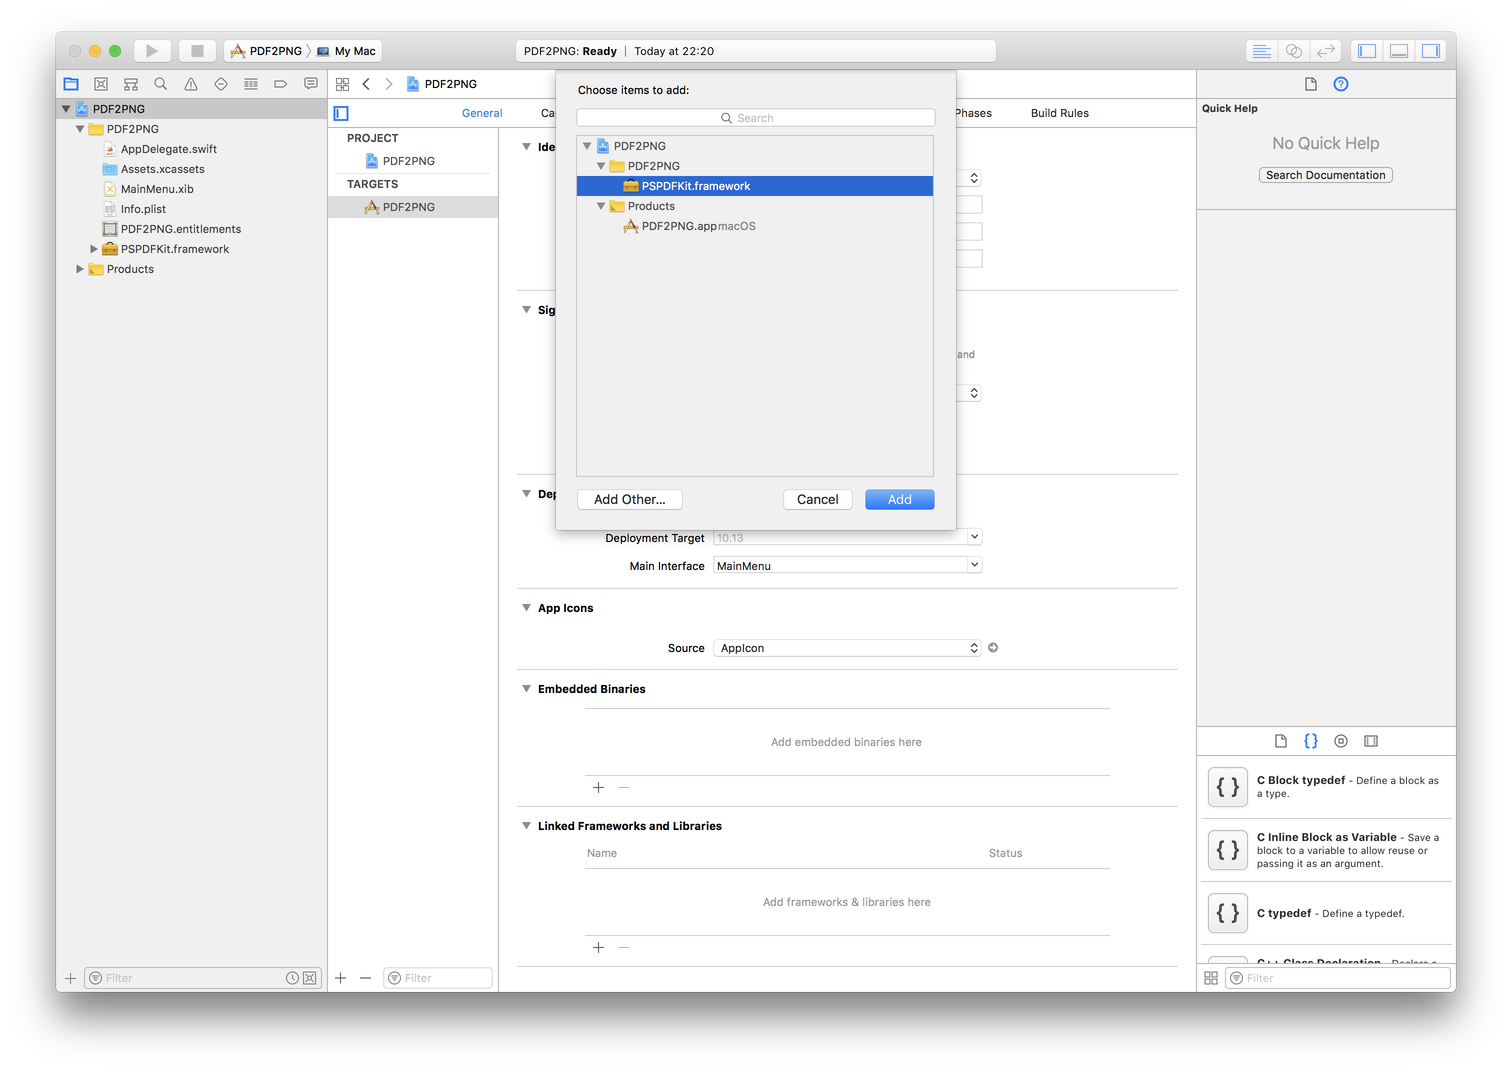
In the target settings, under General, click the + under Embedded Binaries and select PSPDFKit.framework. This will link and embed the framework.
Delete the entire contents of AppDelegate.swift. You don’t need @NSApplicationMain or the AppDelegate class because you’re not making an app. The filename no longer makes much sense, so rename it if you want.
Add import PSPDFKit at the top of the Swift file and you’re ready to start working with PDF!
Converting PDF to PNG or JPEG
In the Swift file, create a PSPDFDocument:
let inputURL: URL = ... // Path to read the PDF from.
let document = PSPDFDocument(url: inputURL)
Render the first page of the PDF as an NSImage. Subsequent pages will be ignored. Since we’re running this as a script, crashing on errors is acceptable:
let outputSize: CGSize = ... // Size of output image.
let image = try! document.imageForPage(at: 0, size: outputSize,
  clippedTo: .zero, annotations: nil, options: nil)
Generate PNG or JPEG data from the NSImage (PNG in this example):
let bitmapRep = image.representations[0] as! NSBitmapImageRep
let data = bitmapRep.representation(using: .png, properties: [:])!
Write the data to a file:
let outputURL: URL = ... // Path to write the image to.
try! data.write(to: outputURL)
Shrinking the Images
At this point, we’ve generated PNG or JPEG images. This is fine, but for publishing purposes, it’s well worth it to reduce the size of the images since faster downloads will lead to happier users (though this isn’t the only added benefit).
We’ll use ImageOptim to reduce the image size losslessly. To do this, you just need to have the ImageOptim Mac app installed. Then use:
NSWorkspace.shared.open([outputURL], withAppBundleIdentifier: "net.pornel.ImageOptim", options: [], additionalEventParamDescriptor: nil, launchIdentifiers: nil)
This runs asynchronously, so after our script terminates, ImageOptim will keep working and will update the image files when it completes. If you have a directory of images, you can pass in the directory URL and ImageOptim will find all the images inside.
As described in the ImageOptim documentation, an alternative would be to call ImageOptim synchronously without launching a user visible app. This can be done from Swift using Process.
Example: Generating Images for an iOS App Icon
Xcode supports vector PDFs for most assets in an asset catalog. However, this is not the case for the app icon: You still have to supply PNG images for each size.
Inspired by Iconizer.sh (an app icon exporting script using ImageMagick), we wrote a Swift script that takes an app icon as a PDF and generates the PNGs in all sizes, along with the corresponding Contents.json file for the image assets.
The script (included in full at the bottom of this post) expects two arguments:
-
Path to input PDF
-
Path to output asset catalog (
.xcassetsdirectory)
You can either run the script from Xcode or precompile it and then run it from the command line.
-
From Xcode, put the script into an Xcode project as described above, and set the arguments by editing the scheme and adding two entries to Arguments Passed On Launch.
-
To use the command line, first compile the “app” in Xcode, and then run the executable in
Contents/MacOS/in the app bundle.
Conclusion
We’ve seen how PSPDFKit for macOS can be used to export PNG and JPEG images from a PDF, and how ImageOptim can be used for compressing the images, with the example of generating all the sizes of an iOS app icon. This approach can be applied to many other image export workflows as well.
Appendix: Full Example Source
This is the full Swift source code to generate an iOS app icon from a PDF:
import PSPDFKit

PSPDFKit.setLicenseKey(<#Your License Key#>)

let args = CommandLine.arguments
precondition(args.count >= 3, "Usage: \(args[0]) file.pdf whatever.xcassets")

let pdfPath = args[1]
precondition(FileManager.default.fileExists(atPath: pdfPath), "Source PDF file must exist.")

let xcassetsPath = args[2]
let xcassetsURL = URL(fileURLWithPath: xcassetsPath, isDirectory: true)
let iconsetURL = xcassetsURL.appendingPathComponent("AppIcon.appiconset", isDirectory: true)
precondition(FileManager.default.fileExists(atPath: iconsetURL.path), "AppIcon.appiconset directory must exist.")

let fileURL = URL(fileURLWithPath: pdfPath, isDirectory: false)
precondition(fileURL.pathExtension == "pdf", "Expected file with .pdf filename extension.")

print("Cleaning \(iconsetURL.path)")
for fileURL in try! FileManager.default.contentsOfDirectory(at: iconsetURL, includingPropertiesForKeys: [], options: [.skipsHiddenFiles]) {
    try! FileManager.default.removeItem(at: fileURL)
}

let document = PSPDFDocument(url: fileURL)

for length in [20, 29, 40, 58, 60, 76, 80, 87, 120, 152, 167, 180, 1024] {
    print("Creating \(length) px icon")

    let image = try! document.imageForPage(at: 0, size: CGSize(width: length, height: length), clippedTo: .zero, annotations: nil, options: nil)
    let reps = image.representations

    precondition(reps.count == 1)

    let bitmapRep = reps[0] as! NSBitmapImageRep

    precondition(bitmapRep.pixelsWide == length && bitmapRep.pixelsHigh == length)

    let data = bitmapRep.representation(using: .png, properties: [:])!

    try! data.write(to: iconsetURL.appendingPathComponent("appicon-\(length).png", isDirectory: false))
}

print("Created app icon files, writing Contents.json file.")

let json: [String: Any] = [
    "images": [
        ["size": "20x20", "idiom": "iphone", "filename": "appicon-40.png", "scale": "2x"],
        ["size": "20x20", "idiom": "iphone", "filename": "appicon-60.png", "scale": "3x"],
        ["size": "29x29", "idiom": "iphone", "filename": "appicon-58.png", "scale": "2x"],
        ["size": "29x29", "idiom": "iphone", "filename": "appicon-87.png", "scale": "3x"],
        ["size": "40x40", "idiom": "iphone", "filename": "appicon-80.png", "scale": "2x"],
        ["size": "40x40", "idiom": "iphone", "filename": "appicon-120.png", "scale": "3x"],
        ["size": "60x60", "idiom": "iphone", "filename": "appicon-120.png", "scale": "2x"],
        ["size": "60x60", "idiom": "iphone", "filename": "appicon-180.png", "scale": "3x"],
        ["size": "20x20", "idiom": "ipad", "filename": "appicon-20.png", "scale": "1x"],
        ["size": "20x20", "idiom": "ipad", "filename": "appicon-40.png", "scale": "2x"],
        ["size": "29x29", "idiom": "ipad", "filename": "appicon-29.png", "scale": "1x"],
        ["size": "29x29", "idiom": "ipad", "filename": "appicon-58.png", "scale": "2x"],
        ["size": "40x40", "idiom": "ipad", "filename": "appicon-40.png", "scale": "1x"],
        ["size": "40x40", "idiom": "ipad", "filename": "appicon-80.png", "scale": "2x"],
        ["size": "76x76", "idiom": "ipad", "filename": "appicon-76.png", "scale": "1x"],
        ["size": "76x76", "idiom": "ipad", "filename": "appicon-152.png", "scale": "2x"],
        ["size": "83.5x83.5", "idiom": "ipad", "filename": "appicon-167.png", "scale": "2x"],
        ["size": "1024x1024", "idiom": "ios-marketing", "filename": "appicon-1024.png", "scale": "1x"],
    ],
    "info": ["version": 1, "author": "xcode"],
]

try! JSONSerialization.data(withJSONObject: json, options: [.prettyPrinted]).write(to: iconsetURL.appendingPathComponent("Contents.json", isDirectory: false))

print("Opening ImageOptim")

NSWorkspace.shared.open([iconsetURL], withAppBundleIdentifier: "net.pornel.ImageOptim", options: [], additionalEventParamDescriptor: nil, launchIdentifiers: nil)

print("Complete! (but you should wait for ImageOptim)")