Authentication API

PSPDFKit Processor has been deprecated and replaced by PSPDFKit Document Engine. All PSPDFKit Processor licenses will work as before and be supported until 15 May 2024 (we will contact you about license migration). To start using Document Engine, refer to the migration guide. With Document Engine, you’ll have access to robust new capabilities (read the blog for more information).
PSPDFKit Processor offers multiple authentication strategies; which one you use depends on the requirements of your application. This document will walk you through all of them and discuss their advantages and disadvantages.
No Authentication
By default, PSPDFKit Processor starts with no authentication method enabled. This means that to use the POST /build endpoint, no authentication header is necessary, and all valid requests are processed.
This authentication is ideal when you’re just getting started working with Processor, or if you plan to only use it locally on your machine.
Advantages:
-
Requires no additional setup on the server side.
-
Can send requests with no special authentication headers on the client side.
Disadvantages:
-
No authentication means you can’t control which operations are performed or restrict access to certain users.
API Token Authentication
To use the API token-based authentication, you need to set the API_AUTH_TOKEN environment variable to the token you want to use. That could look like this in your docker-compose.yml file:
version: "3.7"

services:
  processor:
    image: "pspdfkit/processor:2023.11.1"
    environment:
      API_AUTH_TOKEN: secret
Any request sent to your PSPDFKit Processor instance will now require an Authorization: Token token=<api_auth_token> header. Any request that doesn’t include an authorization header or includes the wrong token will be rejected. An example curl request could look like this:
curl -X POST http://localhost:5000/build \
  -H "Authorization: Token token=secret" \
  -o result.pdf \
  --fail \
  -F document=@document.pdf \
  -F logo=@logo.png \
  -F instructions='{
      "parts": [
        {
          "file": "document"
        }
      ],
      "actions": [
        {
          "type": "watermark",
          "image": "logo",
          "width": "25%"
        }
      ]
    }'
This authentication method is a great choice when your backend systems are interacting with Processor directly or the Processor endpoint isn’t exposed to the internet.
Advantages:
-
Compared to using JSON Web Token (JWT) authentication, the setup is relatively easy, with only a single secret needing to be shared between the server and client applications.
Disadvantages:
-
While the API token allows you to control who accesses PSPDFKit Processor, it doesn’t give you control over which operations are performed.
JSON Web Token (JWT) Authentication
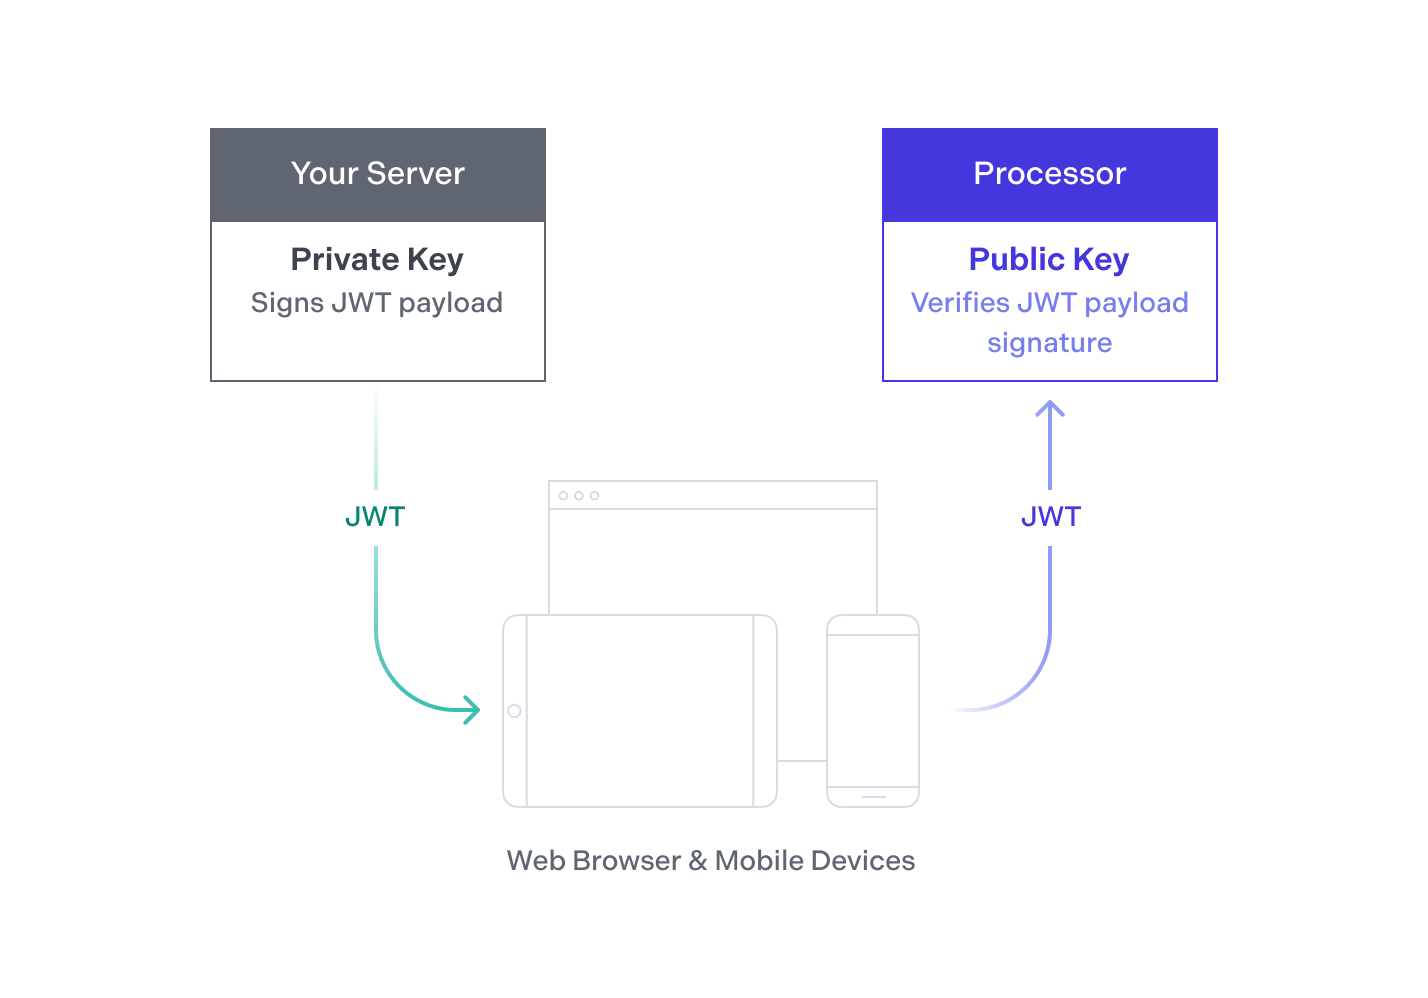
PSPDFKit Processor also supports the JWT standard for authentication. Your backend signs a JWT asserting that the holder of the token is allowed to process certain documents using certain operations. Next, it passes the JWT to your client apps. Your app then passes its token to the PSPDFKit Processor HTTP API to prove it’s allowed to process the document.
This authentication method is best for user-facing applications where you want to control who accesses Processor and what operations they perform.
Advantages:
-
JWT authentication gives you the most flexibility with granting permissions, as it allows you to both control who accesses Processor and decide what operations they’re allowed to run.
-
If you use JWT authentication, you can use the mobile Office conversion endpoint in your Android and iOS apps that also use the PSPDFKit SDK.
Disadvantages:
-
For the JWT authentication to work, you need an additional server component that has access to your private key and that can generate JWTs on behalf of your clients, making the initial setup more complicated.
-
Your clients need to make two requests for processing documents — one to obtain a JWT, and one to actually process the document.
Generating JWTs
You can generate a token with one of the many open source libraries that are available and listed on jwt.io.
Requirements
-
The JWT has to include the standard claim
"exp", which sets the deadline for the validity of the token. This needs to be a non-negative number using the Unix “Seconds Since the Epoch” timestamp format. -
The JWT has to be signed using an asymmetric cryptographic algorithm. PSPDFKit Processor supports the algorithms RS256, RS512, ES256, and ES512. See RFC 7518 for details about specific algorithms.
Optional Claims
We provide two optional claims that give you control over which documents can be processed and which operations can be applied to the document. You can use this to ensure the JWTs you create are only used on certain documents, with certain attachments, and to apply certain operations.
-
"allowed_files"— This controls which documents the operations may be applied to. You can use this if you want the JWT to only be used to process a specific set of documents, or to limit which attachments can be used. There are multiple options you can use.-
"any"or not specified at all — There’s no limitation on the documents that can be processed, meaning this token works on all documents and with all attachments. -
A JSON object containing the following:
-
Required —
file— One of:-
"any"— Any file can be processed. -
A list of SHA-256 hashes of the documents that can be processed.
-
-
Required —
url— One of:-
"any"— Any URL can be processed. -
A list of URLs documents can be processed from.
-
-
Required for every attachment — An object with the same name as the attachment containing one of:
-
"any"— Any attachment is allowed. -
A list of SHA-256 hashes allowed for the attachment with the given name.
-
-
-
-
"allowed_operations"— This controls which document operations may be applied. You can use this if you want this JWT to only be used for applying a specific set of operations, or to only permit specific operation types. Possible options:-
"any"or not specified at all — There’s no limitation on the operations that are applied, meaning all operations are allowed. -
A JSON object containing one or both:
-
"operationTypes"— A JSON array containing a list of all document operations permitted. Every document operation that’s not part of this list will be rejected unless explicitly permitted by a list of operations, as described below. -
"operations"— A JSON array containing a list of operation sets that are allowed. Keep in mind that this needs to match the specified operations exactly. Even if an operation isn’t permitted byoperationTypes, as long as the operation set matches, the operation will be permitted.
-
-
Generating Tokens
The following example shows the creation of a JWT in a Node/Express app using the jsonwebtoken library. It assumes you chose the RS256 algorithm and have created a pair of private and public keys.
To create a key, use openssl:
openssl genrsa -out jwtRS256.key 4096

# Get the public key in PEM format:
openssl rsa -in jwtRS256.key -pubout -outform PEM -out jwtRS256_pub.pem
Now use the private key to sign the tokens you hand out to the clients and add the public key to the Processor’s configuration so that Processor will be able to validate the tokens’ signatures.
If you want to quickly test PSPDFKit Processor, you can also use the key from our example apps (passphrase: secret). Make sure to change to a self-generated key before going into production:
// index.js

const express = require('express');
const router = express.Router();
const fs = require('fs');
const jwt = require('jsonwebtoken');
const key = fs.readFileSync('./jwt.pem');
const token = jwt.sign(
	{ allowed_operations: 'any', allowed_files: 'any' },
	key,
	{
		algorithm: 'RS256',
		expiresIn: 60 * 60, // 1hr, this will set the `exp` claim for us.
	},
);

/* GET home page. */
router.get('/', function (req, res, next) {
	res.render('index', { token: token });
});

module.exports = router;