An image can be added to a PDF file in two ways:
Drawing an Image to a PDF Page
To draw an image as a part of a PDF page, follow the steps outlined below.
-
Load the PDF file.
-
Add the specified image as a resource by using one of the following methods:
-
AddJpegImageFromFile, which is where you specify the path to the image. -
AddJpegImageFromStream, with which you specify the stream containing an image.
-
-
Set the origin of the coordinate system with the
SetOriginmethod. This method requires thePdfOriginenumeration, which accepts the following values:
-
PdfOriginTopLeft -
PdfOriginTopRight -
PdfOriginBottomRight -
PdfOriginBottomLeft
-
Set the dimension units with the
SetMeasurementUnitmethod, which uses thePdfMeasurementUnitenumeration as an argument. It allows the following values:
-
PdfMeasurementUnitCentimeter -
PdfMeasurementUnitMillimeter -
PdfMeasurementUnitInch -
PdfMeasurementUnitPoint -
PdfMeasurementUnitUndefined
-
Select the PDF page you want to add the image to with the
SelectPagemethod. -
Draw the image to the PDF page with the
DrawImagemethod. This method requires the following parameters:
-
ImageResName— Image resource name. -
DstX— Horizontal distance of the bottom-left corner of the PDF file, where the image is drawn. -
DstY— Vertical distance of the bottom-left corner of the PDF file, where the image is drawn. -
Width— Width of the drawn image resource. -
Height— Height of the drawn image resource.
To add an image to the first and the last PDF page, use the following code:
using GdPicturePDF gdpicturePDF = new GdPicturePDF();
gdpicturePDF.LoadFromFile(@"C:\temp\source.pdf");
// Add an image as a resource.
string image = gdpicturePDF.AddJpegImageFromFile(@"C:\temp\source.jpg");
// Set the origin of the coordinate system to the top-left corner.
gdpicturePDF.SetOrigin(PdfOrigin.PdfOriginTopLeft);
// Set the measurement units to millimeters.
gdpicturePDF.SetMeasurementUnit(PdfMeasurementUnit.PdfMeasurementUnitMillimeter);
var width = gdpicturePDF.GetPageWidth();
// Select the first page of the PDF file.
gdpicturePDF.SelectPage(1);
// Draw the image to the top-center of the PDF page.
gdpicturePDF.DrawImage(image, (width - 10) / 2, 15, 10, 10);
// Select the last page of the PDF file.
gdpicturePDF.SelectPage(gdpicturePDF.GetPageCount());
// Change the origin of the coordinate system to the bottom-left corner.
gdpicturePDF.SetOrigin(PdfOrigin.PdfOriginBottomLeft);
// Draw the image to the bottom-center of the PDF page.
gdpicturePDF.DrawImage(image, (width - 10) / 2, 5, 10, 10);
gdpicturePDF.SaveToFile(@"C:\temp\output.pdf");
Using gdpicturePDF As GdPicturePDF = New GdPicturePDF()
    gdpicturePDF.LoadFromFile("C:\temp\source.pdf")
    ' Add an image as a resource.
    Dim image As String = gdpicturePDF.AddJpegImageFromFile("C:\temp\source.jpg")
    ' Set the origin of the coordinate system to the top-left corner.
    gdpicturePDF.SetOrigin(PdfOrigin.PdfOriginTopLeft)
    ' Set the measurement units to millimeters.
    gdpicturePDF.SetMeasurementUnit(PdfMeasurementUnit.PdfMeasurementUnitMillimeter)
    Dim width = gdpicturePDF.GetPageWidth()
    ' Select the first page of the PDF file.
    gdpicturePDF.SelectPage(1)
    ' Draw the image to the top-center of the PDF page.
    gdpicturePDF.DrawImage(image, (width - 10) / 2, 15, 10, 10)
    ' Select the last page of the PDF file.
    gdpicturePDF.SelectPage(gdpicturePDF.GetPageCount())
    ' Change the origin of the coordinate system to the bottom-left corner.
    gdpicturePDF.SetOrigin(PdfOrigin.PdfOriginBottomLeft)
    ' Draw the image to the bottom-center of the PDF page.
    gdpicturePDF.DrawImage(image, (width - 10) / 2, 5, 10, 10)
    gdpicturePDF.SaveToFile("C:\temp\output.pdf")
End Using
Used Methods
Related Topics
Adding an Image as a Separate PDF Page
To add an image as a separate PDF page at the end of a file, follow the steps outlined below.
-
Load the PDF file.
-
Create a GdPicture image from the specified file using the
CreateGdPictureImageFromFilemethod. -
Insert the image as a separate page at the end of the file with one of the following methods:
Both methods, AddImageFromGdPictureImage and AddImageFromBitmap, require the following parameters:
-
Either
imageIDorbitmap. -
ImageMask— Indicates whether the inserted image is treated as an image mask (or stencil mask). The recommended default value isfalse. Applicable only for 1 bit per pixel images. -
DrawImage— Set this parameter totrue, which adds a new page, and the image is drawn on its whole surface.
To add an image as a separate page, use the following code:
using GdPicturePDF gdpicturePDF = new GdPicturePDF();
using GdPictureImaging gdpictureImaging = new GdPictureImaging();
gdpicturePDF.LoadFromFile(@"C:\temp\source.pdf");
// Add an image as a resource.
int imageID = gdpictureImaging.CreateGdPictureImageFromFile(@"C:\temp\source.jpg");
// Add the image to a new page.
gdpicturePDF.AddImageFromGdPictureImage(imageID, false, true);
gdpicturePDF.SaveToFile(@"C:\temp\output.pdf");
gdpictureImaging.ReleaseGdPictureImage(imageID);
Using gdpicturePDF As GdPicturePDF = New GdPicturePDF()
Using gdpictureImaging As GdPictureImaging = New GdPictureImaging()
    gdpicturePDF.LoadFromFile("C:\temp\source.pdf")
    ' Add an image as a resource.
    Dim imageID As Integer = gdpictureImaging.CreateGdPictureImageFromFile("C:\temp\source.jpg")
    ' Add the image to a new page.
    gdpicturePDF.AddImageFromGdPictureImage(imageID, False, True)
    gdpicturePDF.SaveToFile("C:\temp\output.pdf")
    gdpictureImaging.ReleaseGdPictureImage(imageID)
End Using
End Using
Used Methods
Related Topics
Drawing an Image onto Another Image
The easiest way to draw an image onto another image is by using the DrawGdPictureImage method. It requires the following parameters:
-
SrcImage— GdPicture image ID of the drawn image. -
DestImage— GdPicture image ID of the image being drawn on. -
DstLeft— Horizontal distance (in pixels) of the upper-left corner of the destination image. -
DstTop— Vertical distance (in pixels) of the upper-left corner of the destination image. -
DstWidth— Width (in pixels) of the drawn image. -
DstHeight— Height (in pixels) of the drawn image. -
InterpolationMode— Member of theDrawing.2D.InterPolationModeenumeration, which specifies the algorithm that’s used when an image is scaled or rotated. The possible fields are:-
Bicubic -
Bilinear -
Default -
High -
HighQualityBicubic -
HighQualityBilinear -
Invalid -
Low -
NearestNeighbor
-
The following code example creates scaled-down copies of an image and pastes them in rows and columns:
using GdPictureImaging gdpictureImaging = new GdPictureImaging();
int imageSourceID = gdpictureImaging.CreateGdPictureImageFromFile(@"C:\temp\source.jpg");
// Set the destination GdPicture image from the same file as the source image.
int imageDestID = gdpictureImaging.CreateGdPictureImageFromFile(@"C:\temp\source.jpg");
// Set the number of copies in a row and column.
int rows = 5, cols = 5;
// Get the image width and height.
int widthDest = gdpictureImaging.GetWidth(imageDestID);
int heightDest = gdpictureImaging.GetHeight(imageDestID);
// Get the scaled-down source image width and height.
int widthSource = gdpictureImaging.GetWidth(imageSourceID) / cols;
int heightSource = gdpictureImaging.GetHeight(imageSourceID) / rows;
for (int x = 0; x < rows; x++)
{
    for (int y = 0; y < cols; y++)
    {
        // Draw the miniaturized source image copy into the destination image.
        gdpictureImaging.DrawGdPictureImage(imageSourceID, imageDestID,
            y * widthSource, x * heightSource, widthSource, heightSource,
            InterpolationMode.Default);
    }
}
gdpictureImaging.SaveAsJPEG(imageDestID, @"C:\temp\output.jpg");
gdpictureImaging.ReleaseGdPictureImage(imageSourceID);
gdpictureImaging.ReleaseGdPictureImage(imageDestID);
Using gdpictureImaging As GdPictureImaging = New GdPictureImaging()
    Dim imageSourceID As Integer = gdpictureImaging.CreateGdPictureImageFromFile("C:\temp\source.jpg")
    ' Set the destination GdPicture image from the same file as the source image.
    Dim imageDestID As Integer = gdpictureImaging.CreateGdPictureImageFromFile("C:\temp\source.jpg")
    ' Set the number of copies in a row and column.
    Dim rows = 5, cols = 5
    ' Get the image width and height.
    Dim widthDest As Integer = gdpictureImaging.GetWidth(imageDestID)
    Dim heightDest As Integer = gdpictureImaging.GetHeight(imageDestID)
    ' Get the scaled-down source image width and height.
    Dim widthSource As Integer = gdpictureImaging.GetWidth(imageSourceID) / cols
    Dim heightSource As Integer = gdpictureImaging.GetHeight(imageSourceID) / rows
    For x = 0 To rows - 1
        For y = 0 To cols - 1
            ' Draw the miniaturized source image copy into the destination image.
            gdpictureImaging.DrawGdPictureImage(imageSourceID, imageDestID,
                y * widthSource, x * heightSource, widthSource, heightSource,
                InterpolationMode.[Default])
        Next
    Next
    gdpictureImaging.SaveAsJPEG(imageDestID, "C:\temp\output.jpg")
    gdpictureImaging.ReleaseGdPictureImage(imageSourceID)
    gdpictureImaging.ReleaseGdPictureImage(imageDestID)
End Using
Used Methods
Related Topics

The GdPicture image destination is using the same image file as the image source. Because of that, there’s no need to calculate the margin required to make sure that the miniaturized copies are scaled proportionally.
Drawing a Clipped Image
To draw an image onto another image on an area specified by a polygonal shape, use the DrawGdPictureImageClipped method. To use this method, you only have to define the source and destination GdPicture images, together with the polygonal shape, which is defined as an array of two-dimensional points.
To draw an image onto another image with a 5 percent margin, use the following code:
using GdPictureImaging gdpictureImaging = new GdPictureImaging();
int imageSourceID = gdpictureImaging.CreateGdPictureImageFromFile(@"C:\temp\source.jpg");
int imageDestID = gdpictureImaging.CreateGdPictureImageFromFile(@"C:\temp\destination.jpg");
// Get the image width and height.
int width = gdpictureImaging.GetWidth(imageDestID);
int height = gdpictureImaging.GetHeight(imageDestID);
// Define the points of the polygonal shape.
Point[] points = {
    new Point(0, 0),
    new Point(width, height),
    new Point(0, height)
};
// Draw the source image onto the destination image.
gdpictureImaging.DrawGdPictureImageClipped(imageSourceID, imageDestID, points);
gdpictureImaging.SaveAsJPEG(imageDestID, @"C:\temp\output.jpg"); ;
gdpictureImaging.ReleaseGdPictureImage(imageSourceID);
gdpictureImaging.ReleaseGdPictureImage(imageDestID);
Using gdpictureImaging As GdPictureImaging = New GdPictureImaging()
    Dim imageSourceID As Integer = gdpictureImaging.CreateGdPictureImageFromFile("C:\temp\source.jpg")
    Dim imageDestID As Integer = gdpictureImaging.CreateGdPictureImageFromFile("C:\temp\source.jpg")
    ' Get the image width and height.
    Dim width As Integer = gdpictureImaging.GetWidth(imageDestID)
    Dim height As Integer = gdpictureImaging.GetHeight(imageDestID)
    ' Define the points of the polygonal shape.
    Dim points As Point() = {New Point(0, 0), New Point(width, height), New Point(0, height)}
    ' Draw the source image onto the destination image.
    gdpictureImaging.DrawGdPictureImageClipped(imageSourceID, imageDestID, points)
    gdpictureImaging.SaveAsJPEG(imageDestID, "C:\temp\output.jpg")
    gdpictureImaging.ReleaseGdPictureImage(imageSourceID)
    gdpictureImaging.ReleaseGdPictureImage(imageDestID)
End Using
Used Methods
Related Topics
If the area defined by the polygonal shape is bigger than the source image, then the source image will be multiplied, both vertically and horizontally, until the whole polygonal shape is filled.
Drawing Part of an Image
To draw a part of an image onto another image, use the DrawGdPictureImageRect method. It uses the same parameters that the DrawGdPictureImage method does, with the addition of the position and size parameters for the source image that you want to draw from:
-
SrcLeft— Horizontal distance (in pixels) of the upper-left corner of the source image. -
SrcTop— Vertical distance (in pixels) of the upper-left corner of the source image. -
SrcWidth— Width (in pixels) of the image being drawn from. -
SrcHeight— Height (in pixels) of the image being drawn from.
This code example divides an image in half and replaces the location of those halves:
using GdPictureImaging gdpictureImaging = new GdPictureImaging();
int imageSourceID = gdpictureImaging.CreateGdPictureImageFromFile(@"C:\temp\source.jpg");
// Set the destination GdPicture image from the same file as the source image.
int imageDestID = gdpictureImaging.CreateGdPictureImageFromFile(@"C:\temp\source.jpg");
// Get the image width and height.
int width = gdpictureImaging.GetWidth(imageDestID);
int height = gdpictureImaging.GetHeight(imageDestID);
// Draw the upper half of the image on the bottom.
gdpictureImaging.DrawGdPictureImageRect(imageSourceID, imageDestID,
    0, height / 2, width, height / 2, 0, 0, width, height / 2, InterpolationMode.Default);
// Draw the lower half of the image on the top.
gdpictureImaging.DrawGdPictureImageRect(imageSourceID, imageDestID,
    0, 0, width, height / 2, 0, height / 2, width, height / 2, InterpolationMode.Default);
gdpictureImaging.SaveAsJPEG(imageDestID, @"C:\temp\output.jpg");
gdpictureImaging.ReleaseGdPictureImage(imageSourceID);
gdpictureImaging.ReleaseGdPictureImage(imageDestID);
Using gdpictureImaging As GdPictureImaging = New GdPictureImaging()
    Dim imageSourceID As Integer = gdpictureImaging.CreateGdPictureImageFromFile("C:\temp\source.jpg")
    ' Set the destination GdPicture image from the same file as the source image.
    Dim imageDestID As Integer = gdpictureImaging.CreateGdPictureImageFromFile("C:\temp\source.jpg")
    ' Get the image width and height.
    Dim width As Integer = gdpictureImaging.GetWidth(imageDestID)
    Dim height As Integer = gdpictureImaging.GetHeight(imageDestID)
    ' Draw the upper half of the image on the bottom.
    gdpictureImaging.DrawGdPictureImageRect(imageSourceID, imageDestID,
        0, height / 2, width, height / 2, 0, 0, width, height / 2, InterpolationMode.[Default])
    ' Draw the lower half of the image on the top.
    gdpictureImaging.DrawGdPictureImageRect(imageSourceID, imageDestID,
        0, 0, width, height / 2, 0, height / 2, width, height / 2, InterpolationMode.[Default])
    gdpictureImaging.SaveAsJPEG(imageDestID, "C:\temp\output.jpg")
    gdpictureImaging.ReleaseGdPictureImage(imageSourceID)
    gdpictureImaging.ReleaseGdPictureImage(imageDestID)
End Using
Used Methods
Related Topics
Drawing a Transparent Image
To draw a part of an image onto another image, use the DrawGdPictureImageTransparency method. It uses the same parameters that the DrawGdPictureImage method does, with the addition of the Transparency parameter, which defines the transparency of the image you’re drawing onto another image. The range of this parameter is between 0 (fully opaque) and 255 (fully transparent).
This code example draws two monocolor images onto another image with a black background. The red image is drawn fully opaque, and the blue image is drawn with its transparency set to 100:
using GdPictureImaging gdpictureImaging = new GdPictureImaging();
InterpolationMode iMode = InterpolationMode.Default;
int width = 180, height = 180, transparency = 100;
// Create images.
int backImage = gdpictureImaging.CreateNewGdPictureImage(340, 340, 24, 0);
int redImage = gdpictureImaging.CreateNewGdPictureImage(width, height, 24,
    gdpictureImaging.ARGBI(255, 255, 0, 0));
int blueImage = gdpictureImaging.CreateNewGdPictureImage(width, height, 24,
    gdpictureImaging.ARGBI(255, 0, 0, 255));
// Draw the red image without transparency.
gdpictureImaging.DrawGdPictureImageTransparency(redImage, backImage,
    0, 25, 25, width, height, iMode);
// Draw the blue image with a defined transparency.
gdpictureImaging.DrawGdPictureImageTransparency(blueImage, backImage,
    transparency, 135, 135, width, height, iMode);
gdpictureImaging.SaveAsJPEG(backImage, @"C:\temp\output.png");
gdpictureImaging.ReleaseGdPictureImage(redImage);
gdpictureImaging.ReleaseGdPictureImage(blueImage);
gdpictureImaging.ReleaseGdPictureImage(backImage);
Using gdpictureImaging As GdPictureImaging = New GdPictureImaging()
    Dim iMode As InterpolationMode = InterpolationMode.[Default]
    Dim width = 180, height = 180, transparency = 100
    ' Create images.
    Dim backImage As Integer = gdpictureImaging.CreateNewGdPictureImage(340, 340, 24, 0)
    Dim redImage As Integer = gdpictureImaging.CreateNewGdPictureImage(width, height, 24, gdpictureImaging.ARGBI(255, 255, 0, 0))
    Dim blueImage As Integer = gdpictureImaging.CreateNewGdPictureImage(width, height, 24, gdpictureImaging.ARGBI(255, 0, 0, 255))
    ' Draw the red image without transparency.
    gdpictureImaging.DrawGdPictureImageTransparency(redImage, backImage, 0, 25, 25, width, height, iMode)
    ' Draw the blue image with a defined transparency.
    gdpictureImaging.DrawGdPictureImageTransparency(blueImage, backImage, transparency, 135, 135, width, height, iMode)
    gdpictureImaging.SaveAsJPEG(backImage, "C:\temp\output.png")
    gdpictureImaging.ReleaseGdPictureImage(redImage)
    gdpictureImaging.ReleaseGdPictureImage(blueImage)
    gdpictureImaging.ReleaseGdPictureImage(backImage)
End Using
Used Methods
Related Topics
Drawing a Skewed Image
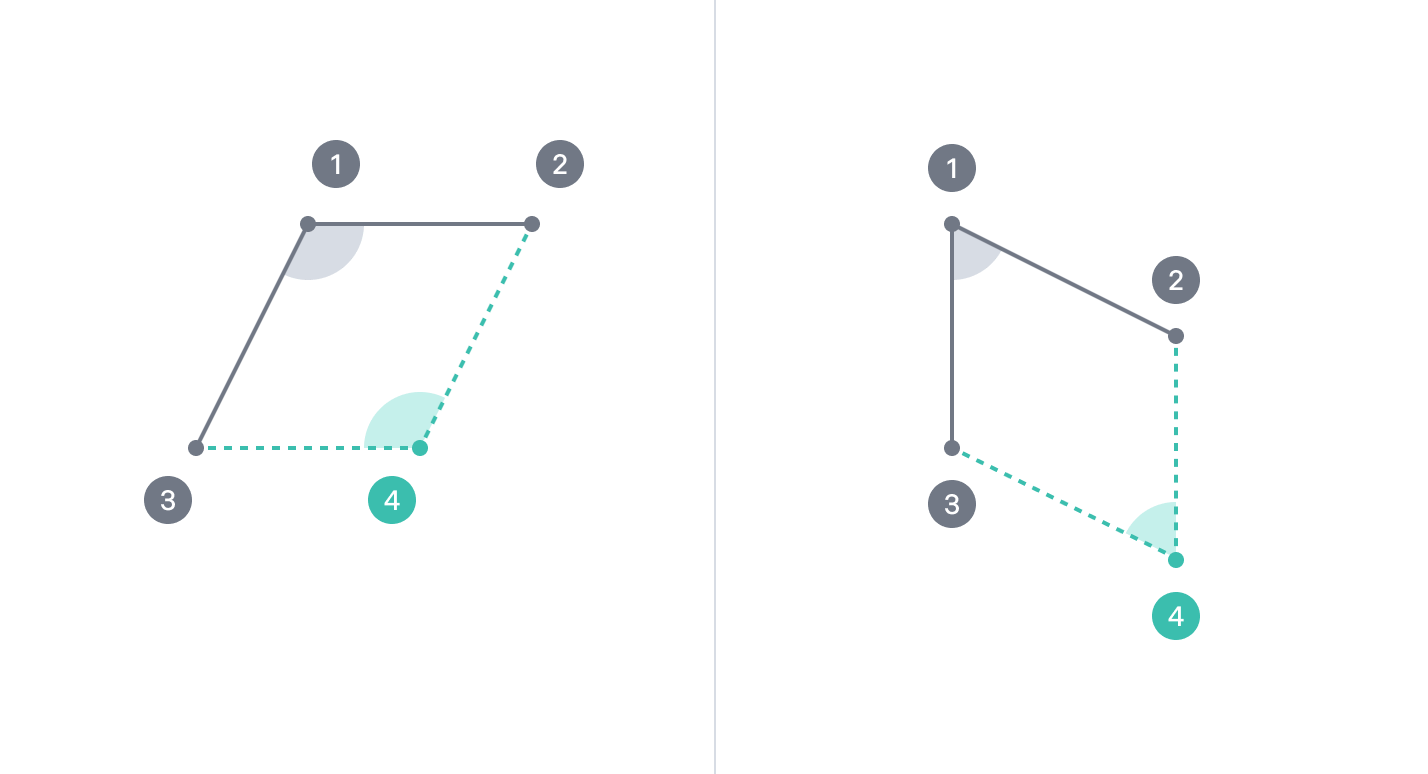
The DrawGdPictureImageSkewing method allows you to draw a skewed image onto another image. This method requires the GdPicture image IDs of the source and destination images, as well as a set of three pairs of coordinates (in pixels) defining the placement of three corners of the source image in relation to the destination image. The first point is the upper-left corner, the second point is the upper-right corner, and the last point is the bottom-left corner. This method also requires the InterpolationMode parameter (for more information, go to the Drawing an Image onto Another Image section) and the AntiAlias Boolean parameter, which specifies whether the image should be drawn using the anti-aliasing algorithm.
The skewing direction depends on the position of the three defined corners. The distance and angle of the fourth corner in relation to the third defined point is the same as the distance and angle of the line between the first and the second point.
To draw a vertically skewed image onto another image, use the following code:
using GdPictureImaging gdpictureImaging = new GdPictureImaging();
int imageSourceID = gdpictureImaging.CreateGdPictureImageFromFile(@"C:\temp\source.jpg");
int imageDestID = gdpictureImaging.CreateGdPictureImageFromFile(@"C:\temp\destination.jpg");
// Draw an image skewed horizontally onto another image.
gdpictureImaging.DrawGdPictureImageSkewing(imageSourceID, imageDestID,
    0, 0, 500, 500, 0, 500, InterpolationMode.Default, true);
gdpictureImaging.SaveAsJPEG(imageDestID, @"C:\temp\output.jpg"); ;
gdpictureImaging.ReleaseGdPictureImage(imageSourceID);
gdpictureImaging.ReleaseGdPictureImage(imageDestID);
Using gdpictureImaging As GdPictureImaging = New GdPictureImaging()
    Dim imageSourceID As Integer = gdpictureImaging.CreateGdPictureImageFromFile("C:\temp\source.jpg")
    Dim imageDestID As Integer = gdpictureImaging.CreateGdPictureImageFromFile("C:\temp\destination.jpg")
    ' Draw an image skewed horizontally onto another image.
    gdpictureImaging.DrawGdPictureImageSkewing(imageSourceID, imageDestID,
        0, 0, 500, 500, 0, 500, InterpolationMode.[Default], True)
    gdpictureImaging.SaveAsJPEG(imageDestID, "C:\temp\output.jpg")
    gdpictureImaging.ReleaseGdPictureImage(imageSourceID)
    gdpictureImaging.ReleaseGdPictureImage(imageDestID)
End Using