How to Integrate Digital Signatures with AWS CloudHSM
This how-to guide covers how to implement a simplified software architecture in which the signing and all the related cryptographic operations are done via a hardware security model (HSM) offered by Amazon’s AWS CloudHSM service.
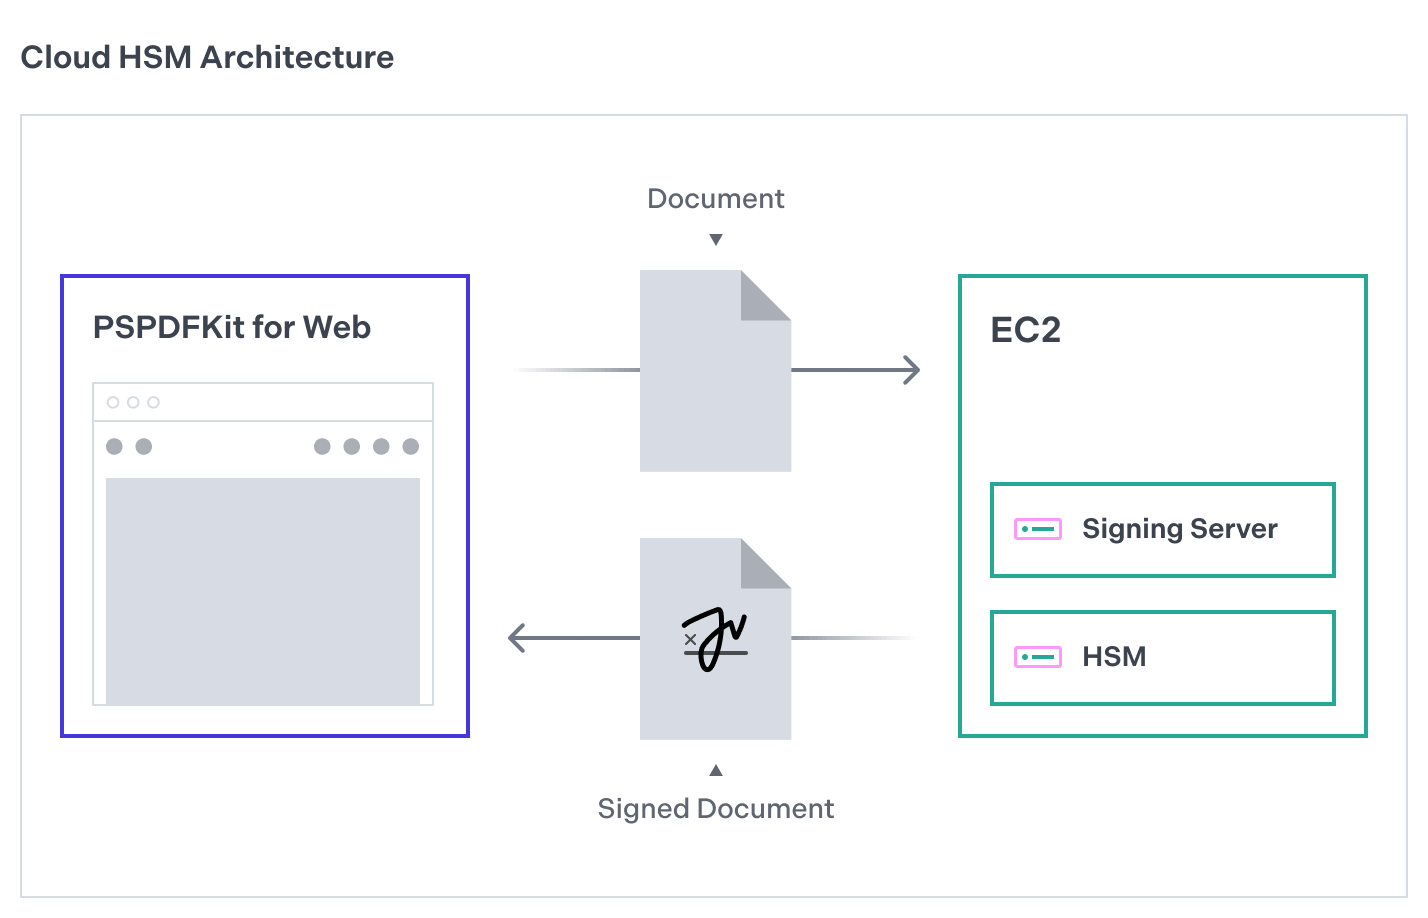
The following image shows how the architecture of this signing solution will look.

The remainder of this guide will focus on the key aspects needed for the signing service to work. For a complete reference, refer to the full example project on GitHub.
Setting Up the AWS Cloud
Follow the official CloudHSM getting started guide to create an AWS EC2 instance and an HSM cluster that will store the cryptographic keys for signing documents.
When you have the EC2 instance and the HSM cluster running, install the PKCS #11 library in the EC2 client instance. To do this, you can follow the official PKCS #11 installation guide in AWS.
The next section will focus on the server’s implementation on the cloud instance you just created. The signing application will be a Node.js web server built using the Express framework, so you first need to get a Node.js installation ready in your EC2 instance. Follow this Node installation guide to install it.
Setting Up the Signing Server
The signing server application will be a web server that listens on HTTP connections and features a single /sign POST endpoint for handling signing requests. For this, use the Express framework with a cors middleware, in order to offer full CORS support.
Create a new directory to host the application, and run npm init -y to create a basic structure that will allow you to add dependencies through npm. To use the ES modules syntax, go to the created package.json file and add the "type": "module" declaration to it.
Install Express and the CORS middleware:
npm install express cors
To set up the Express web server, create an index.js file and add the following code to it:
// index.js
import express from 'express';
import cors from 'cors';

const app = express();
const PORT = 3756;

app.use(cors());
app.use(express.json());

app.listen(PORT, () => {
  console.log('Server running on PORT ', PORT);
});
Try running the application with node index.js. You’ll see a message in the console letting you know the server is running. This example uses 3756 as the port number, but it can be a different value.
Now, add a /sign endpoint that will handle HTTP requests made with the POST method for signing. The endpoint will receive a Base64-encoded representation of the PDF contents to sign, which is provided by PSPDFKit for Web, and for now, it’ll return a JSON representation of it:
// index.js
app.post('/sign', (req, res) => {
  const { encodedContents } = req.body;
  res.json({ encodedContents });
});
Now that the basic server is running, you’ll move to the interesting stuff: HSM integration.
Modify your /sign endpoint in the following way:
// index.js
import generateSelfSignedX509Cert from './self-sign/index.js';
// ...
app.post('/sign', (req, res) => {
  const { encodedContents } = req.body;
  const fileContents = Buffer.from(encodedContents, 'base64');
  const result = generateSignature(fileContents, certificate);
  res.json({ p7: result });
});
In the code above, you first decode the PDF binary contents that you received over the network. Then, you call the generateSignature function (described later), passing it two arguments: the decoded PDF contents, and a reference to a certificate you’ll use to sign the document.
For creating the certificate in Node.js, use the Forge crypto library. Add it to the project with the following command:
$ npm install node-forge
The generateSignature function returns a PKCS #7 container as a PEM-encoded string that you return as part of the HTTP response. Here’s the full generateSignature implementation:
// index.js
import graphene from 'graphene-pk11';

function generateSignature(fileContents, certificate) {
  const mod = initHSM();
  const slot = mod.getSlots(0);
  let result = null;

  if (slot.flags & graphene.SlotFlag.TOKEN_PRESENT) {
    const session = loginHSMCU(slot);
    const keys = getRSAKeyPair(session);
    const signerFn = getSignerFn(session, keys);
    // Create a PKCS #7 container of the signature and the certificate.
    const p7 = createPKCS7Signature(
      fileContents,
      certificate,
      signerFn,
    );

    // Convert the PKCS #7 to a Base64-encoded string for sending it over the network.
    result = Buffer.from(
      forge.asn1.toDer(p7.toAsn1()).getBytes(),
      'binary',
    ).toString('base64');

    // Log out of the HSM and close the session.
    session.logout();
    session.close();
  } else {
    console.error('Slot is not initialized');
  }

  mod.finalize();

  return result;
}
Follow the steps to install Client SDK 5 for the PKCS #11 library if you haven’t already. This is a preliminary step in enabling communication with the HSM via Node.js. You’ll use an npm package called graphene-pk11 to communicate with the HSM via Node.js.
The generateSignature function works as follows. First, it initiates the HSM connection by calling the initHSM function. Create an hsm.js file and add the implementation of initHSM, like this:
// hsm.js
import graphene from 'graphene-pk11';

export function initHSM() {
  const Module = graphene.Module;
  const mod = Module.load(
    '/opt/cloudhsm/lib/libcloudhsm_pkcs11.so',
    'CloudHSM',
  );

  mod.initialize();

  return mod;
}
The /opt/cloudhsm/lib/libcloudhsm_pkcs11.so path is the default location of the PKCS#11 native library in Amazon Linux 2 after installation. The initHSM function returns a Module object from which you can access different functionalities offered by the cloud HSM.
Now we need to set up a crypto user (CU) that will be authorized to execute cryptographic operations within the HSM. Read the official guide on HSM users to learn about the different roles and how to create new ones. To interact with the HSM from the Node.js application, you’ll need to create a CU account. Refer to the guide on how to create users for instructions.
Once you’ve created a CU, modify hsm.js and add support for logging in to the HSM:
// hsm.js
const slot = mod.getSlots(0);

export function loginHSMCU(slot) {
  const session = slot.open(
    graphene.SessionFlag.SERIAL_SESSION |
    graphene.SessionFlag.RW_SESSION,
  );

  session.login(process.env.PIN, graphene.UserType.User);

  return session;
}
Start a new read-write session in the first slot from the HSM module. Aim to receive a string that contains login credentials. You’ll get these credentials from the PIN environment variable. According to AWS, login credentials should be formatted as "user:password". For instance, if the CU is named cu_user and the password is test, you’d set the PIN environment variable as PIN=cu_user:test.
Once you’re logged in and you’ve obtained a session reference, you can create a pair of keys (public and private) to use for building a digital signature. In this particular example, you’ll create a pair of keys using the RSA mechanism. Since the HSMs provided by CloudHSM are able to store key pairs, first check the HSM to find existing keys. If they’re found, use them. Otherwise, create and store a new pair:
// hsm.js
export function getRSAKeyPair(session) {
  const privateKeys = session.find({
    class: graphene.ObjectClass.PRIVATE_KEY,
  });

  if (privateKeys.length > 0) {
    console.log('Existing private key found in the HSM...');
    // Get the first private key and the public key.
    const privateKey = privateKeys.items(0);
    const publicKey = session
        .find({ class: graphene.ObjectClass.PUBLIC_KEY })
        .items(0);

    return { privateKey, publicKey };
  }
  console.log(
    'No key pair found. Will use the HSM to create a new one...',
  );

  return session.generateKeyPair(
    graphene.KeyGenMechanism.RSA,
    {
        keyType: graphene.KeyType.RSA,
        modulusBits: 2048, // Set the size of the key to 2048 bits.
        publicExponent: new Uint8Array([1, 0, 1]), // Set the public exponent to 65537 (0x010001)
        token: true, // Store the key on the HSM.
        verify: true, // The key can be used for verification.
        encrypt: true, // The key can be used for encryption.
        wrap: true, // The key can be used for wrapping other keys.
        extractable: true, // The key can be extracted.
    },
    {
        keyType: graphene.KeyType.RSA,
        token: true, // Store the key on the HSM.
        sign: true, // The key can be used for signing.
        decrypt: true, // The key can be used for decryption.
        unwrap: true, // The key can be used for unwrapping other keys.
        extractable: false, // Important: we don't want to allow this key to be extracted.
    },
  );
}
The session.generateKeyPair function takes the algorithm to create the keys as the first argument, the public key properties as the second argument, and the properties of the private key as the last one.
It’s important to use token: true for both keys. This instructs the HSM to store the created keys in the device. This will enable you to reuse them in the future:
// hsm.js
export function getSignerFn(session, keys) {
  return {
    sign: (md) => {
      // Create a signature prefix (ASN.1 sequence) to indicate that the signature is a digest
      // of a previously hashed message.
      const prefix = Buffer.from([
        // ...omitted for brevity...
      ]);
      // Concatenate the prefix and the message digest.
      let buf = Buffer.concat([
        prefix,
        Buffer.from(md.digest().toHex(), 'hex'),
      ]);
      let sign = session.createSign('RSA_PKCS', keys.privateKey);

      return sign.once(buf).toString('binary');
    },
  };
}
The arguments of the getSignerFn function are session, the initialized graphene-pk11 session, and keys, which is the reference to the key pair.
This function returns an object with a sign property that is, in turn, a function that takes a single argument: md. md is the message digest to sign. This function is the one that the Forge library calls behind the scenes.
Once you concatenate the SHA-256 identifier prefix with the digest, call session.createSign to create the signing reference, and then sign.once(buf) to create the signature in a single step, which you’ll then return as a binary string.
Here’s the implementation of createPKCS7Signature:
// index.js
function createPKCS7Signature(fileContents, cert, signerFn) {
  const p7 = forge.pkcs7.createSignedData();

  p7.content = new forge.util.ByteBuffer(fileContents);
  p7.addCertificate(cert);
  p7.addSigner({
    key: signerFn,
    certificate: cert,
    // This bit is important; you must choose an algorithm supported by the key vault.
    // SHA1 isn't supported, for example.
    digestAlgorithm: forge.pki.oids.sha256,
    authenticatedAttributes: [
      {
        type: forge.pki.oids.contentType,
        value: forge.pki.oids.data,
      },
      {
        type: forge.pki.oids.messageDigest,
        // Value will be auto-populated at signing time.
      },
      {
        type: forge.pki.oids.signingTime,
        value: new Date(),
      },
    ],
  });
  p7.sign({ detached: true });

  return p7;
}
Initialize a Forge container for PKCS #7 signatures, in which you specify the content to sign; the X.509 certificate to use; your signerFn reference instead of a private key (again, to perform the signing portion in the HSM); SHA-256 as the hashing algorithm (this is important, since using SHA-1 won’t produce a valid signature); and additional attributes.
Then, invoke p7.sign({ detached: true }); to produce a detached signature (i.e. a PKCS #7 container in which the contents that were signed aren’t included).
This finishes the key aspects of the signing server’s implementation. The next section will explain how to communicate with the signing server from the frontend app that runs PSPDFKit for Web.
Setting Up the Frontend
As described in Sign a PDF Document, the main API to start the signing process is PSPDFKit.instance#signDocument. You can call this API as follows:
instance.signDocument(null, generatePKCS7);The implementation of generatePKCS7 will complete the creation of a PKCS#7 signature by calling the signing service, specifically its /sign POST endpoint:
async function generatePKCS7({ fileContents, hash }) {
  const encodedContents = btoa(
    String.fromCharCode.apply(null, new Uint8Array(fileContents))
  );
  const response = await fetch('http://localhost:3756/sign', {
    method: 'POST',
    body: JSON.stringify({
      hash,
      encodedContents,
    }),
    headers: {
      'Content-Type': 'application/json',
    },
  });
  const json = await response.json();
  const arrayBuffer = base64ToArrayBuffer(json.p7);

  return arrayBuffer;
}
PSPDFKit passes the binary range to sign, along with its digest, to the generatePKCS7 function. The function encodes the contents and sends them to the HSM signing service (in this example, the server is running in http://localhost:3756). Then, the function decodes the Base64-encoded PKCS #7 container and returns it as an ArrayBuffer. When generatePKCS7 returns, PSPDFKit for Web is able to produce a valid digitally signed document.