How to Programmatically Create and Fill PDF Forms in Angular
In Angular applications, you can create and fill PDF forms programmatically using libraries like pdf-lib. In this blog post, you’ll learn how to generate a PDF form and populate its fields with values using Angular and the pdf-lib library.
Prerequisites
Before getting started, ensure you have the necessary prerequisites in place:
-
Angular 16 installed on your development environment.
-
Basic understanding of Angular concepts.
Step 1 — Setting Up the Angular Project
-
To begin, you need to set up an Angular project. If you haven’t installed the Angular CLI, you can do so by running the following command:
npm install -g @angular/cli
Before running the command, ensure you have Node.js and Node Package Manager (npm) installed on your machine. You can download and install them from the official Node.js website.
-
Once the Angular CLI is installed, create a new Angular project using the following command:
ng new pdf-forms-angular
The Angular CLI will ask you information about the app configuration. Accept the defaults by repeatedly pressing the Enter key.
This will create a new directory named pdf-forms-angular with the basic structure and files for an Angular application.
-
Navigate to the project directory:
cd pdf-forms-angular
Step 2 — Setting Up the Angular Component
-
To get started, install pdf-lib by running the following command in your Angular project directory:
npm install pdf-lib
-
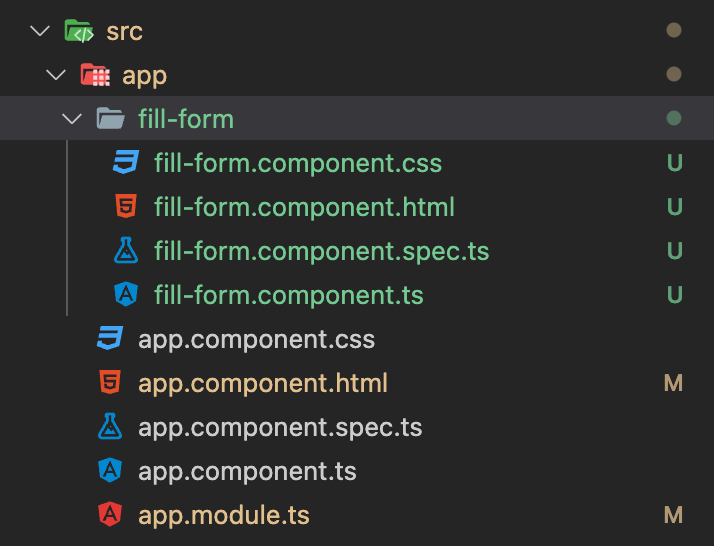
Then, create an Angular component to handle the form. For example, create a component called
FillFormComponent:
ng generate component fill-form
This will create a new directory with the component files named fill-form.
-
Next, open the
fill-form.component.tsfile and import the required modules, including thePDFDocumentclass from the pdf-lib library:
import { Component, OnInit } from '@angular/core';
import { PDFDocument } from 'pdf-lib';

@Component({
	selector: 'app-fill-form',
	templateUrl: './fill-form.component.html',
	styleUrls: ['./fill-form.component.css'],
})
export class FillFormComponent implements OnInit {
	constructor() {}

	ngOnInit(): void {
		this.generateAndFillPDF();
	}

	async generateAndFillPDF(): Promise<void> {
		// Implementation goes here.
	}
}
Step 3 — Generating the PDF Form
Inside the generateAndFillPDF() method, start by creating a new PDF document using PDFDocument.create(). Add a page to the document and retrieve the form object using pdfDoc.getForm().
Now, you can create a new PDF document and add form elements to it. For example, to add a text field, you can use the createTextField() method:
async generateAndFillPDF(): Promise<void> {
  const pdfDoc = await PDFDocument.create();
  const page = pdfDoc.addPage();
  const form = pdfDoc.getForm();

  // Implementation continues...
}
Step 4 — Creating and Filling Form Fields
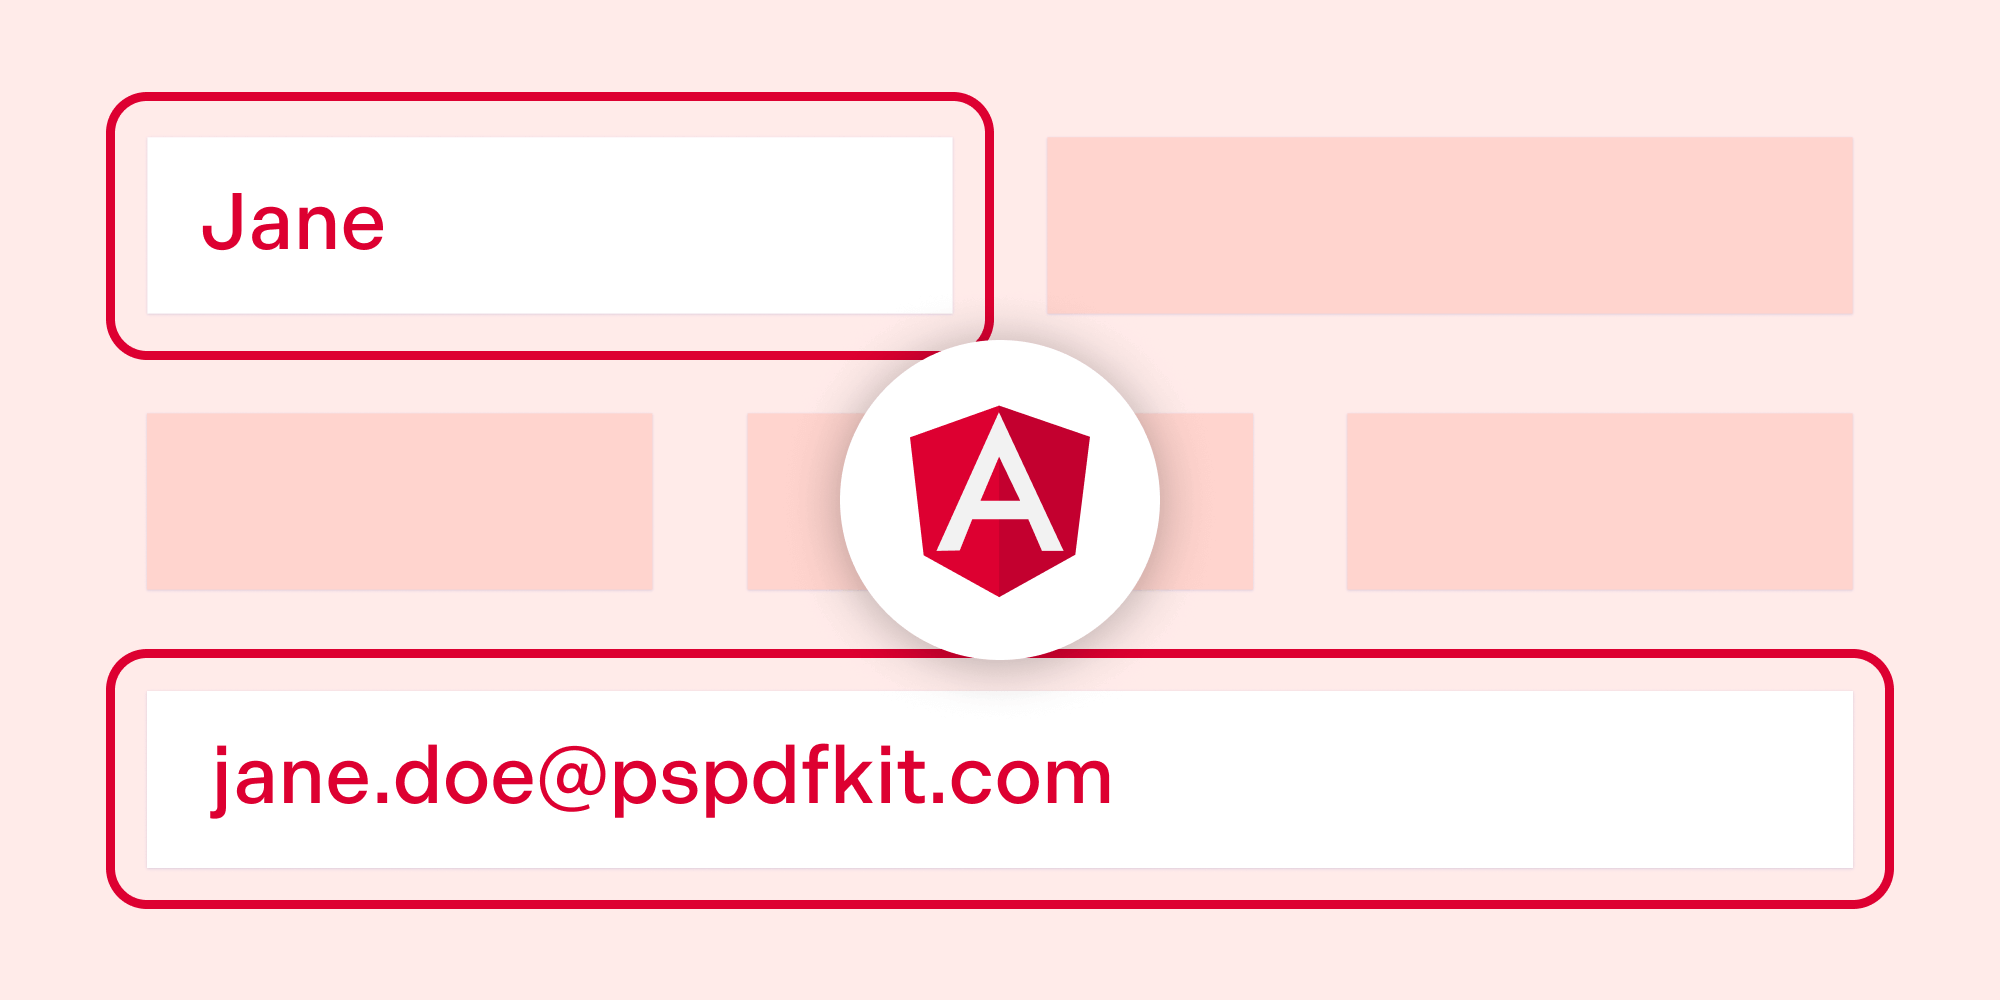
Next, create the form fields you want to include in the PDF form. In this example, you’ll create two text fields: one for the name, and one for the email address.
Use the createTextField() method on the form object to create each field and provide a unique name for identification. To fill the form programmatically, you can use the same setText() method to set values for the form fields:
async generateAndFillPDF(): Promise<void> {
  // ...

  const nameField = form.createTextField('name');
  nameField.setText('John Doe');
  nameField.addToPage(page, { x: 50, y: 100, width: 200, height: 20 });

  const emailField = form.createTextField('email');
  emailField.setText('test@gmail.com');
  emailField.addToPage(page, { x: 50, y: 50, width: 200, height: 20 });

  // ...
}
Step 5 — Saving and Downloading the PDF Form
Once you’ve created and filled the PDF form, you can save it and offer it for download to the user. To save the PDF document, use the save() method provided by pdf-lib:
async generateAndFillPDF(): Promise<void> {
  // ...

  const pdfBytes = await pdfDoc.save();

  const blob = new Blob([pdfBytes], { type: 'application/pdf' });
  const url = URL.createObjectURL(blob);

	// Use the URL to download or display the PDF form.
  window.open(url);
}
This will return the PDF bytes as an array. Create a Blob object from the bytes, and generate a URL using URL.createObjectURL(). Finally, use window.open(url) to open the filled PDF form for download or display.
Step 6 — Adding a Fill Button to Trigger Form Filling
Add a button or trigger in your fill-form.component.html file that calls the generateAndFillPDF method when clicked:
<h1>Fill PDF Form</h1>
<button (click)="generateAndFillPDF()">Fill Form</button>
By following these steps, you can programmatically create and fill PDF forms with data in your Angular application.
Here’s the full code for the fill-form.component.ts file:
import { Component, OnInit } from '@angular/core';
import { PDFDocument } from 'pdf-lib';

@Component({
	selector: 'app-fill-form',
	templateUrl: './fill-form.component.html',
	styleUrls: ['./fill-form.component.css'],
})
export class FillFormComponent implements OnInit {
	constructor() {}

	ngOnInit(): void {
		this.generateAndFillPDF();
	}

	async generateAndFillPDF(): Promise<void> {
		const pdfDoc = await PDFDocument.create();
		const page = pdfDoc.addPage();
		const form = pdfDoc.getForm();

		const nameField = form.createTextField('name');
		nameField.setText('John Doe');
		nameField.addToPage(page, {
			x: 50,
			y: 100,
			width: 200,
			height: 20,
		});

		const emailField = form.createTextField('email');
		emailField.setText('test@gmail.com');
		emailField.addToPage(page, {
			x: 50,
			y: 50,
			width: 200,
			height: 20,
		});

		const pdfBytes = await pdfDoc.save();

		const blob = new Blob([pdfBytes], { type: 'application/pdf' });
		const url = URL.createObjectURL(blob);

		// Use the URL to download or display the PDF form.
		window.open(url);
	}
}
Step 7 — Updating the App Component Template
To use the FillFormComponent in your Angular application, replace the placeholder content in the app.component.html file with the following code:
<div>
	<app-fill-form></app-fill-form>
</div>
This will render the FillFormComponent and trigger the generation and filling of the PDF form when the component is initialized.
Step 8 — Running the Application
Now, you’re ready to run the Angular application. Use the following command:
ng serve
This command will compile the application and start a development server. Open your web browser and navigate to http://localhost:4200 to see the application in action.
Drawbacks of Utilizing pdf-lib
Despite its capabilities in PDF document manipulation, including form filling, the pdf-lib library has a few limitations and drawbacks:
-
Limited user interface interaction — The main focus of the pdf-lib library is programmatically handling PDF documents, and it lacks built-in user interface (UI) components and interactivity for form filling. Consequently, users cannot input data directly into form fields within the application’s interface. Instead, form fields must be filled programmatically using code, as exemplified in the provided example.
-
Absence of real-time updates — Since form fields are programmatically filled either on the server or within the application code, there’s no real-time update or synchronization with the UI. If users want to see their input reflected in the filled form fields, they must generate and download the updated PDF file.
Form Filling with PSPDFKit
PSPDFKit offers comprehensive capabilities for filling forms, providing both a user-friendly interface and programmable alternatives.
-
User interface form filling — PSPDFKit’s prebuilt UI components enable users to effortlessly navigate and interact with PDF forms. They can fill in text fields, select options from dropdown menus, and interact with checkboxes and radio buttons. See it in action by exploring the demo.
Programmatic form filling — PSPDFKit for Web offers versatile options for programmatic form filling:
-
PSPDFKit Server — Easily persist, restore, and synchronize form field values across devices without the need to develop the functionality yourself.
-
XFDF — Seamlessly exchange form field data with other PDF readers and editors.
-
Instant JSON — Efficiently export and import changes made to form fields.
-
Manual API — Complete control over extracting, saving, and manipulating form field values.
In addition, PSPDFKit also provides an option for creating PDF forms:
-
PDF Form Creator: Simplify PDF form creation with a point-and-click UI. You can create PDF forms from scratch using an intuitive UI or via the API. Convert static forms into fillable forms, or modify existing forms by letting your users create, edit, and remove form fields in a PDF.
These options provide flexibility for custom workflows, data interoperability, and efficient form filling processes.
By combining UI-based form filling with programmatic control, PSPDFKit caters to various use cases, offering a seamless user experience, and empowering developers to customize form filling workflows.
Conclusion
In this blog post, you learned how to create and fill PDF forms programmatically in Angular using the pdf-lib library. We covered the process of generating a PDF form, adding form elements, filling the form, and saving it for download. We also discussed the limitations of using pdf-lib for form filling and how PSPDFKit offers a better alternative.
To learn more about PSPDFKit for Web, start your free trial. Or, launch our demo to see our viewer in action.

Hulya is a frontend web developer and technical writer at PSPDFKit who enjoys creating responsive, scalable, and maintainable web experiences. She’s passionate about open source, web accessibility, cybersecurity privacy, and blockchain.


