Generate PDFs in Salesforce with Lightning Web Components

This tutorial will guide you through the process of creating a Lightning web component that leverages the jsPDF library to dynamically generate PDF documents directly within Salesforce. Additionally, you’ll explore the limitations of client-side PDF generation and gain insights into when to consider alternative approaches.
Prerequisites
-
Visual Studio Code installed on your computer
About PSPDFKit for Salesforce
If you work with PDF documents in Salesforce, PSPDFKit provides a client-side JavaScript library that can be integrated into a Lightning web component to enable opening, editing, and saving PDFs from a web browser. Some of our most popular features include the ability to:
-
View and edit PDF content directly in Salesforce
-
Collaborate on documents by highlighting text and adding notes or stamps
-
Organize documents by adding, deleting, rotating, or reordering pages
-
Programmatically fill PDF forms with information from Salesforce
-
Add an eSignature by drawing, typing, or uploading an image of your signature
-
Permanently redact sensitive information like email addresses, SSNs, phone numbers, and more
Step 1 — Setting Up Your Development Environment
-
Open Visual Studio Code on your computer.
-
Log in to your Salesforce developer account by pressing Control-Shift-P (on Windows) or Command-Shift-P (on macOS). Then, select SFDX: Authorize an Org > Project Default and press Enter. This action will redirect you to log in to your Salesforce organization.
Step 2 — Creating a New Lightning Web Component
-
In Visual Studio Code, open the Command Palette using Control-Shift-P (on Windows) or Command-Shift-P (on macOS).
-
Type SFDX and select SFDX: Create Lightning Web Component (not SFDX: Create Lightning Component).
-
Enter PdfGenerator as the name of the new component.
-
Press Enter to accept the default path,
force-app/main/default/lwc. -
Press Enter again.
Step 3 — Designing the Component
-
Open the
pdfGenerator.htmlfile and add the following content:
<template>
	<div>
		<h1>PDF Generator</h1>
		<lightning-button
			label="Generate PDF"
			onclick="{handleGeneratePDF}"
		></lightning-button>
	</div>
</template>
Step 4 — Including a PDF Generation Library
Static resources play a crucial role in Salesforce development by allowing you to upload and reference external files, such as JavaScript libraries and stylesheets, within your Salesforce organization. Since Lightning web components operate within a secure context and have limitations on how external resources are loaded, using static resources is the recommended approach to bring in third-party libraries.
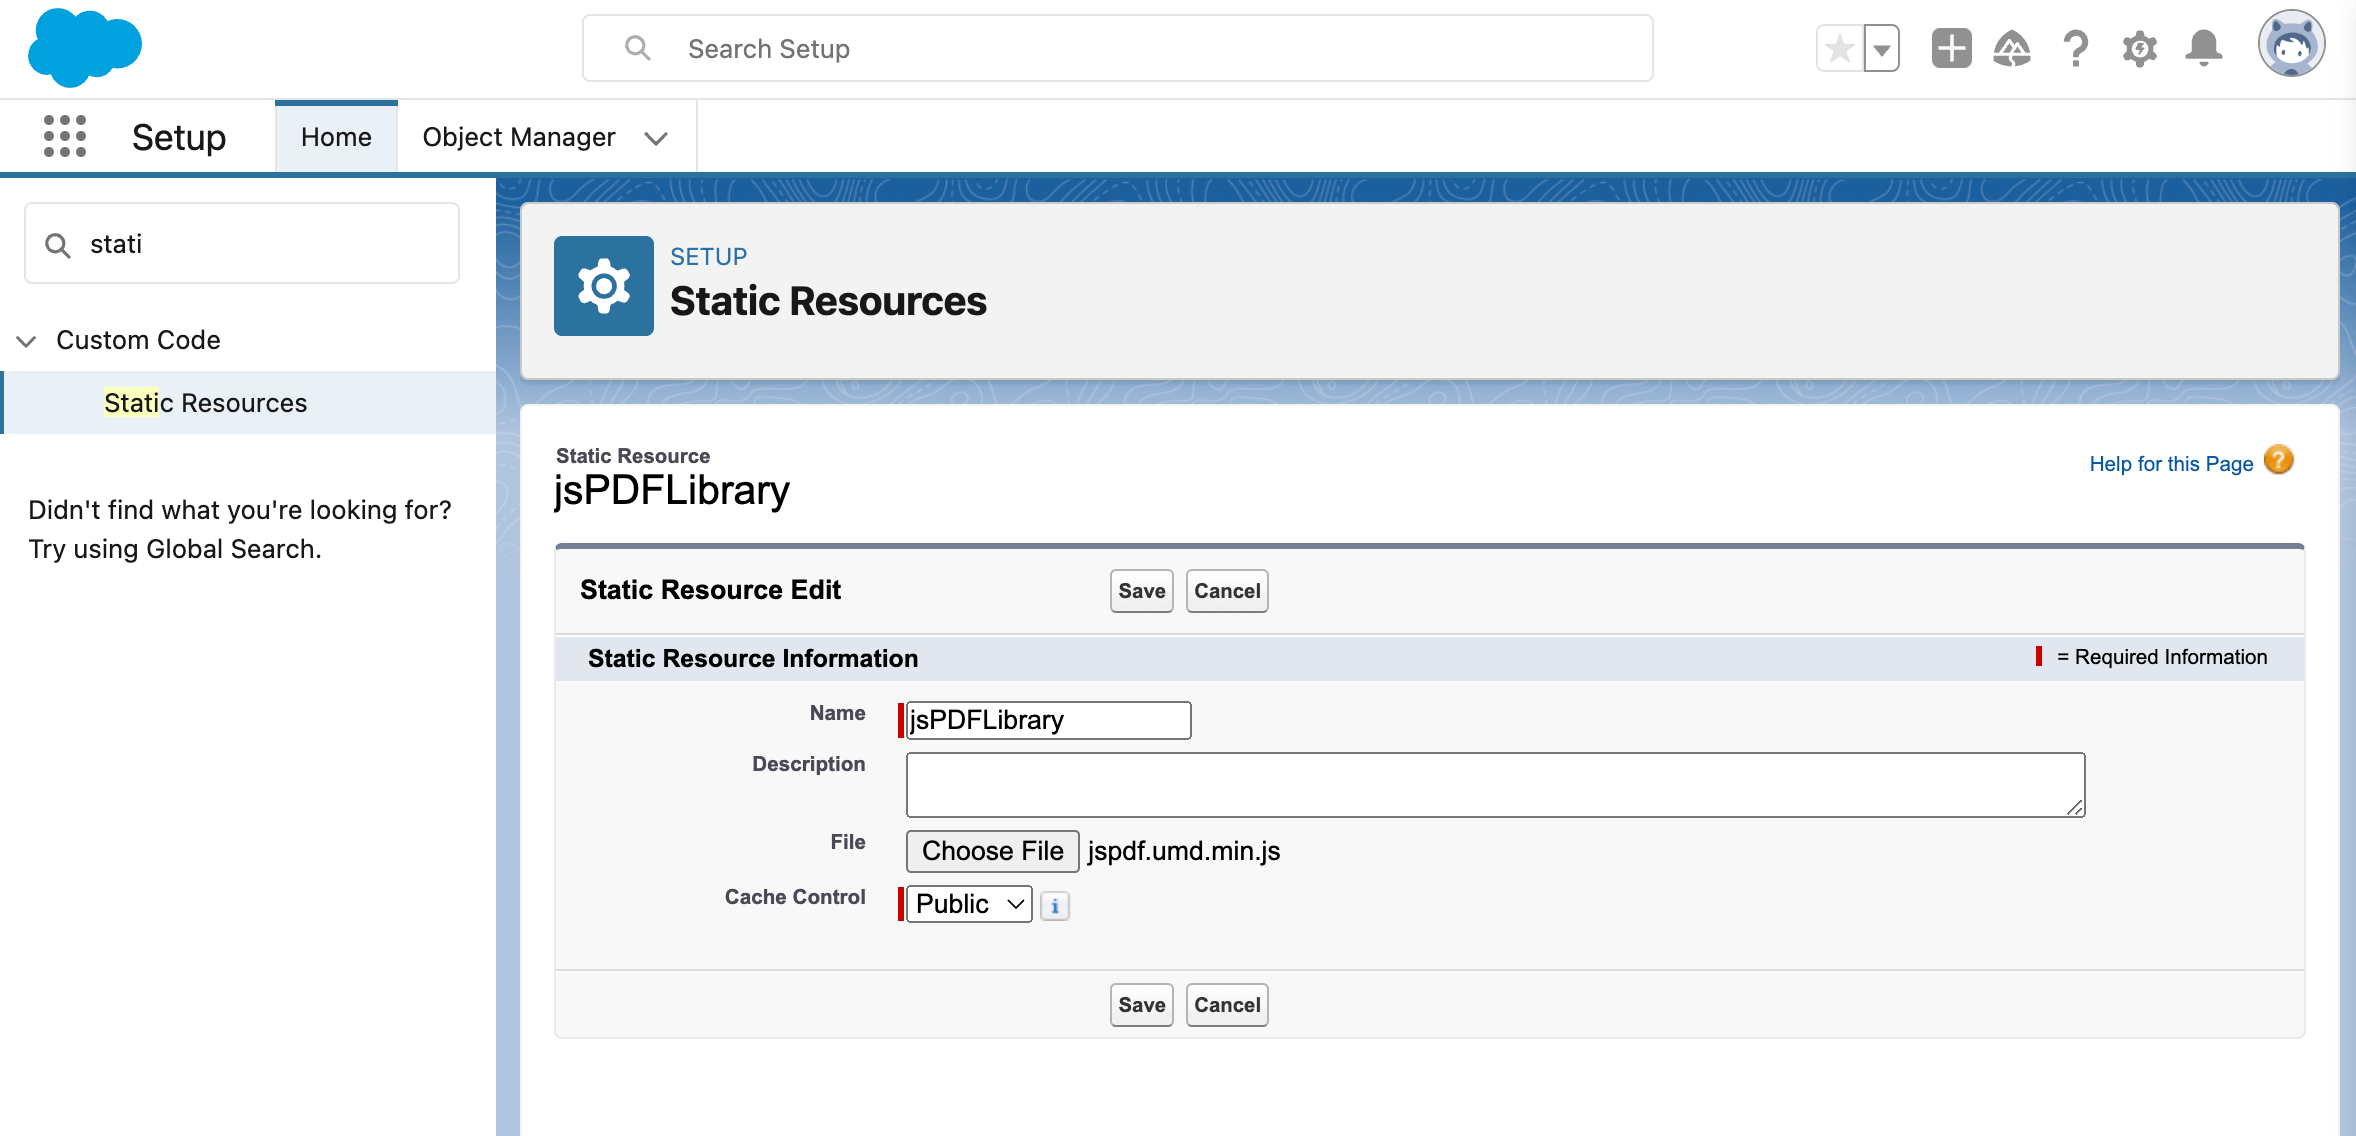
To generate a PDF, you’ll need a PDF generation library. One popular choice is jsPDF. Create a static resource in Salesforce to hold the jsPDF library.
-
Log in to your Salesforce developer account.
-
Click App Launcher (grid icon) and search for Static Resources.
-
Click Static Resources to access the Static Resources page.
-
Click New.
-
Enter a name for the static resource. Name it something like
jsPDFLibrary. -
Leave the Cache Control field set to Public.
-
Choose the Upload File option and select the
jspdf.umd.min.jsfile in thenode_modules/jspdf/distfolder. This is the jsPDF library you want to upload. Double-check that the name of the static resource you uploaded is exactlyjspdf.umd.min.js, as the name is case-sensitive. -
Click Save.
Step 5 — Implementing PDF Generation Logic
-
Open the
pdfGenerator.jsfile to handle PDF generation. This function will use the jsPDF library to generate the PDF document based on the content you’ve designed.
Load the static resource containing the jsPDF library using loadScript:
import { LightningElement } from 'lwc';
import { loadScript } from 'lightning/platformResourceLoader';
import JS_PDF from '@salesforce/resourceUrl/jsPDFLibrary';

export default class PdfGenerator extends LightningElement {
	jsPDFInitialized = false;

	renderedCallback() {
		if (!this.jsPDFInitialized) {
			this.jsPDFInitialized = true;
			loadScript(this, JS_PDF)
				.then(() => {
					console.log('jsPDF library loaded successfully');
				})
				.catch((error) => {
					console.error('Error loading jsPDF library', error);
				});
		}
	}

	handleGeneratePDF() {
		if (this.jsPDFInitialized) {
			// Make sure to correctly reference the loaded jsPDF library.
			const doc = new window.jspdf.jsPDF();

			// Add content to the PDF.
			doc.text('Hello PDF!', 10, 10);

			// Save the PDF.
			doc.save('generated_pdf.pdf');
		} else {
			console.error('jsPDF library not initialized');
		}
	}
}
-
In the
pdfGenerator.js-meta.xmlfile, add the following lines to thetargetssection:
<?xml version="1.0" encoding="UTF-8"?>
<LightningComponentBundle xmlns="http://soap.sforce.com/2006/04/metadata">
    <apiVersion>58.0</apiVersion>
    <isExposed>true</isExposed>
    <targets>
        <target>lightning__AppPage</target>
        <target>lightning__RecordPage</target>
        <target>lightning__HomePage</target>
      </targets>
</LightningComponentBundle>
Step 6 — Pushing Changes to Your Organization
-
Press Control-Shift-P (on Windows) or Command-Shift-P (on macOS) to open the Command Palette.
-
Type SFDX and select SFDX: Deploy This Source to Org.
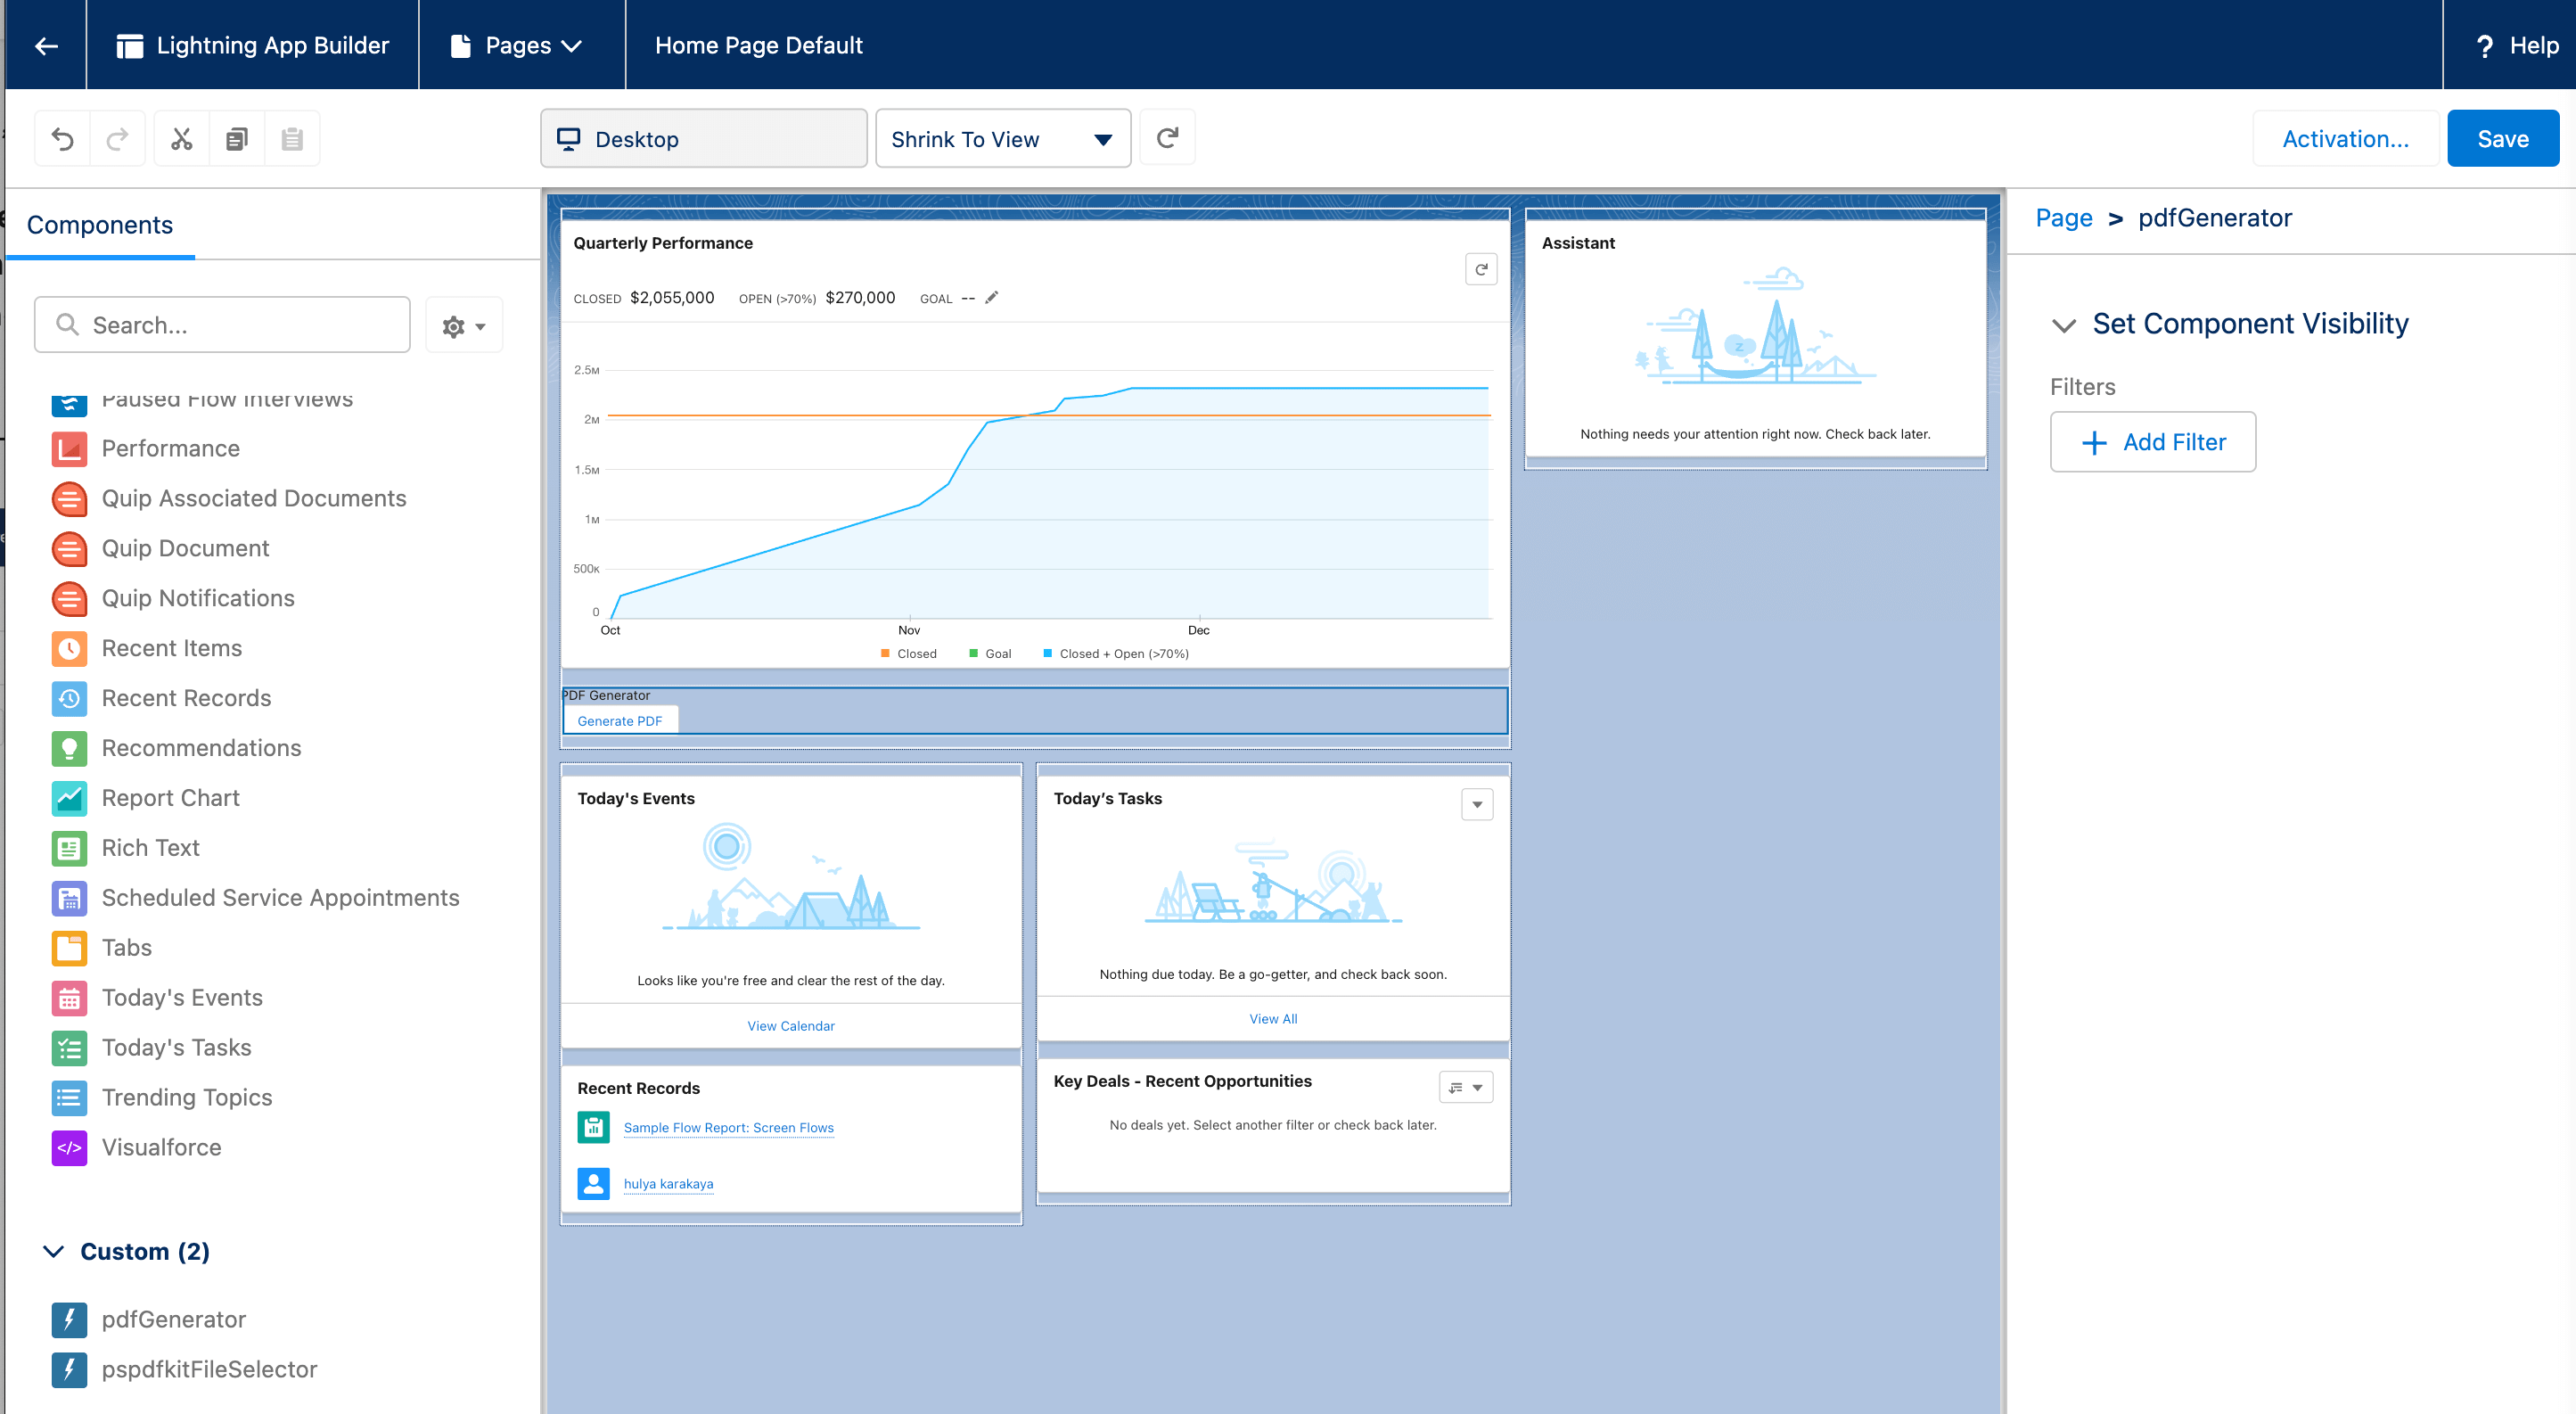
Step 7 — Verify the Component in Your Organization
-
Open your Salesforce organization.
-
Click App Launcher (grid icon) and search for Sales.
-
Click the setup gear icon, and then select Edit Page.
-
Drag the
pdfGeneratorcomponent from the custom section to the page. -
Save the page.
-
Click Generate PDF to create a PDF document.
Upon successful completion, feel free to deploy your Lightning web component to your production environment and customize it to suit your Salesforce application’s needs.
Limitations of PDF Generation Using jsPDF and LWC
-
Client-Side Processing — jsPDF generates PDFs on the client side, which could impact performance for complex or large PDFs.
-
Styling and Layout — jsPDF is suited for basic PDFs; complex styling and layouts might require additional effort.
-
Advanced Features — Advanced elements like complex tables, interactive forms, or intricate charts may require extra handling.
Conclusion
By following the steps outlined in this tutorial, you’ve learned how to integrate a PDF generation library and create PDFs on the fly in Salesforce. While jsPDF offers a powerful solution for simple PDF generation, it’s important to consider the limitations and constraints of client-side PDF generation. For more complex PDF requirements, or if you’re looking for advanced features, you might explore other options, including integrating with server-side PDF generation services or commercial PDF libraries. Always assess your project’s specific requirements and constraints before deciding on a solution.
We offer a Salesforce PDF library that can be used to add PDF viewing, annotation, and editing to your native Salesforce application. Get started with a free trial, or contact our Sales team for licensing questions.

Hulya is a frontend web developer and technical writer at PSPDFKit who enjoys creating responsive, scalable, and maintainable web experiences. She’s passionate about open source, web accessibility, cybersecurity privacy, and blockchain.


