Deflaking CI Tests with xcresults

One of the best tools you can have in your arsenal as a software developer is a large set of automated tests. A good test suite will give you the necessary confidence to make changes to your project without needing to worry about related modules or failing with edge case values. Ideally, these tests run constantly somewhere in the cloud as part of your Continuous Integration (CI) infrastructure, so your work is checked without bogging down your development machine.
If you’ve worked with this kind of setup before, you’re surely aware that while CI can be a great asset, it can also turn into a giant timesink nightmare if tests aren’t reliable. This is especially true if they seem to work fine locally but then sporadically fail on CI. Our fairly complex testing setup has unfortunately not spared us from these issues. However, over the years we’ve developed a few internal guidelines and tips for “deflaking“ flaky CI, some of which I’d like to share with you in this post.
Be sure to check out our CI series for small iOS/macOS teams.
Reproducing Flaky Tests Locally
When dealing with flaky tests on CI, it’s often best to first spend a bit of time trying to reproduce the problem locally. If successful, you’ll have the full power of Xcode’s debugger on hand, which will make tracking down the issue much easier.
Before embarking on this mission, be sure to set the test failure breakpoint so that you can catch the issue when it first surfaces. If dealing with exceptions, you’ll also want to add the exception breakpoint and perhaps some other handy ones.
Stress Testing
If you’re seeing something sporadically failing on CI, but you can’t see the same thing locally, then maybe you’re not trying hard enough! If the issue is caused by a race condition or other indeterminate behavior, then retrying the same test a few times could help surface the problem. A neat trick to achieve this without mocking around your test cases is to override invokeTest in the relevant test class:
override func invokeTest() {
    for _ in 0...100 {
        super.invokeTest()
    }
}
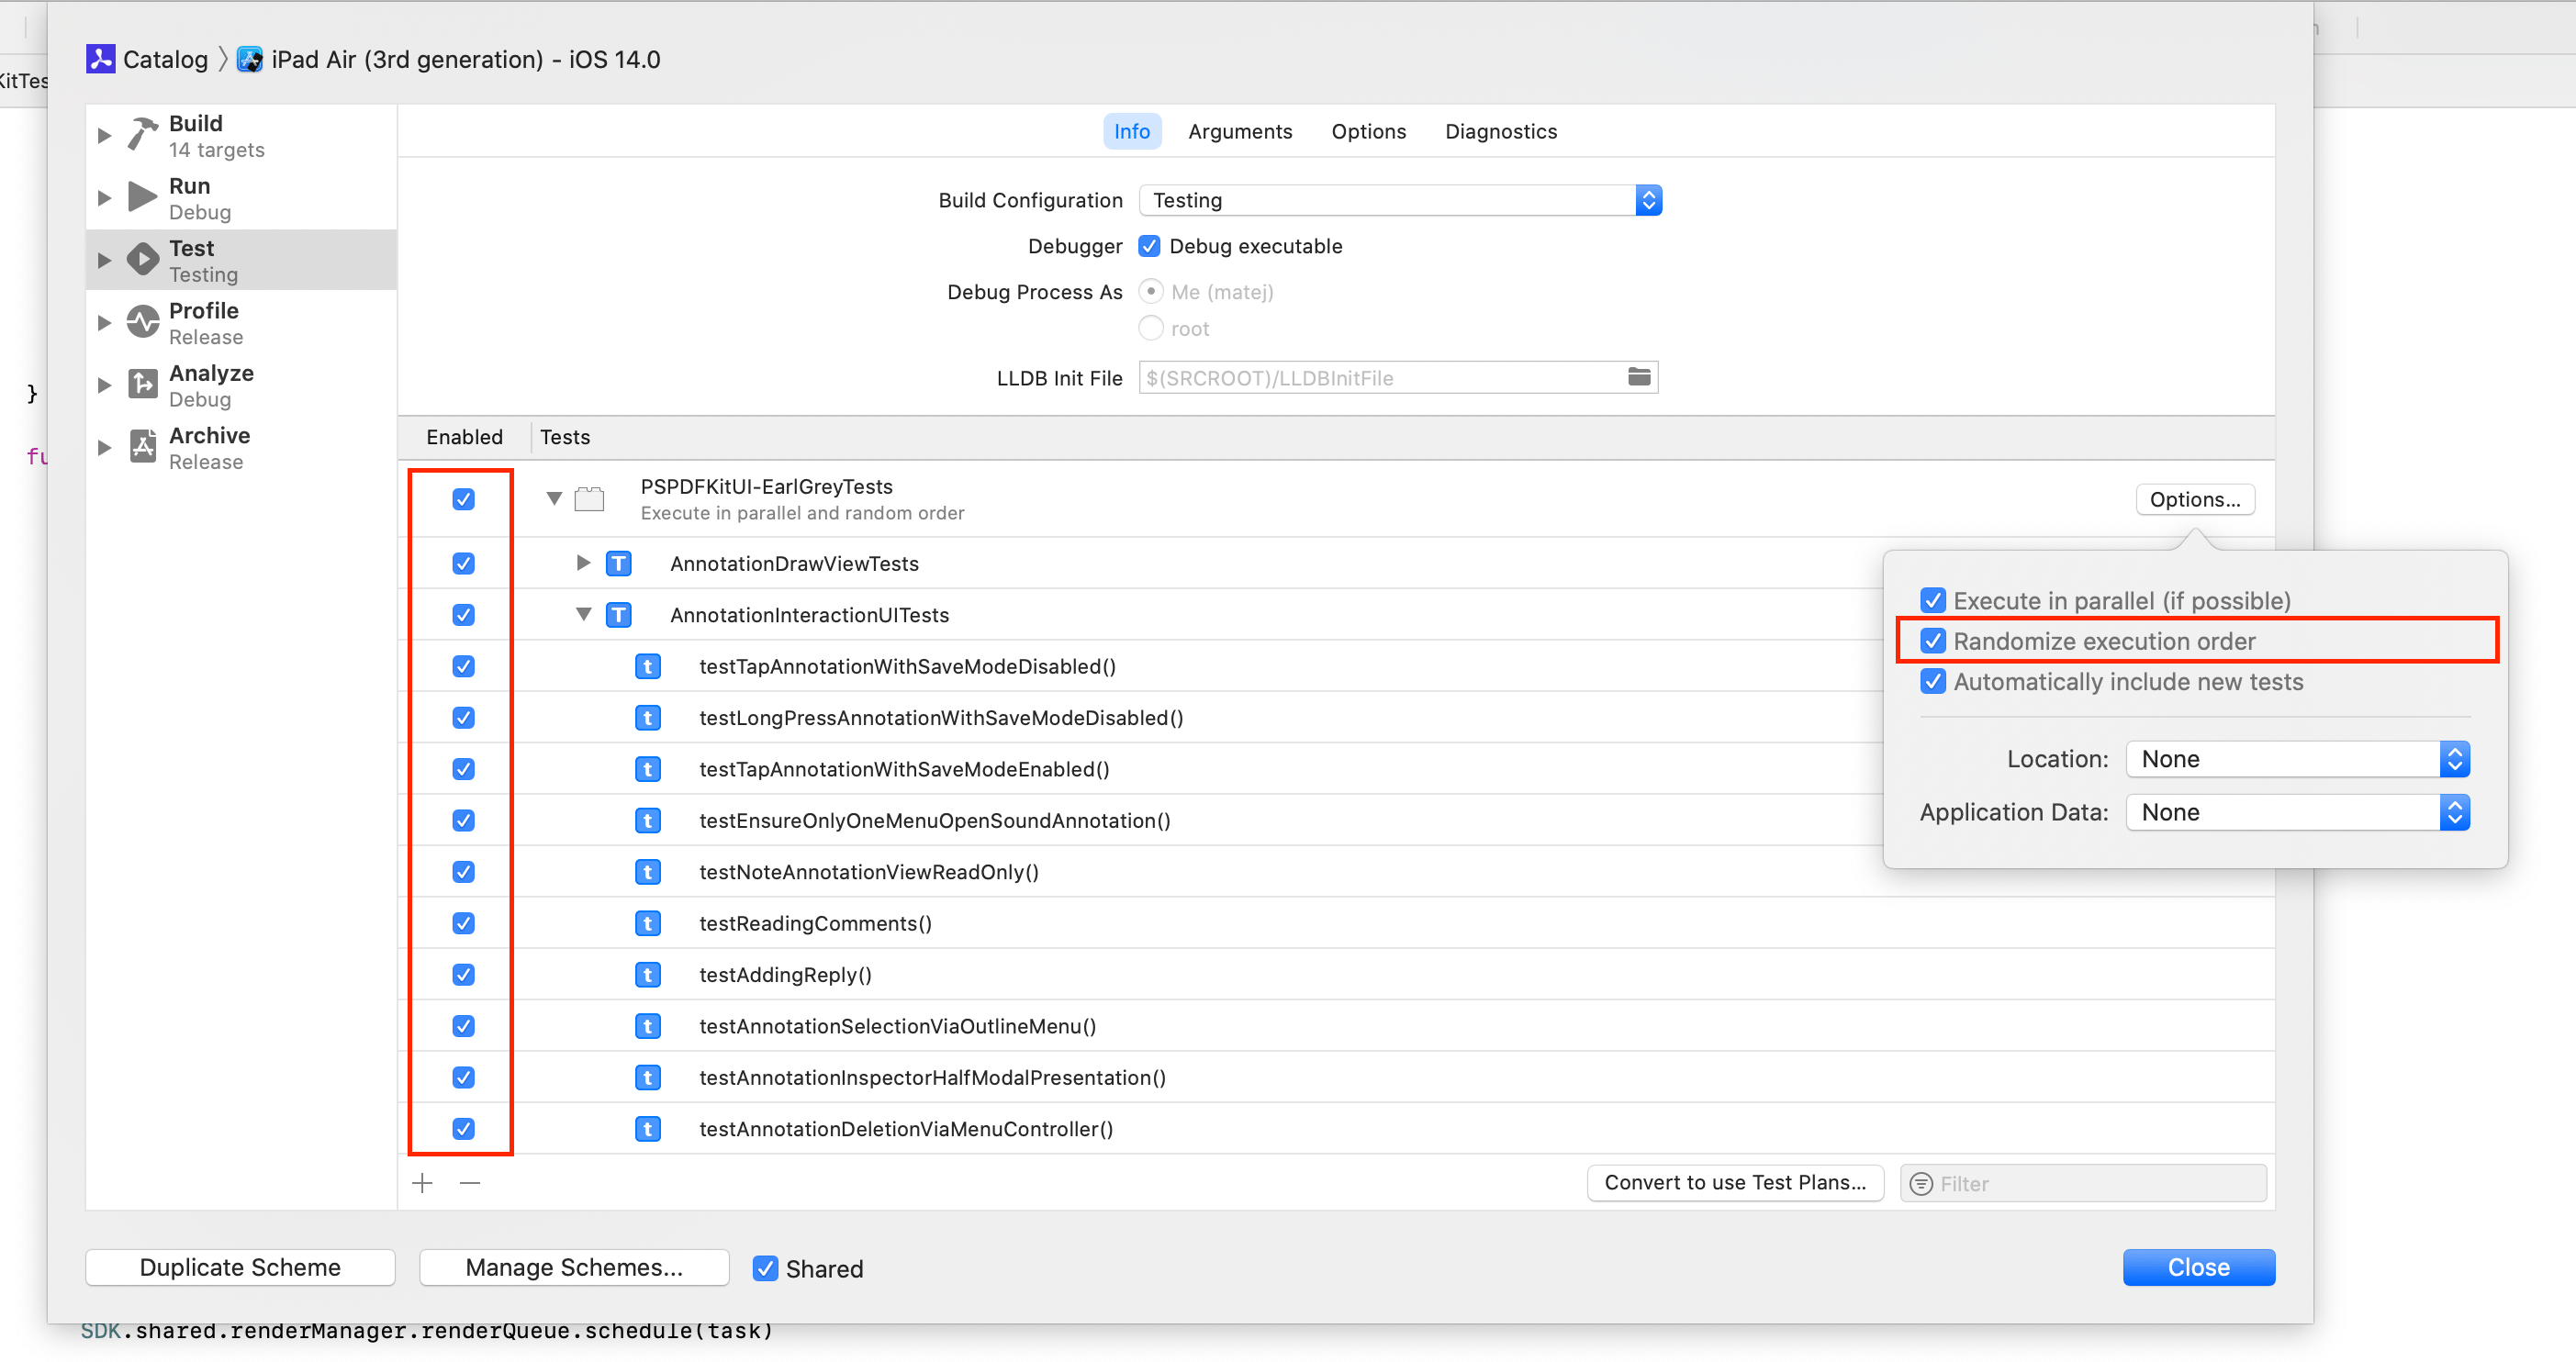
There’s a catch though. It’s fairly common for flaky test cases to not manifest their issues when they’re run in isolation; it could be that other test cases in your test suite are leaking state or otherwise affecting the problematic test. In such a scenario, it might be helpful to rerun a subset of your tests that’s large enough to introduce some randomness but small enough to not take too long to execute. In Xcode, you can use the Scheme editor to select which tests you’d like to run when invoking the Test action.

To spare ⌘ and U on your keyboard from too much abuse, you could leverage xcodebuild’s -only-testing option to do the same thing programmatically:
#!/bin/bash
for i in {1..100}
do
   xcodebuild test-without-building -workspace MYWorkspace.xcworkspace -scheme TestingScheme -destination 'platform=iOS Simulator,OS=14.0,name=iPhone 8' -only-testing:TestTarget/TestClass/testMethod
done
You might also consider enabling the randomization option to see if a different execution order affects results. Unfortunately, there’s still no seed available to actually repeat a problematic order. To work around this, you’d need to leverage Xcode’s default alphabetical test sorting and manually rename your test cases to match the order that exhibited issues.
Matching the Configuration
While it’s fairly easy to keep your local copy of Xcode up to date, it’s often difficult to stay current on CI. Checking the exact Xcode build versions is a good first step to make sure your local environment matches CI as closely as possible. If the CI is outdated, then investing time in an update might be time well spent. You can use xcodebuild -version to check the version on CI, which is something that’s good to always include as part of your CI log output.
Another source of configuration discrepancies between your local environment and CI could be third-party dependencies. If you use a dependency manager like CocoaPods, be sure to doublecheck that lock files (Podfile.lock) match on all machines.
You might also have a setup where build settings for your tests differ slightly when running tests locally and on CI. In our case, we run tests on CI with heavy compiler optimizations and code protection to mimic release builds. On development machines, we don’t apply the same settings so as to leverage better debugger support and faster build times when creating new tests. Those differences can sometimes affect the reproduction chances for a flaky test case.
The best way we found to separate settings while still allowing for an easy sync-up with the CI configuration when needed is to leverage xcconfig files with conditional imports. We have the following at the end of our Defaults-Testing.xcconfig configuration file:
// Allows conditional include of files (CI file should only exist on CI).
#include? "Defaults-Testing-CI.xcconfig"
#include? "Defaults-Testing-TSAN-CI.xcconfig"
#include? "Defaults-CustomGitIgnored.xcconfig"

// Enable this to temporarily test with the CI configuration locally.
// Note that this messes up debugging severely due to optimizations.
//#include "Defaults-Testing-CI.xcconfig.disabled"
Solving Issues on CI
Sometimes reproducing the issue locally just doesn’t work out. It could be because of different hardware characteristics, different system load, or subtle differences in the configuration or environment.
Wait Times
For us, the largest source of test flakiness continues to be too aggressive wait times and timeout times. We want to minimize wait time, so our test suite completes faster, but at the same time, there’s often a vast difference in available system resources between CI nodes and our development machines. If a test is failing due to a timeout of an expectation, it’s fairly easy to try and bump the timeout or to set a policy to always use large values for the timeout. But often, it’s not as simple when time interval-based waiting fails, which might then lead to an assertion failing somewhere further down in the test code.
A good approach for avoiding these kinds of issues is to switch from interval-based waiting to either expectations or state polling.
Here’s a brief example from our tests (we use EarlGrey and custom helpers). You should replace the following:
// Enter "Reader View."
EarlGrey.element("Reader View").tap()
// Wait for 3s, which should be enough for the
// content to populate.
wait(for: 3)
// Work with the UI.
With something like this:
// Enter "Reader View."
EarlGrey.element("Reader View").tap()
// Repeat: the condition and spin the run loop, until the condition success,
// fail on the spot if a predefined large timeout is exceeded.
wait(readerController.didLoadContent == true)
// Work with the UI.
This approach ensures both that we wait for just the right time when the happy path is taken and that we fail in a predictable way when things go wrong.
Using xcresult Bundles
When inspecting the xcodebuild output, you’ll find that the information printed in the console often isn’t sufficient enough to help track the issue down. One of the main elements missing is the console log; any visual results from tests involving graphics or the UI are also nowhere to be found. Luckily, xcresult bundles are here to save the day! These bundles get created for every test run, regardless of whether the test run is executed from the command line or via Xcode. With the default settings, they’re placed under ~/Library/Developer/Xcode/DerivedData/MyProject-<UUID>/Logs/Test, but the location can be changed by passing the -resultBundlePath option to the xcodebuild command. This is a great asset to archive as a CI artifact.
Since Xcode 11, xcresult bundles can be opened with Xcode. They display test results, code coverage, and logs (including NSLogs and prints) for every test case. They can also be accessed using the command line via xcrun xcresulttool, or converted to HTML with handy open source projects like XCTestHTMLReport.
Logging
Now that we know where to find test logs, we can add some logging to try and track down test flakiness without the luxury of having the debugger attached.
To give a concrete example of how this works: We recently faced an issue where the global UIMenuController — used for standard text selection actions such as copying and pasting — was sometimes not being presented when the tests expected it to show up. To track down the issue, we swizzled the menu presentation and dismissal methods and logged the invoked calls along with the current stack trace. This was done by leveraging the Thread.callStackSymbols API to get the current thread’s call stack without having to crash the process.
The logs revealed that the menu was being dismissed while the test was waiting for it to appear, and this was due to our UI getting stuck in an animation block from a previous test case. If the animation block happened to be released while a different test was waiting for the menu, it was dismissed before it fully appeared, since part of our UI cleanup logic contained code to dismiss the global menu:
static void PSPDFInstallUIMenuControllerDebugging(void) {
    static dispatch_once_t onceToken;
    dispatch_once(&onceToken, ^{
        @autoreleasepool {
            {
                SEL selector = @selector(showMenuFromView:rect:);
                __block IMP origSetMenuVisibleIMP = pspdf_swizzleSelectorWithBlock(UIMenuController.class, selector, ^(UIMenuController *_self, UIView *view, CGRect rect) {

                    NSArray<NSString *> *symbols = [NSThread callStackSymbols];
                    NSArray<NSString *> *filteredSymbols = [symbols subarrayWithRange:NSMakeRange(0, MIN((int)symbols.count, 10))];
                    NSLog(@"Menu: showMenuFromView:rect: called\n%@", filteredSymbols);

                    ((void (*)(id, SEL, UIView *, CGRect))origSetMenuVisibleIMP)(_self, selector, view, rect);
                    _self.pspdf_isShowingMenu = NO;
                });
            }
            {
                SEL selector = @selector(hideMenu);
                __block IMP origSetMenuVisibleIMP = pspdf_swizzleSelectorWithBlock(UIMenuController.class, selector, ^(UIMenuController *_self) {

                    NSArray<NSString *> *symbols = [NSThread callStackSymbols];
                    NSArray<NSString *> *filteredSymbols = [symbols subarrayWithRange:NSMakeRange(0, MIN((int)symbols.count, 10))];
                    NSLog(@"Menu: hideMenu called\n%@", filteredSymbols);

                    ((void (*)(id, SEL))origSetMenuVisibleIMP)(_self, selector);
                });
            }
        }
    });
}
Lesson learned.
Image Attachments
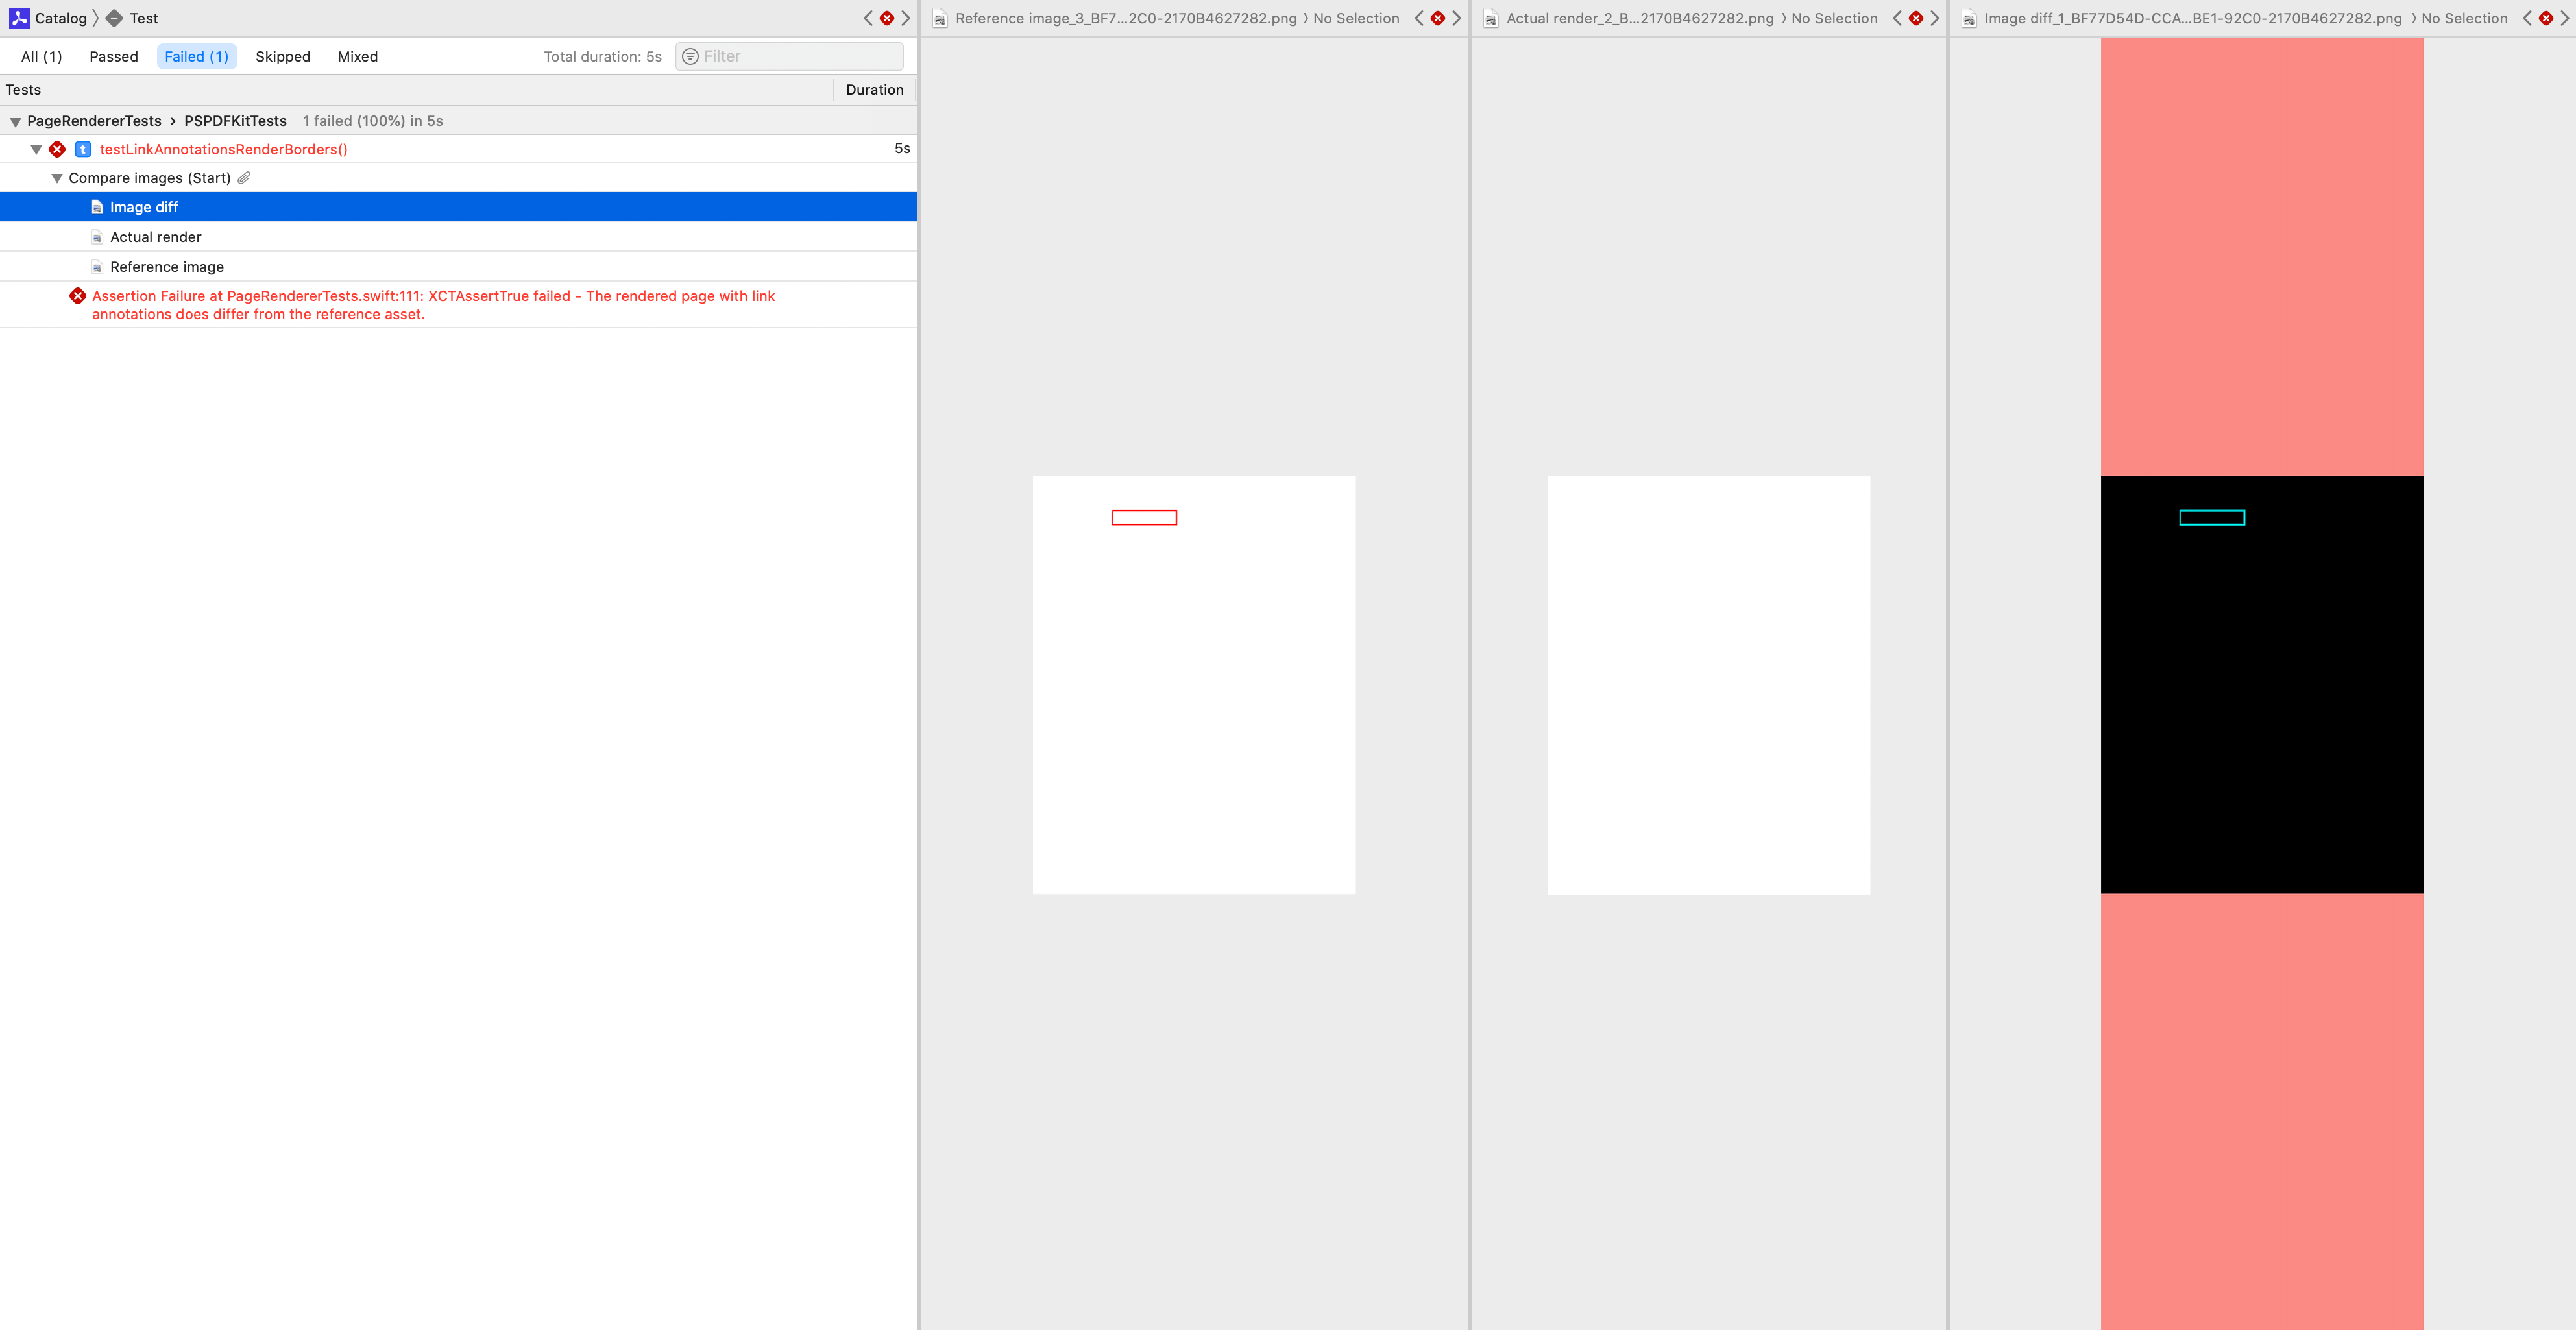
As it turns out, xcresults can also help with the visualization of UI tests. The format supports attachments that can be added by test cases. We use this in our PDF rendering tests to show both the expected and actual render output, as well as a simple diff of the two images. This helped numerous times in tracking down issues that were the result of subtle font rendering, image compression, or anti-aliasing changes observed between different machines.

Conclusion
Having unreliable tests can often be worse than not having tests at all. This is why we employ a policy of immediately disabling tests that are identified as flaky. The disabled tests are then tracked in dedicated issues, and work to investigate and fix the problem is scheduled, just like any other development task is.
Even with the tools and techniques presented above, it can sometimes be challenging to track down and fix a flaky test. At the end of the day, if you believe the problem is more likely the result of buggy test code and not due to something in your main product, it might not be worth spending an extraordinary amount of time investigating the problem. Instead, a more pragmatic approach could be to just rewrite the test so it approaches the checks from a different angle. Or you might want to remove the test case altogether, if existing tests already provide sufficient coverage.
I do wish there was a step-by-step guide to give here, but in the end, it’s like with many other engineering challenges — there’s simply no silver bullet that’ll work in all cases. Regardless, I do hope the above ideas can at least help a bit to guide you on your journey toward stable tests. Good luck!
If you want to learn more about our approach to CI, be sure to check out these posts:

Matej is a software engineering leader from Slovenia. He began his career freelancing and contributing to open source software. Later, he joined PSPDFKit, where he played a key role in creating its initial products and teams, eventually taking over as the company’s Chief Technology Officer. Outside of work, Matej enjoys playing tennis, skiing, and traveling.


