Opening a PDF in React Native
 Jonathan D. Rhyne


This article was first published in February 2018 and was updated in December 2023.
React Native lets you create mobile apps in JavaScript, but instead of building a cross-platform app, you use the same UI building blocks as regular iOS and Android apps. In this post, you’ll use React Native to build an app that opens a PDF with the press of a button.
In the first part of this tutorial, you’ll use wonday’s react-native-pdf library to open a PDF in an app. In the second part, you’ll learn how to view PDFs using the PSPDFKit React Native PDF library.
Opening a PDF in React Native with react-native-pdf
Below are the steps for how to open a PDF in React Native with react-native-pdf.
Step 1 — Installing the Prerequisites
You’ll use yarn to install packages. If you haven’t yet installed it, please follow the Yarn installation guide to set it up on your system.
To create React Native apps from the command line, you also need to install Node.js and Watchman using Homebrew:
brew install node
brew install watchman
Then download and install Android Studio and configure it following instructions from the official React Native guide.
Windows Users
To manage Node.js versions, you can install Chocolatey, a popular package manager for Windows. It’s recommended to use a long-term support (LTS) version of Node. If you want to be able to switch between different versions, you might want to install Node via nvm-windows, a Node version manager for Windows.
React Native also requires the Java Development Kit (JDK), which can be installed using Chocolatey as well. To do this, open an administrator command prompt by right-clicking Command Prompt and selecting Run as Administrator. Then, run the following command:
choco install -y nodejs-lts openjdk11
If you’re using the latest version of the JDK, you’ll need to change the Gradle version of your project so it can recognize the JDK. You can do that by going to
{project root folder}/android/gradle/wrapper/gradle-wrapper.propertiesand changing thedistributionUrlvalue to upgrade the Gradle version.
Step 2 — Creating a New React Native App
You can use react-native to create a new React Native app from the command line. This example uses the name OpeningaPDF for the app:
npx react-native init OpeningaPDF
npx is the npm package runner. You can read more about it here.
For the rest of the tutorial, you’ll work in OpeningaPDF:
cd OpeningaPDF
Step 3 — Installing Dependencies
You’ll use react-navigation components so that you can switch from one view to another in your app:
yarn add @react-navigation/native @react-navigation/native-stack react-native-screens react-native-safe-area-context
Next, add react-native-pdf, which includes a Pdf component:
yarn add react-native-pdf
Step 4 — Downloading a PDF Document
You can download a sample PDF document:
curl https://pspdfkit.com/downloads/pspdfkit-android-quickstart-guide.pdf -o Document.pdf
Don’t forget to move the document to the required folder after downloading it.
For iOS
Move or copy the document to ios/Document.pdf. Open the iOS project ios/OpeningaPDF.xcworkspace in Xcode and add the document to root of the OpeningaPDF project:
cp Document.pdf ios
For Android
Move or copy the document to android/app/src/main/assets/Document.pdf:
cp Document.pdf android/app/src/main/assets
Step 5 — Writing the App
Now you can start implementing your app. First, import all the required packages and initialize your navigation stack in App.js:
import React from 'react';
import Pdf from 'react-native-pdf';
import {
	Dimensions,
	StyleSheet,
	View,
	Button,
	Platform,
} from 'react-native';
import { NavigationContainer } from '@react-navigation/native';
import { createNativeStackNavigator } from '@react-navigation/native-stack';

const DOCUMENT =
	Platform.OS === 'ios'
		? require('./Document.pdf')
		: 'file:///android_asset/Document.pdf';

const PdfScreen = () => {
	return <Pdf source={DOCUMENT} style={styles.pdf} />;
};

const HomeScreen = ({ navigation }) => {
	return (
		<View style={styles.container}>
			<Button
				onPress={() => navigation.navigate('Pdf')}
				title="Open PDF"
			/>
		</View>
	);
};

const Stack = createNativeStackNavigator();

const App = () => {
	return (
		<NavigationContainer>
			<Stack.Navigator>
				<Stack.Screen
					name="Home"
					component={HomeScreen}
					options={{ title: 'Home' }}
				/>
				<Stack.Screen
					name="Pdf"
					component={PdfScreen}
					options={{ title: 'PDF' }}
				/>
			</Stack.Navigator>
		</NavigationContainer>
	);
};

export default App;

const styles = StyleSheet.create({
	container: {
		flex: 1,
		justifyContent: 'center',
		alignItems: 'center',
	},
	pdf: {
		flex: 1,
		width: Dimensions.get('window').width,
	},
});
HomeScreen contains an Open PDF button that navigates to PdfScreen.
You need to put a Document.pdf file into the same path as App.js so that PdfScreen can show it.
Next, define your App, which renders your navigation stack:
const App = () => {
	return (
		<NavigationContainer>
			<Stack.Navigator>
				<Stack.Screen
					name="Home"
					component={HomeScreen}
					options={{ title: 'Home' }}
				/>
				<Stack.Screen
					name="Pdf"
					component={PdfScreen}
					options={{ title: 'PDF' }}
				/>
			</Stack.Navigator>
		</NavigationContainer>
	);
};

export default App;
At the end of App.js, define your styles:
const styles = StyleSheet.create({
	container: {
		flex: 1,
		justifyContent: 'center',
		alignItems: 'center',
	},
	pdf: {
		flex: 1,
		width: Dimensions.get('window').width,
	},
});
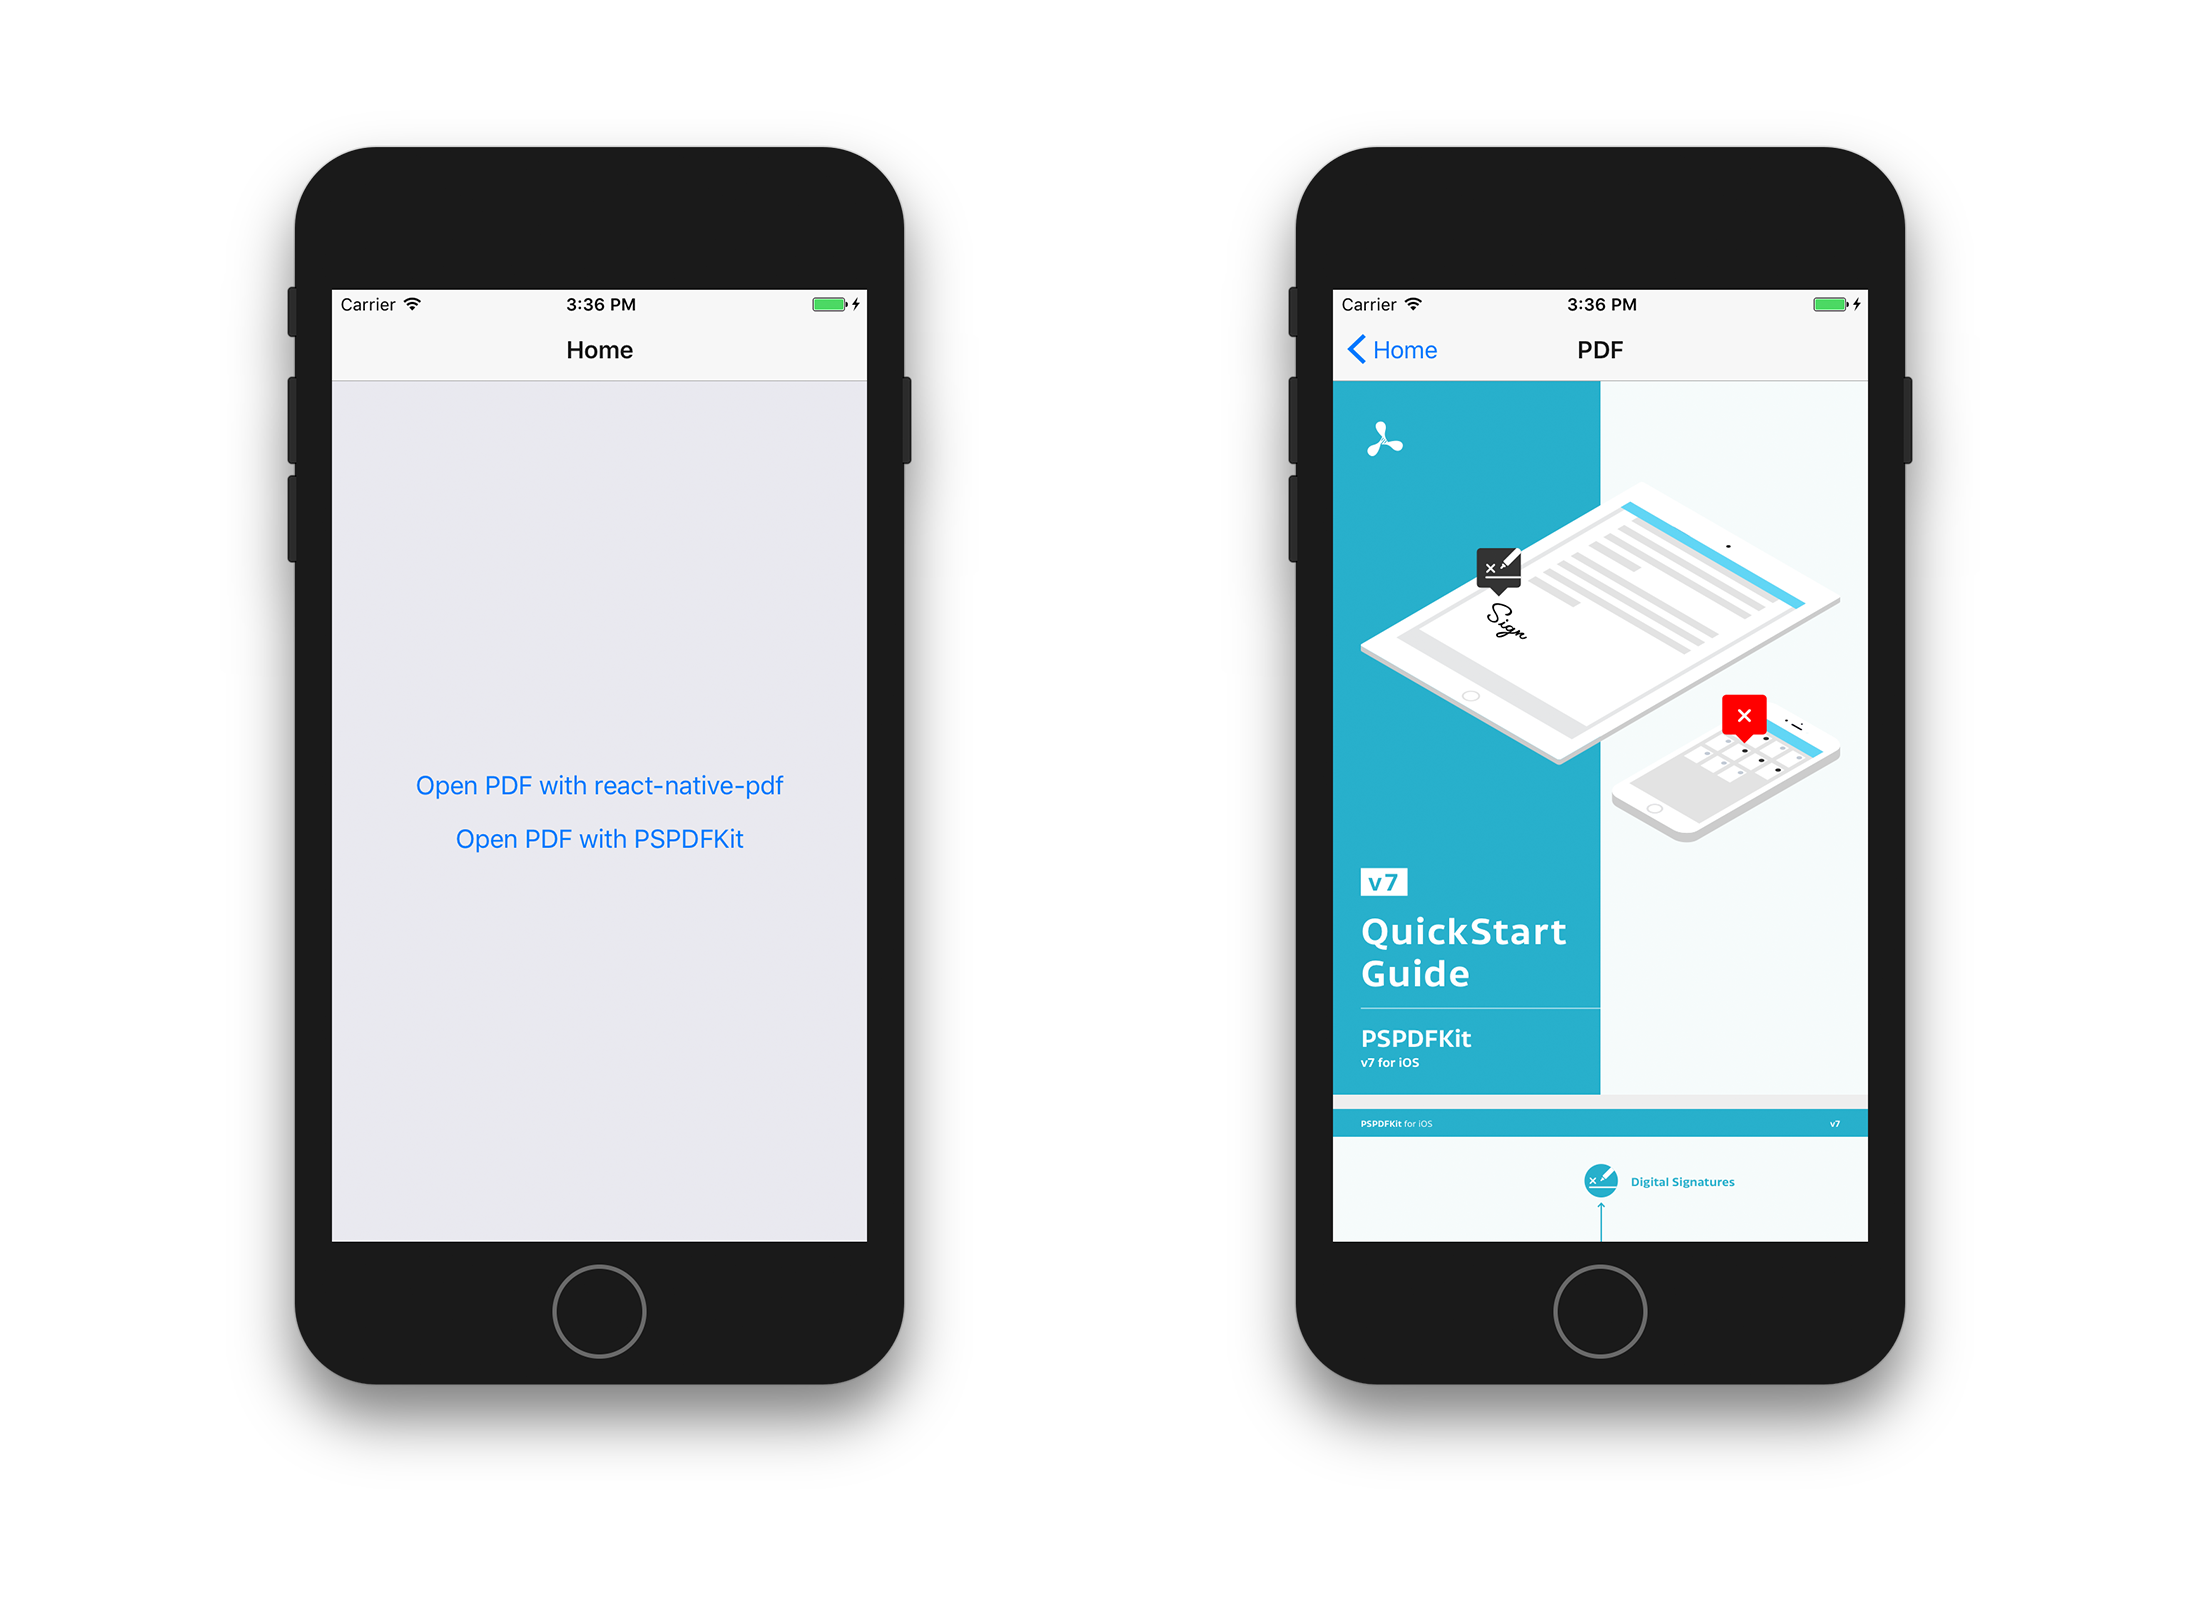
Center the Open PDF button and allow the PDF to fill the entire screen. The image below shows how it looks on iOS.
The image below shows how it looks on Android.
You can find the complete content of App.js on GitHub.
Now, you can tap a button and scroll through a PDF document. However, you can’t do anything else; there’s no zooming, and there are no annotations. You only have the scrolling view mode.
But that’s where PSPDFKit comes in: It includes all of these features — and more — without you having to configure anything.
Opening a PDF with PSPDFKit’s React Native PDF Library
To start, follow the integration guide for iOS and Android.
Then, add a second button to HomeScreen that opens a PDF with PSPDFKit:
var PSPDFKit = NativeModules.PSPDFKit;

PSPDFKit.setLicenseKey(null); // Or your valid license keys using `setLicenseKeys`.

const DOCUMENT =
	Platform.OS === 'ios'
		? require('./Document.pdf')
		: { uri: 'bundle-assets://Document.pdf' };

// Simple screen containing an Open PDF button.
class HomeScreen extends Component {
	_presentPSPDFKit() {
		PSPDFKit.present(DOCUMENT, {
			pageTransition: 'scrollContinuous',
			scrollDirection: 'vertical',
		});
	}

	static navigationOptions = {
		title: 'Home',
	};

	render() {
		const { navigate } = this.props.navigation;
		return (
			<View style={styles.container}>
				<Button
					onPress={() => navigate('Pdf')}
					title="Open PDF with react-native-pdf"
				/>
				<Button
					onPress={this._presentPSPDFKit}
					title="Open PDF with PSPDFKit"
				/>
			</View>
		);
	}
}
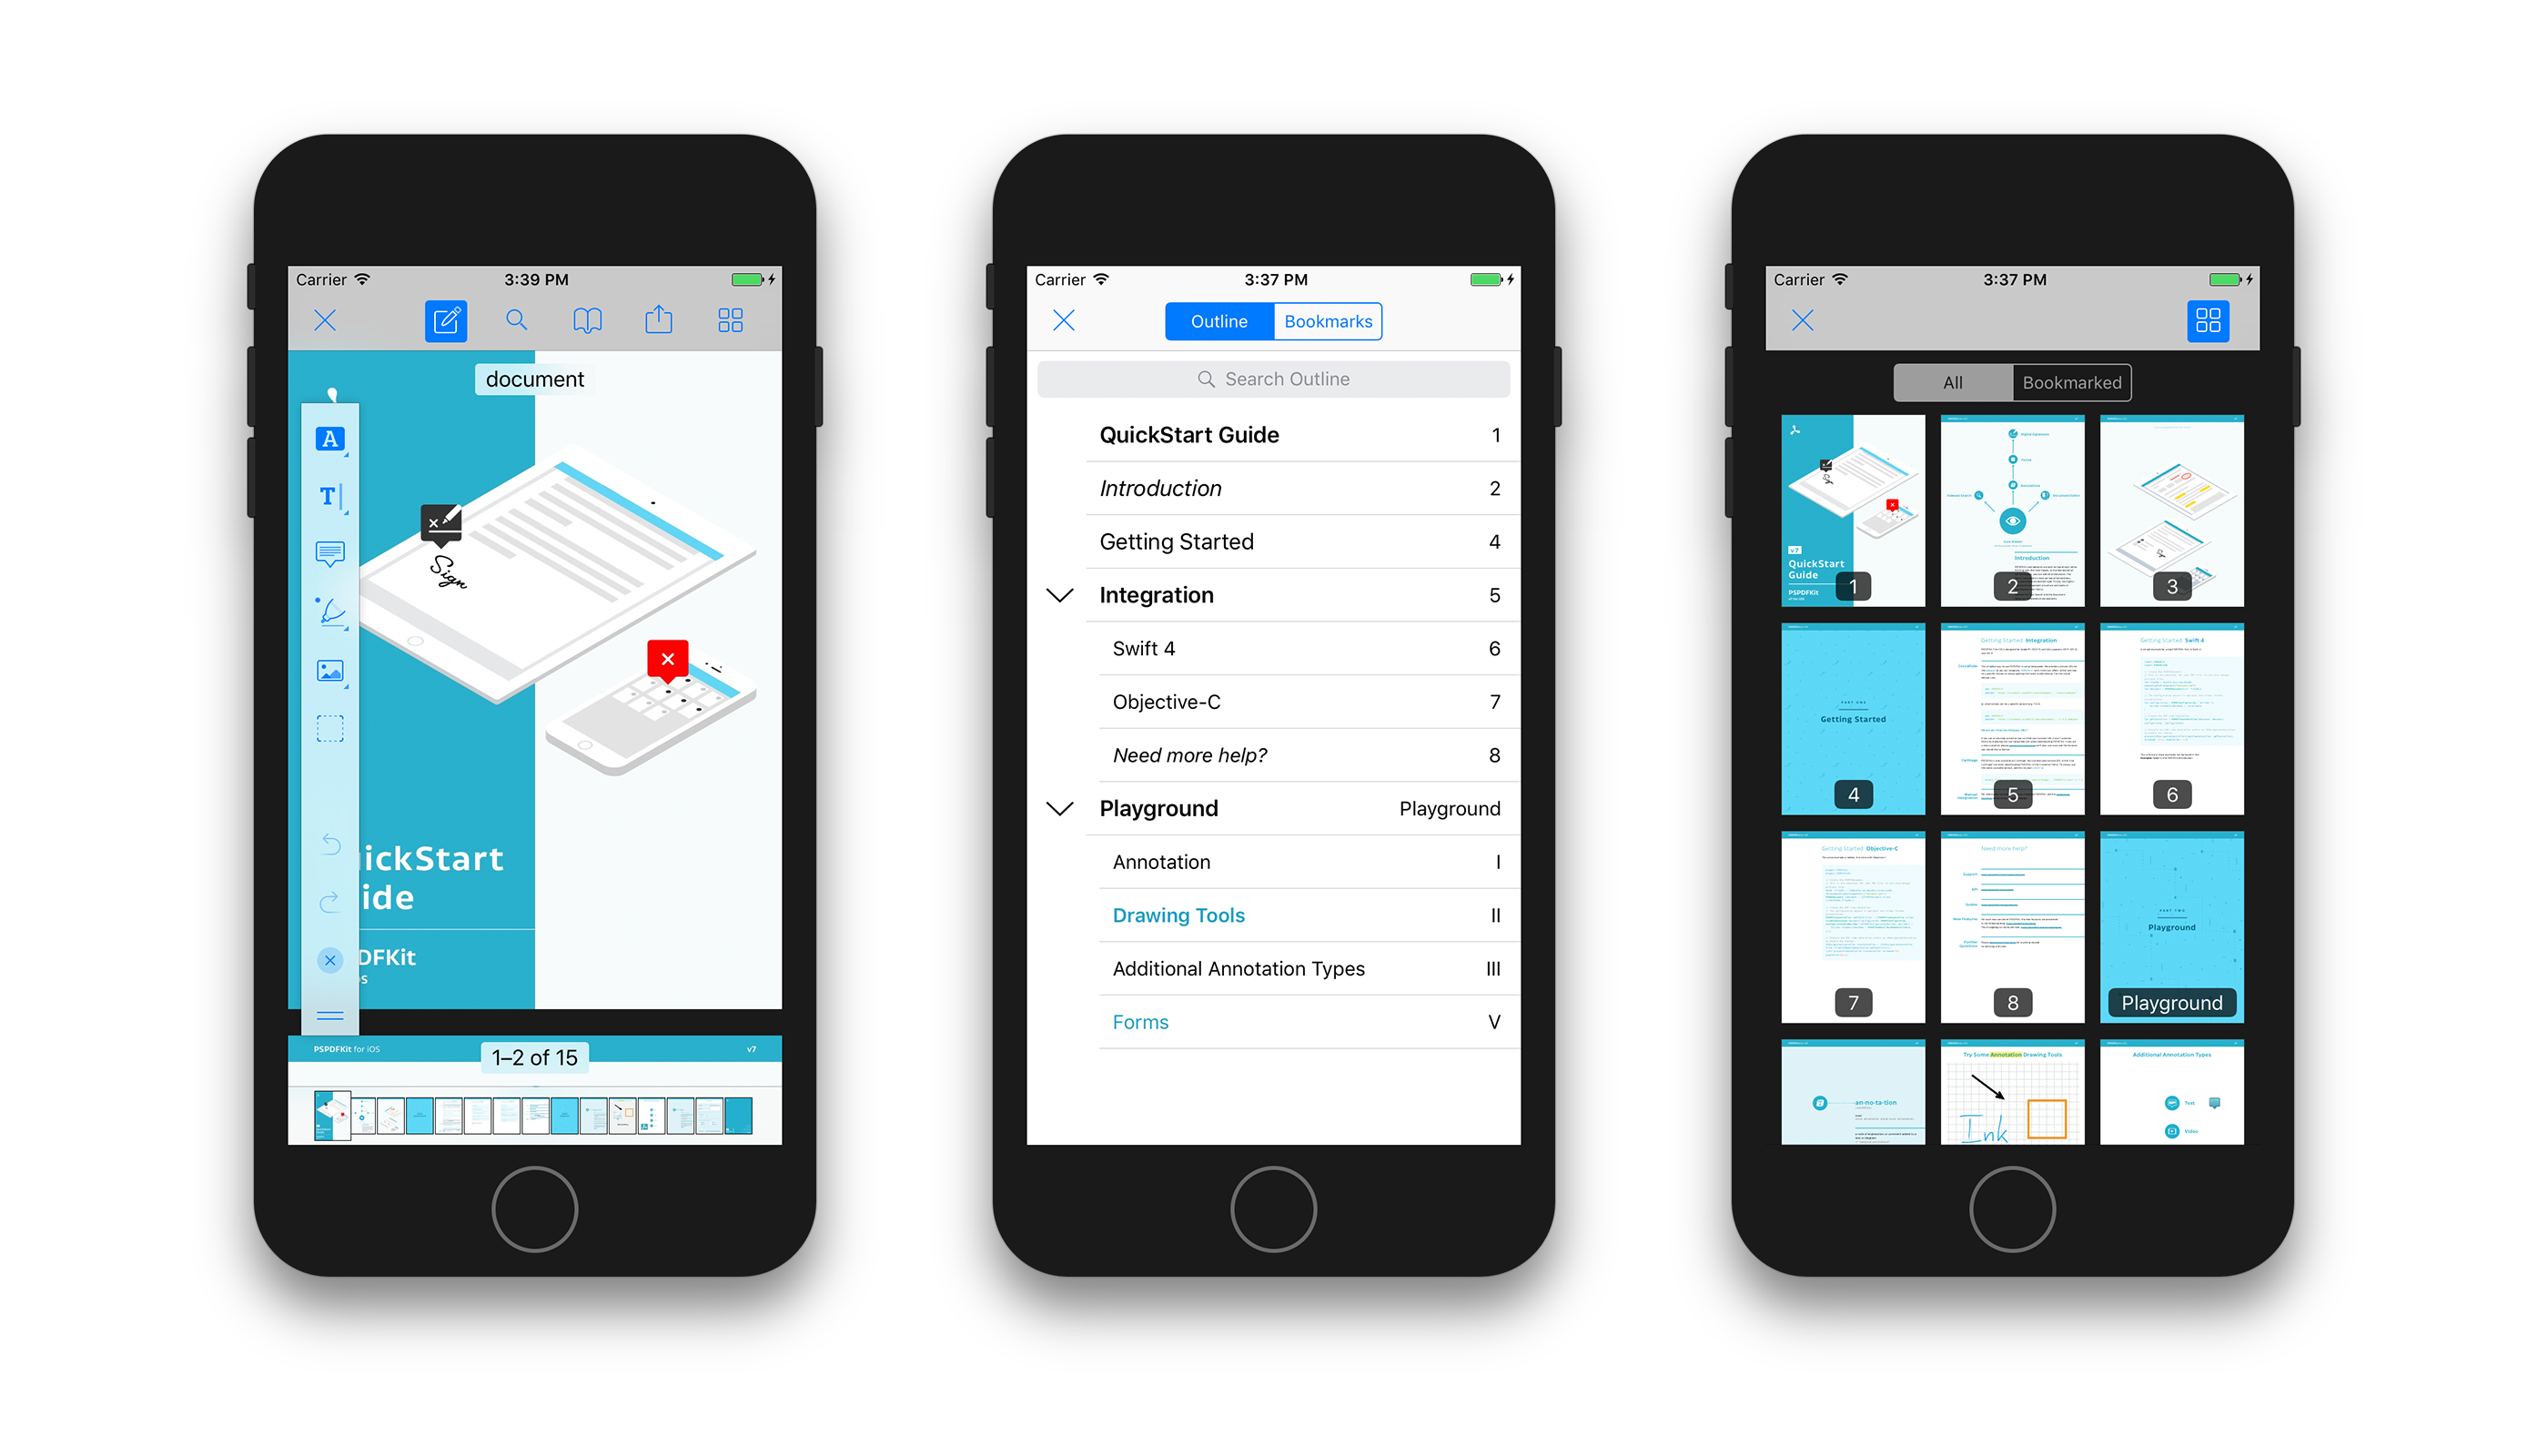
All you need is PSPDFKit.present('document.pdf') and you can view a PDF in PSPDFKit. Not only that, but you can also zoom, create annotations, look at the document’s outline, and lots of other things. Additionally, you can customize the PDF viewer by passing a dictionary to PSPDFKit.present.
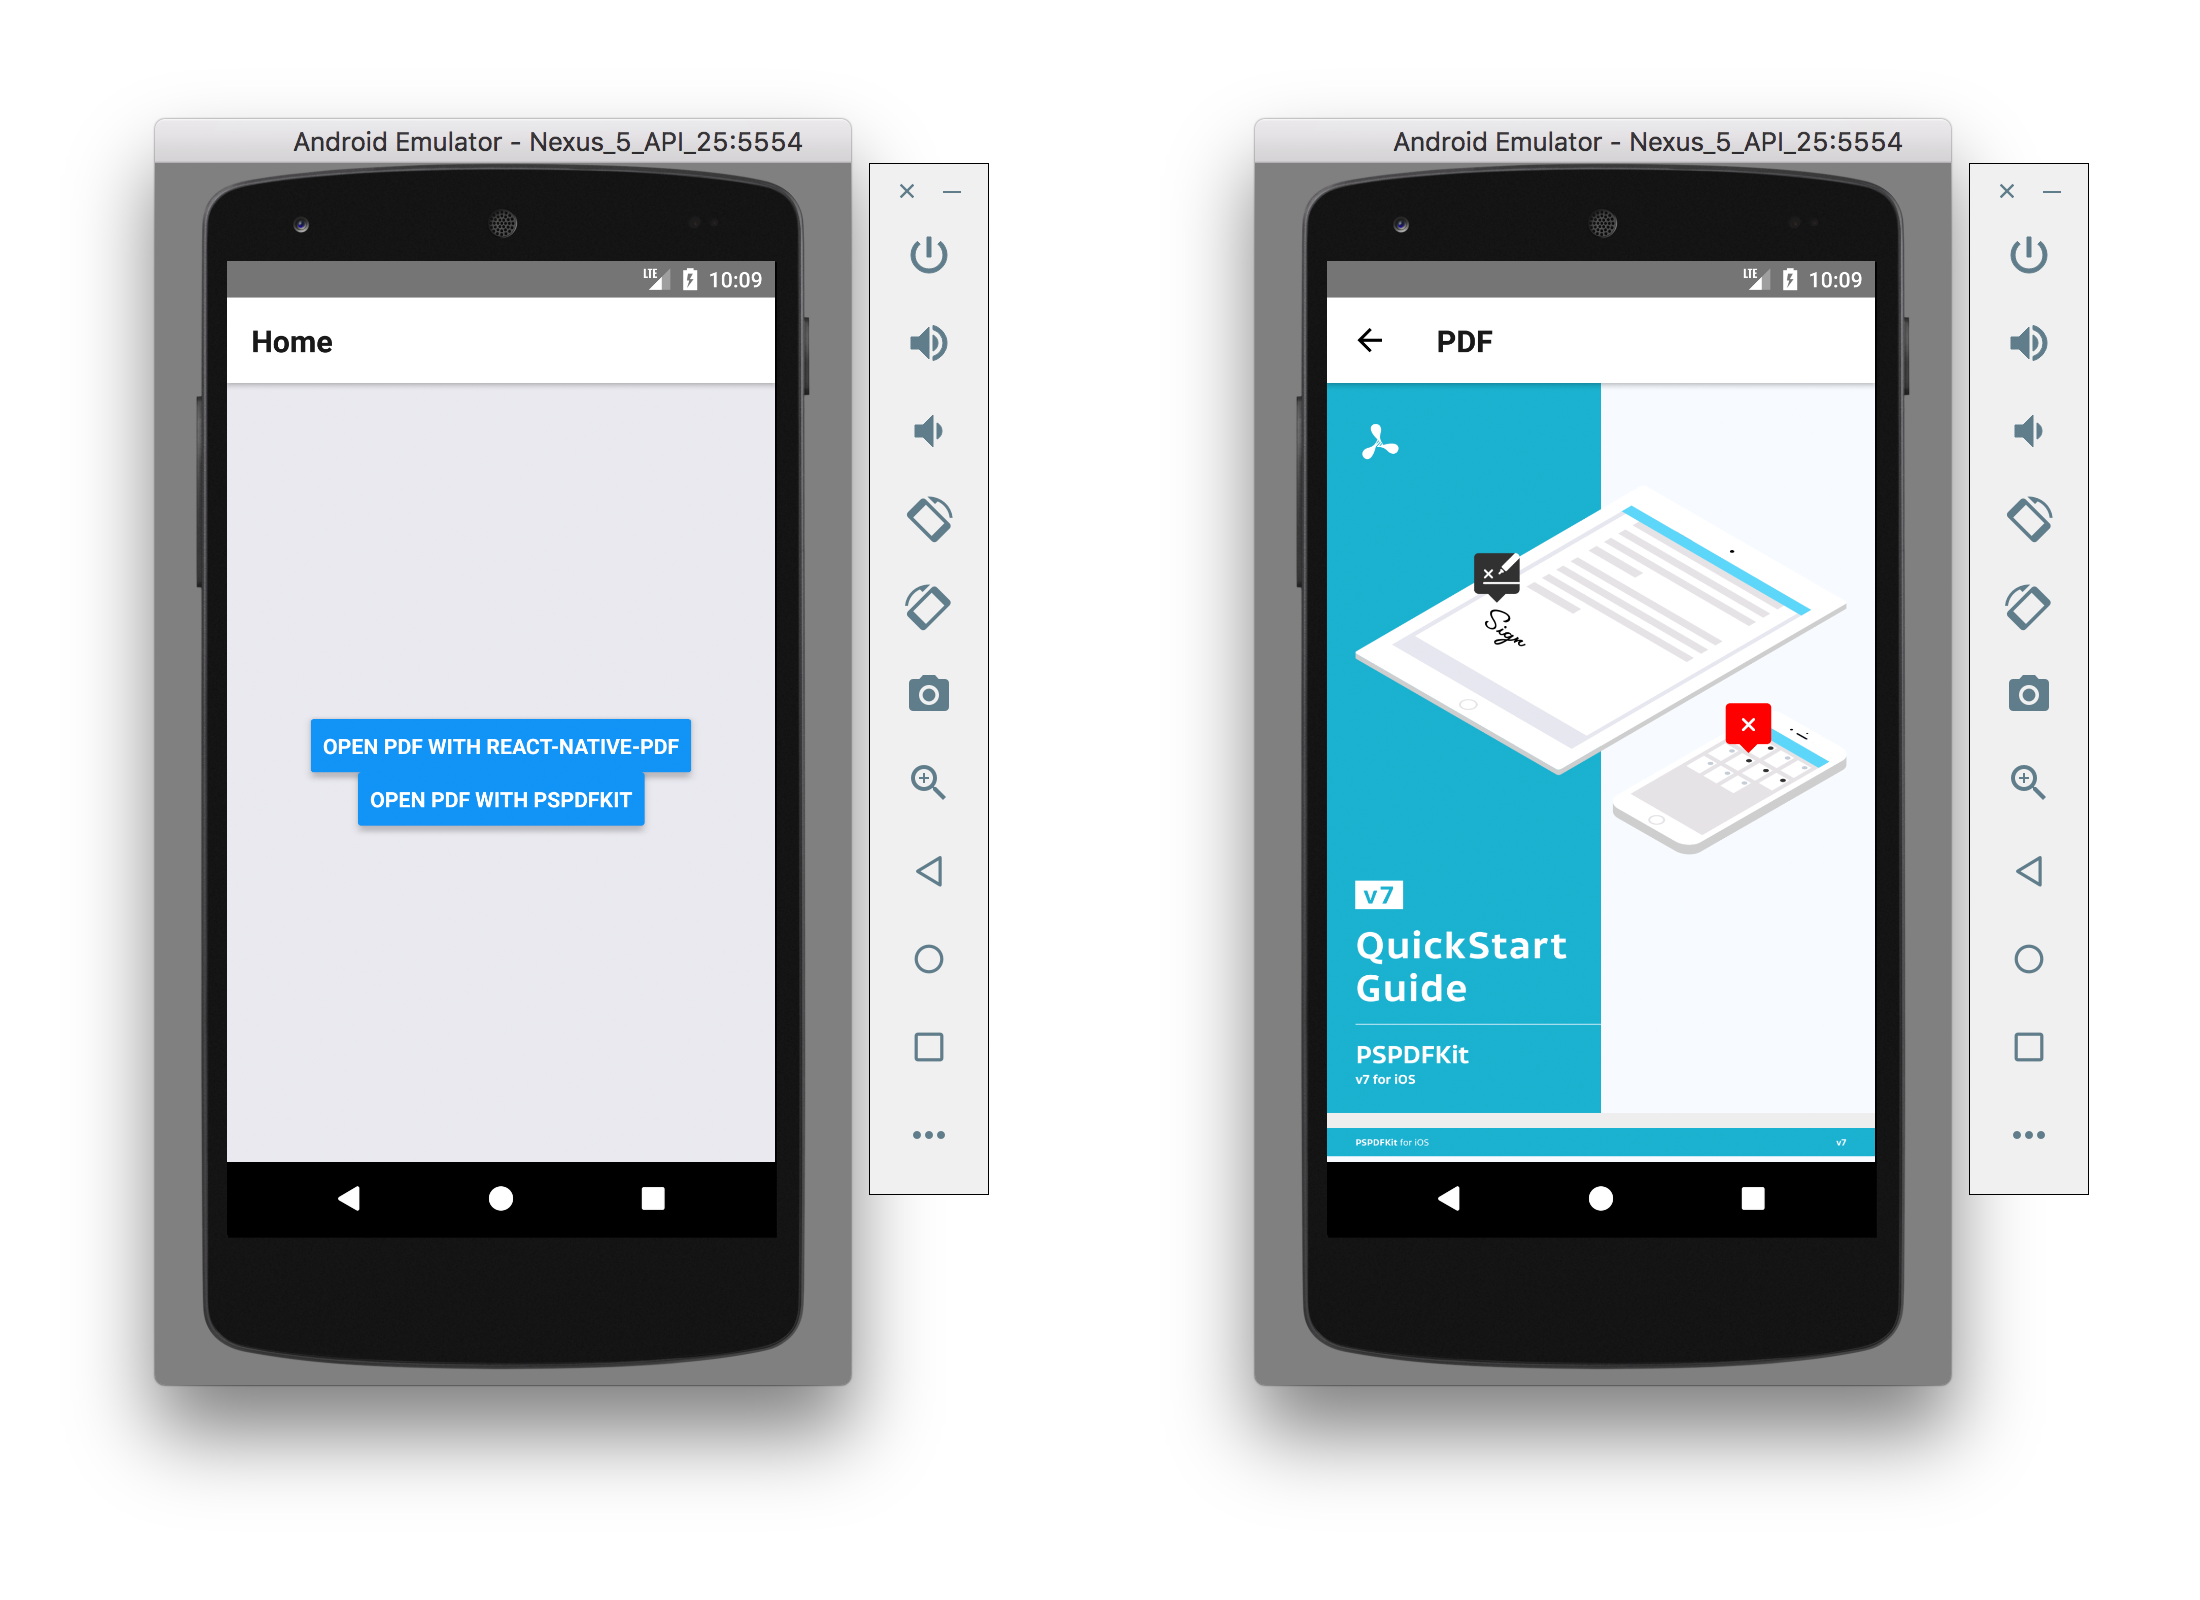
Now, here’s the React Native app powered by PSPDFKit, as seen on iOS.
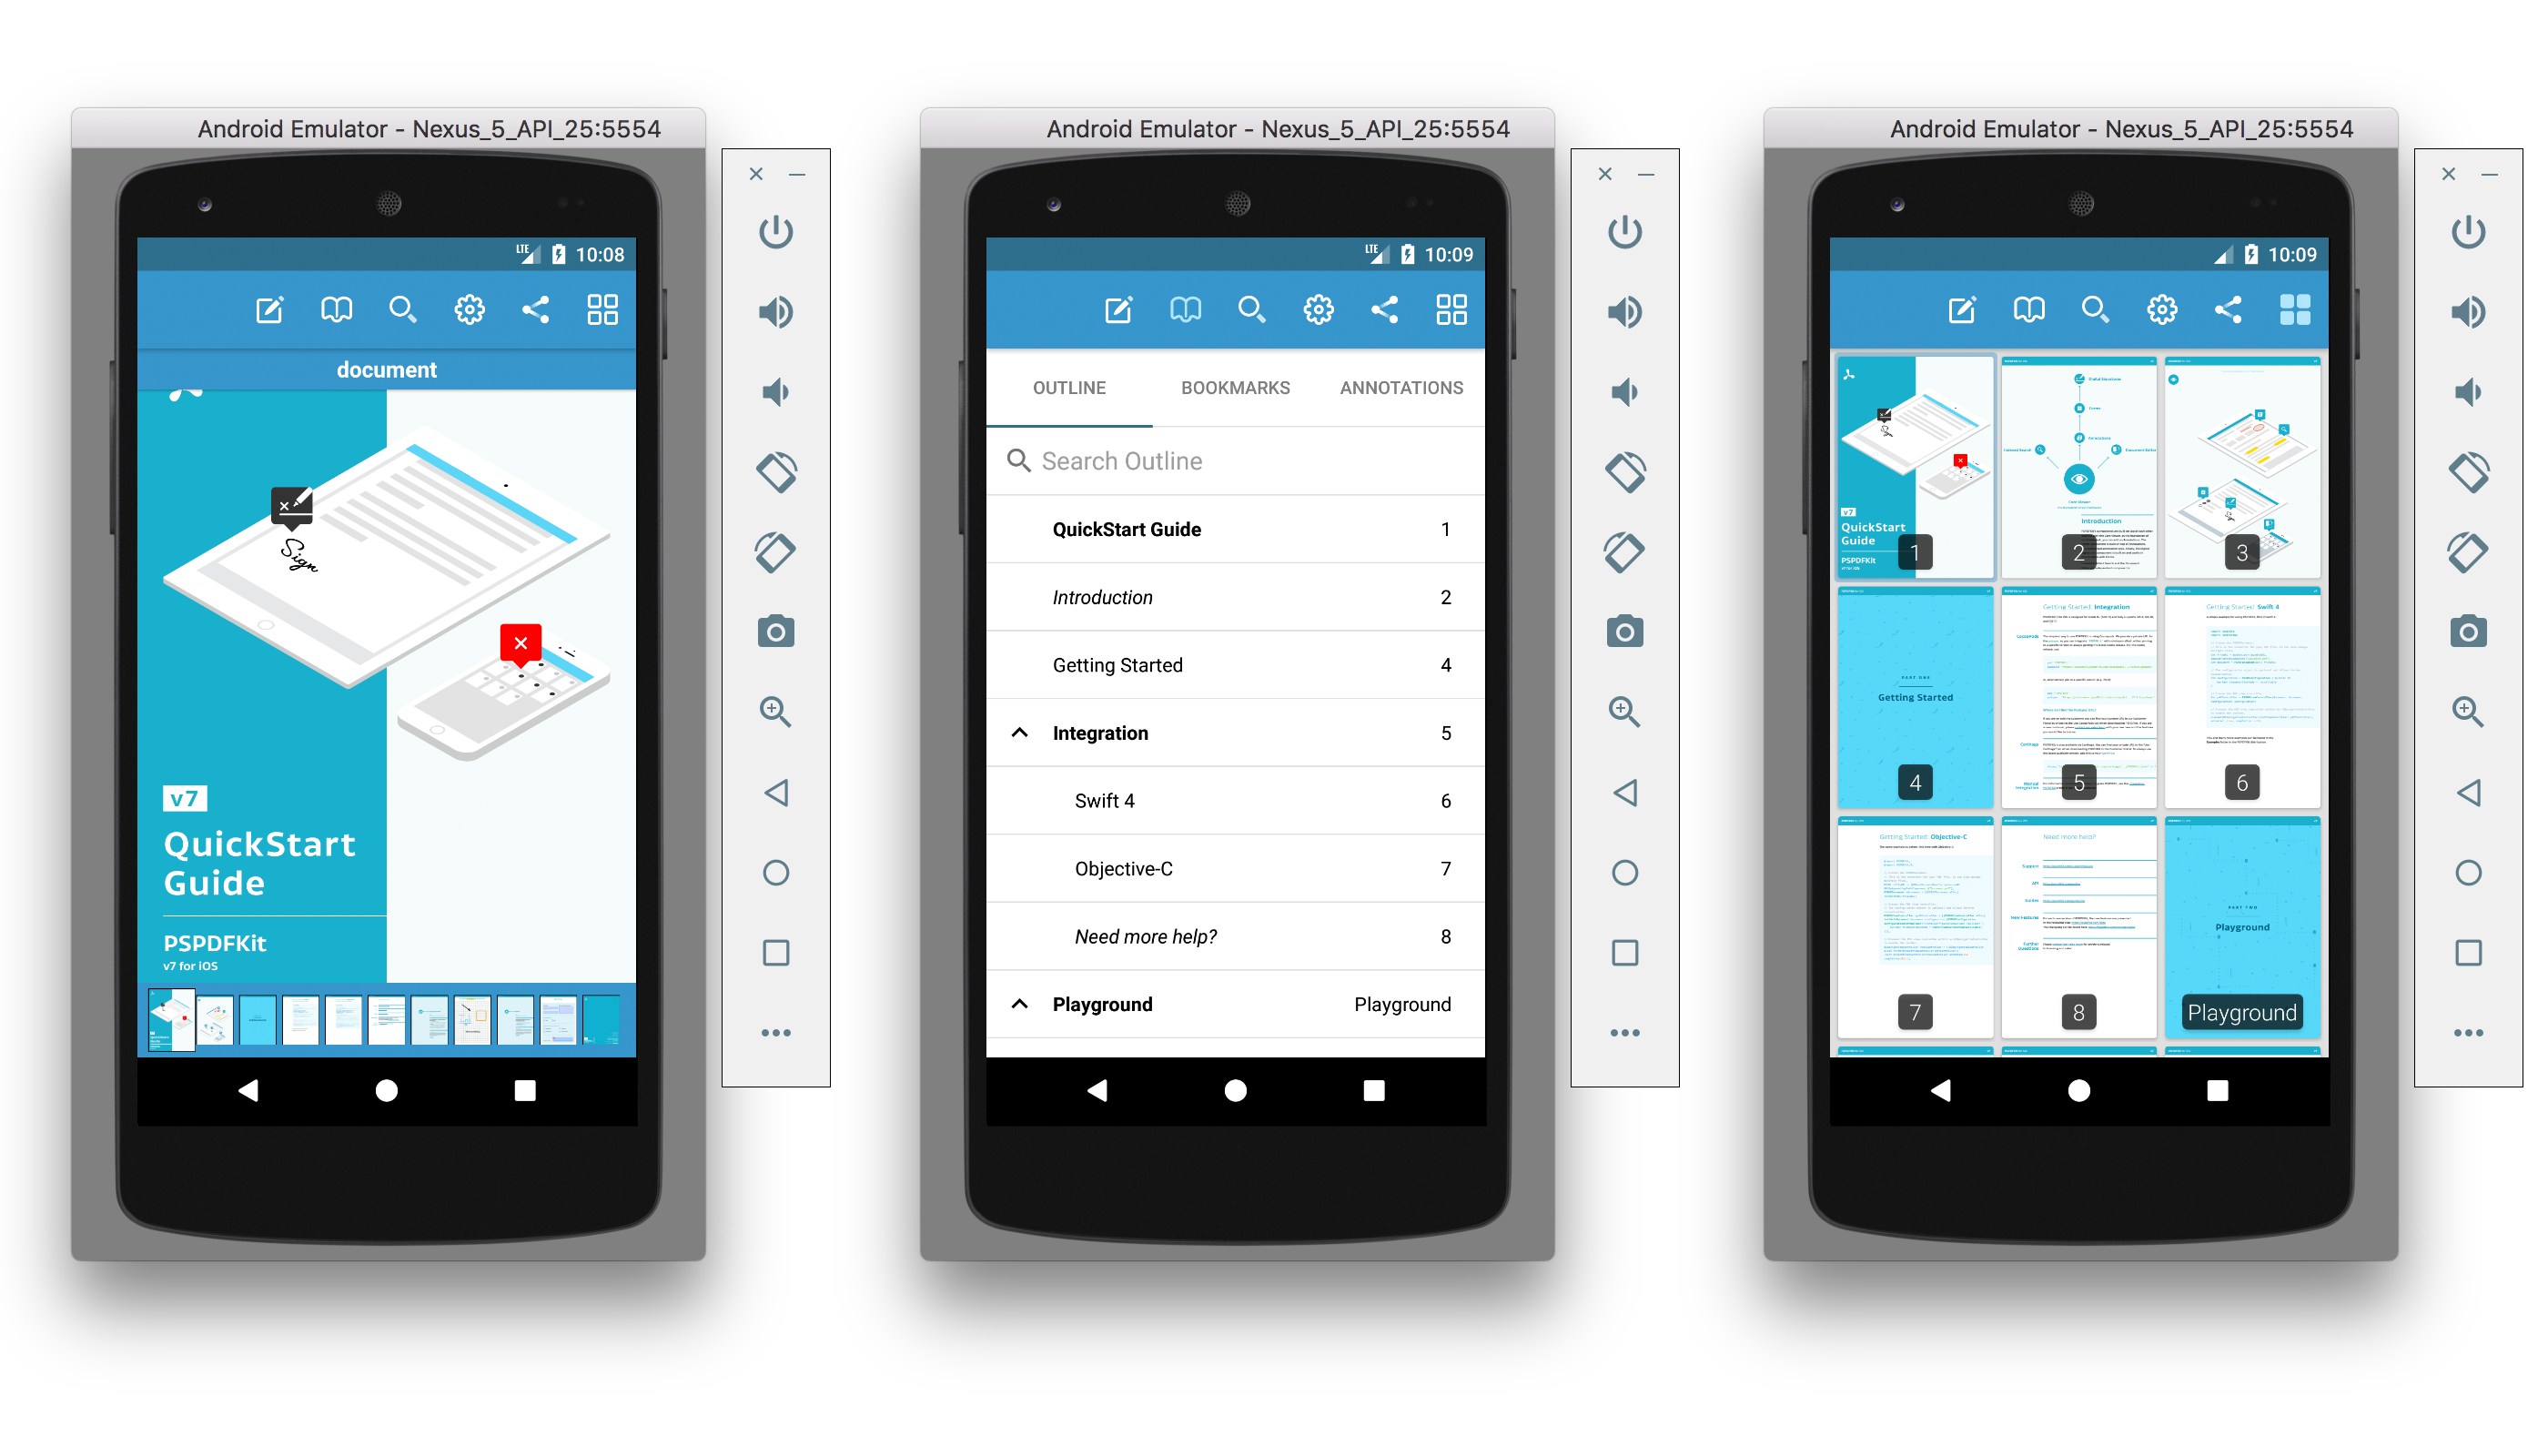
And here’s the same thing, only on Android.
You can find the source code for the entire project on GitHub.
Conclusion
As you saw, adding PDF support to your app with the react-native-pdf package is a breeze.
However, if your React Native project requires more advanced PDF functionality, such as PDF annotations or PDF form filling, you should definitely look into using a commercial library.
Our React Native PDF SDK comes with more than 30 out-of-the-box features and has well-documented APIs to handle advanced use cases. Try out our PDF library using our free trial, and check out our demos to see what’s possible.
PSPDFKit also comes with great customer support, so please reach out to us if you have any questions about our React Native integration.

Jonathan joined PSPDFKit in 2014. As CEO, Jonathan defines the company’s vision and strategic goals, bolsters the team culture, and steers product direction. When he’s not working, he enjoys being a dad, photography, and soccer.