SharePoint PDF Viewer: Integrating On-Premises with PSPDFKit
 Hulya Karakaya

In this post, you’ll learn how to build a SharePoint PDF viewer by integrating PSPDFKit for Web into SharePoint on-premises environments as a file handler. A file handler will allow you to override the default behavior when opening a PDF from SharePoint. By the end of this post, you’ll be able to use a web browser to directly open PDF documents stored in SharePoint.
SharePoint is one of the most popular collaboration platforms worldwide. According to Microsoft, it’s used by more than 200,000 organizations and 190 million people.
SharePoint On-Premises File Handler Integration with PSPDFKit
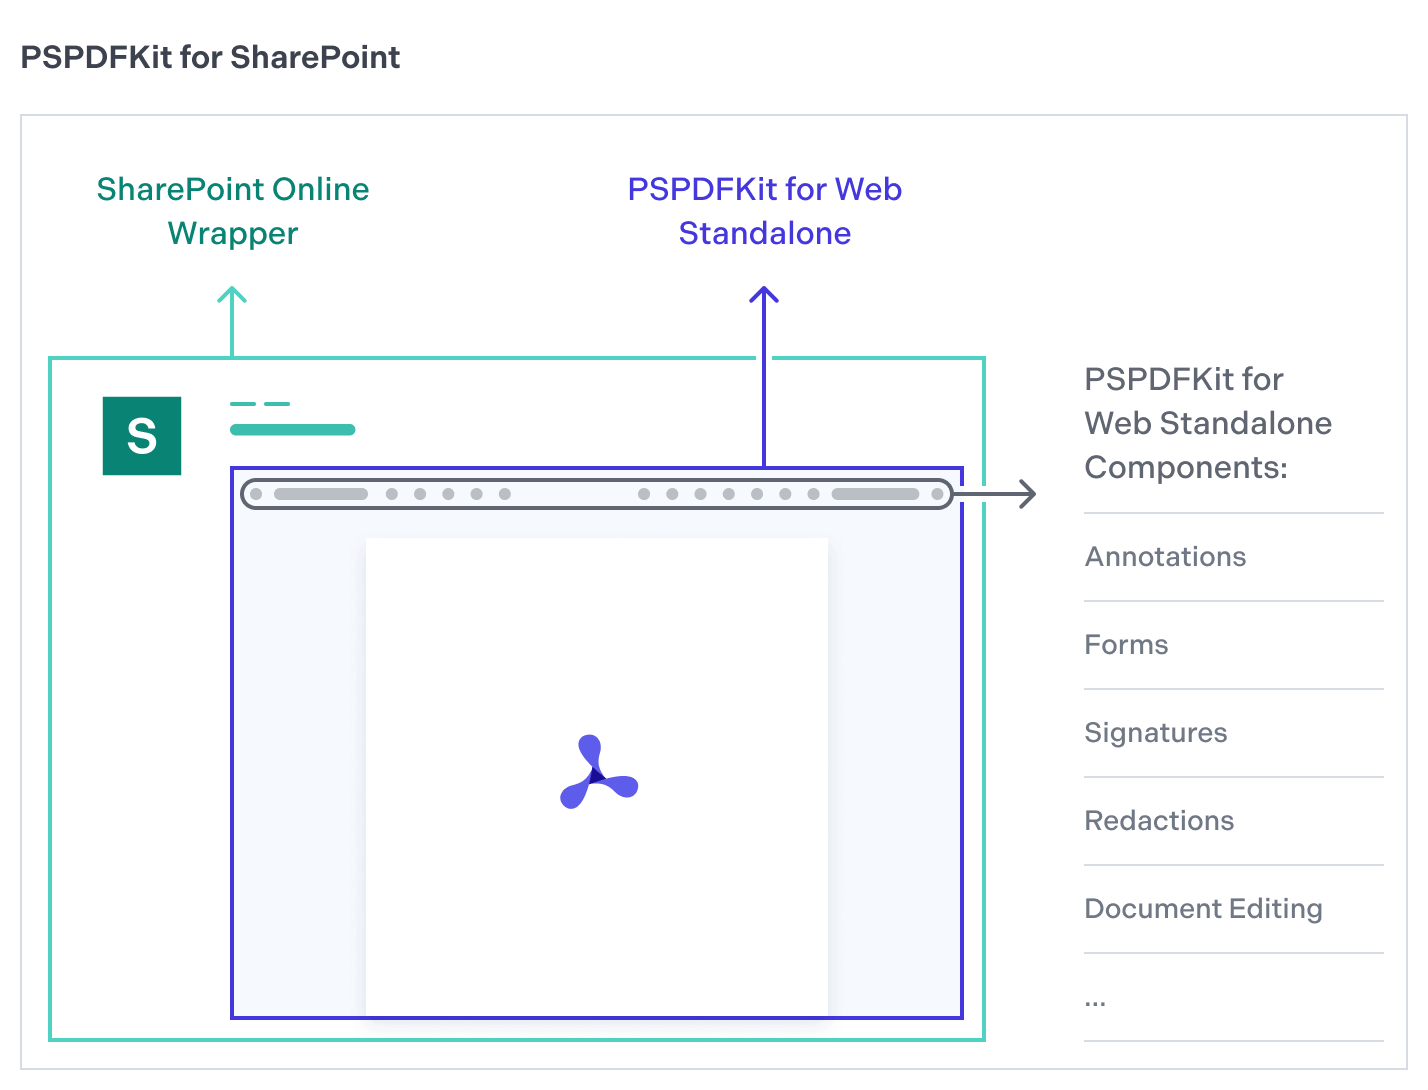
PSPDFKit for SharePoint is a wrapper on top of PSPDFKit for Web Standalone, which is a client-side JavaScript PDF library for viewing and editing PDF files directly in a web browser.
PSPDFKit for SharePoint shares the same APIs as PSPDFKit for Web Standalone, so please use the web documentation when customizing your SharePoint application.
Requirements
Hardware and operating system requirements are determined by both the requirements of the SharePoint version you’re targeting and the requirements of the Visual Studio version used for development. Both SharePoint Server and Visual Studio have to be installed on the developer machine.
The required Visual Studio versions for targeting different SharePoint versions are summarized in the following table. Up to Visual Studio 2017, the matching Microsoft Office Developer Tools needs to be manually downloaded and installed. For Visual Studio 2019 and 2022, the relevant components can be selected during installation of Visual Studio.

SharePoint Permissions Considerations
Before developing SharePoint solutions, you need the correct permissions to run and debug them. So, first do the following, as outlined in Microsoft’s documentation:
-
Add your user account as an Administrator on the system.
-
Add your user account as a Farm Administrator for the SharePoint server.
-
In SharePoint Central Administration, choose Manage the farm administrators group.
-
On the Farm Administrators page, choose New.
-
Add your user account to the
WSS_ADMIN_WPGgroup.
You can find more information based on your version of Visual Studio by checking out the following links:
Creating a New Project
A new project has to be created in Visual Studio. The project then can be deployed to and debugged in your selected SharePoint environment. The project can also be published to create an installable SharePoint solution package (.wsp).
Our example uses Visual Studio 2019, but SharePoint project templates are also available in earlier versions (minimum Visual Studio 2013).
-
Create a new empty SharePoint project matching the desired SharePoint version (SharePoint 2013, SharePoint 2016, or SharePoint 2019).

-
Give your project the name
OpenPDFSharePoint, set its location on your disk, select the desired .NET Framework version, and click Create.

-
Select your development SharePoint site for debugging, and pick Deploy as a farm solution. Click the Finish button. This will create the skeleton of your project.

Creating the Folder Structure
Some folders in your project have to be created or mapped to SharePoint folders in advance.
-
In the Solution Explorer window, right-click on the
OpenPDFSharePointproject and select Add > SharePoint “Layouts” Mapped Folder. This will create theLayoutsfolder and a folder for your code (OpenPDFSharePoint) inside. It also automatically updates the package details.

-
Right-click the
OpenPDFSharePointproject in the Solution Explorer window again and select Add > SharePoint Mapped Folder. Select{SharePointRoot} > TEMPLATE > XMLfrom the tree structure in the popup dialogue and click OK.

-
Using the context menu again, right-click on the newly created
OpenPDFSharePointfolder inside theLayoutsfolder and select Add > New Folder. Create the following nested subfolders inside theOpenPDFSharePointfolder:assets > modern > pspdfkit-lib.

Adding the PSPDFKit Libraries to the Project
The content (the .wasm, JavaScript, CSS, and font files) mentioned in this next part is the PSPDFKit Web Standalone product. It enables the browser to render and edit PDF files.
-
Download the latest PSPDFKit Web Standalone libraries.
-
The download will start immediately and will save a
.tar.gzarchive likePSPDFKit-Web-binary-2022.2.2.tar.gzto your computer. -
Once the download is complete, extract the archive.
-
Right-click on the
Layouts > OpenPDFSharePoint > assets > modernfolder in the Solution Explorer window and select Add > Existing Item… -
Navigate to the extracted
package > dist > modern > pspdfkit.jsfile, select it, and click the Add button. -
Now, right-click on the
Layouts > OpenPDFSharePoint > assets > modern > pspdfkit-libfolder in the Solution Explorer window and select Add > Existing Item… again. -
Navigate to the extracted
package > dist > modern > pspdfkit-libfolder, select all the files in the folder, and click the Add button. The result will look like this:

Adding a PDF Viewer Page
This SharePoint application page will encapsulate the PSPDFKit Web Standalone component and configure it to display the selected PDF file. It’ll also save the changes back into the SharePoint library.
Right-click on your OpenPDFSharePoint folder inside the Layouts folder in the Solution Explorer window and select Add > New Item.

Select Application Page (Farm Solution only) and name it ViewPDF.aspx. Click Add.

In the ViewPDF.aspx file, identify the main content placeholder:
<asp:Content ID="Main" ContentPlaceHolderID="PlaceHolderMain" runat="server">
</asp:Content>
You have to add three things inside the main content placeholder.
-
Add an empty
<div>element with a defined width and height to where PSPDFKit will be mounted:
<div
	id="pspdfkit"
	style="width: 100%; height: calc(100vh - 210px);"
></div>
-
Add a reference to the PSPDFKit JavaScript file:
<script type="text/javascript" src="assets/modern/pspdfkit.js"></script>
-
Add the following script:
<script type="text/javascript">
	// !!! Enter your license key here !!!
	let licenseKey = 'paste your license here';

	// Load PDF Editor.
	PSPDFKit.load({
		container: '#pspdfkit',
		document: '<%= fileURL %>',
		licenseKey: licenseKey,
	})
		.then(function (instance) {
			console.log('PSPDFKit loaded', instance);
		})
		.catch(function (error) {
			console.error(error.message);
		});
</script>
If you have a PSPDFKit license, then paste it into the script (at the beginning) between the quotation marks. Otherwise, let the licenseKey variable be an empty string.

You must explicitly set the type attribute of the script elements to `"text/javascript"`. Otherwise, they’ll be ignored.
Modify the ViewPDF.aspx.cs code behind the file to include the fileURL public property and some new code in the Page_load event:
using Microsoft.SharePoint;
using Microsoft.SharePoint.WebControls;
using System;

namespace OpenPDFSharePoint.Layouts.OpenPDFSharePoint
{
	 public partial class ViewPDF : LayoutsPageBase
	 {
		  /// <summary>
		  /// Gets the file URL extracted from the URL key.
		  /// </summary>
		  public string fileURL { get; private set; }

		  /// <summary>
		  /// Page load event.
		  /// </summary>
		  protected void Page_Load(object sender, EventArgs e)
		  {
				// Extract file URL for the SharePoint file.
				fileURL = Request.QueryString["fileURL"];
		  }
	 }
}
Adding a File Handler
A SharePoint file handler can be used to link PDF files to the PSPDFKit PDF editor. The file handlers are simple XML files at a specific location. They instruct SharePoint to redirect to your URL of choice whenever a file with a particular extension is clicked.
Add an .xml file to the XML folder in the solution named serverfilesPSPDFKit.xml with the following content:
<?xml version="1.0" encoding="utf-8" ?>
<ServerFiles>
  <!-- Redirect any links to a PDF file to the PDF Editor application page -->
  <Mapping FileExtension="pdf" RedirectUrlTemplate="/_layouts/15/OpenPDFSharePoint/ViewPDF.aspx?fileURL=|0" NoGetRedirect="TRUE"/>
</ServerFiles>
Enabling the WASM MIME Type
Before the above example can be used, verify that .wasm files are served by your SharePoint web server.
Start the Internet Information Services (IIS) Manager. Navigate to the website that belongs to your SharePoint instance. Double-click MIME Types in the Features View.

If .wasm isn’t in the list of extensions, click Add in the Actions pane. In the Add MIME Type popup window, enter .wasm (as File name extension) and application/wasm (as MIME type). Click OK.

Publishing the Solution
Visual Studio allows you to deploy your solution to the SharePoint instance you selected at the beginning for debugging purposes. Select Deploy Solution from the Build menu.

It’s also possible to publish a deployable package (.wsp) by selecting Publish… in the Build menu. Pick Publish to File System, specify your desired location, and click Publish.

Installing the Solution
Open the SharePoint Management Shell with Run as administrator. Assuming you have the .wsp file in the c:\deploy folder, copy and execute the following command:
Add-SPSolution "c:\deploy\OpenPDFSharePoint.wsp"
Next, copy and execute the following command:
Install-SPSolution -Identity OpenPDFSharePoint.wsp -GACDeployment
The SharePoint Administration and SharePoint Timer Service services must be running.
Using the Solution
Navigate to a SharePoint document library and click on a PDF file. It’ll open in the PSPDFKit PDF editor.
Adding Even More Capabilities
Once you’ve deployed your viewer, you can start customizing it to meet your specific requirements or easily add more capabilities. To help you get started, here are some of our most popular SharePoint guides:
Conclusion
You should now have our SharePoint On-Premises file handler integration up and running. If you hit any snags, don’t hesitate to reach out to our support team for help.
You can also use our vanilla JavaScript PDF viewer to build a Microsoft OneDrive PDF Viewer or a Microsoft Teams PDF Viewer.
To see a list of all web frameworks, start your free trial. Or, launch our demo to see our viewer in action.