Adopting UIAppearance in Custom Views

It’s difficult to overestimate the importance of beauty and uniqueness where the appearance of user interfaces is concerned: A well-designed UI is a crucial ingredient in making an app stand out among its competitors in the now-saturated App Store market. Thankfully, Apple provides a tool that helps achieve just that. UIAppearance makes it possible to apply a consistent style to views across an entire application.
Rather than showing how to use UIAppearance to style existing views, this article will focus on how to adopt it in custom views, as part of either an open source framework or a closed-source app. It will also cover some challenges that might occur in the process.
What UIAppearance Is and How It Works
UIAppearance was introduced in 2011 as part of iOS 5 SDK, which brought about the explosion of UI customization in the world of iOS app development. Its job is very simple — it allows you to customize the look of every instance of a particular view in your app without needing to apply the style manually every time:
// This will make background of every view red.
UIView.appearance().backgroundColor = .red
// This will make background of every view red.
[UIView appearance].backgroundColor = UIColor.redColor;
UIAppearance works on top of the powerful Objective-C runtime by recording invocations of methods and property setters in a so-called appearance proxy, and by reapplying them one by one after the view is added to a window, just before didMoveToWindow() is called. The appearance proxy is also smart enough to not override any styles you set on individual views:
let view = UIView()

// This view will have a blue background even though we set it to red using `UIAppearance`.
view.backgroundColor = .blue
UIView *view = [[UIView alloc] init];

// This view will have a blue background even though we set it to red using `UIAppearance`.
view.backgroundColor = UIColor.blueColor;
Getting Started
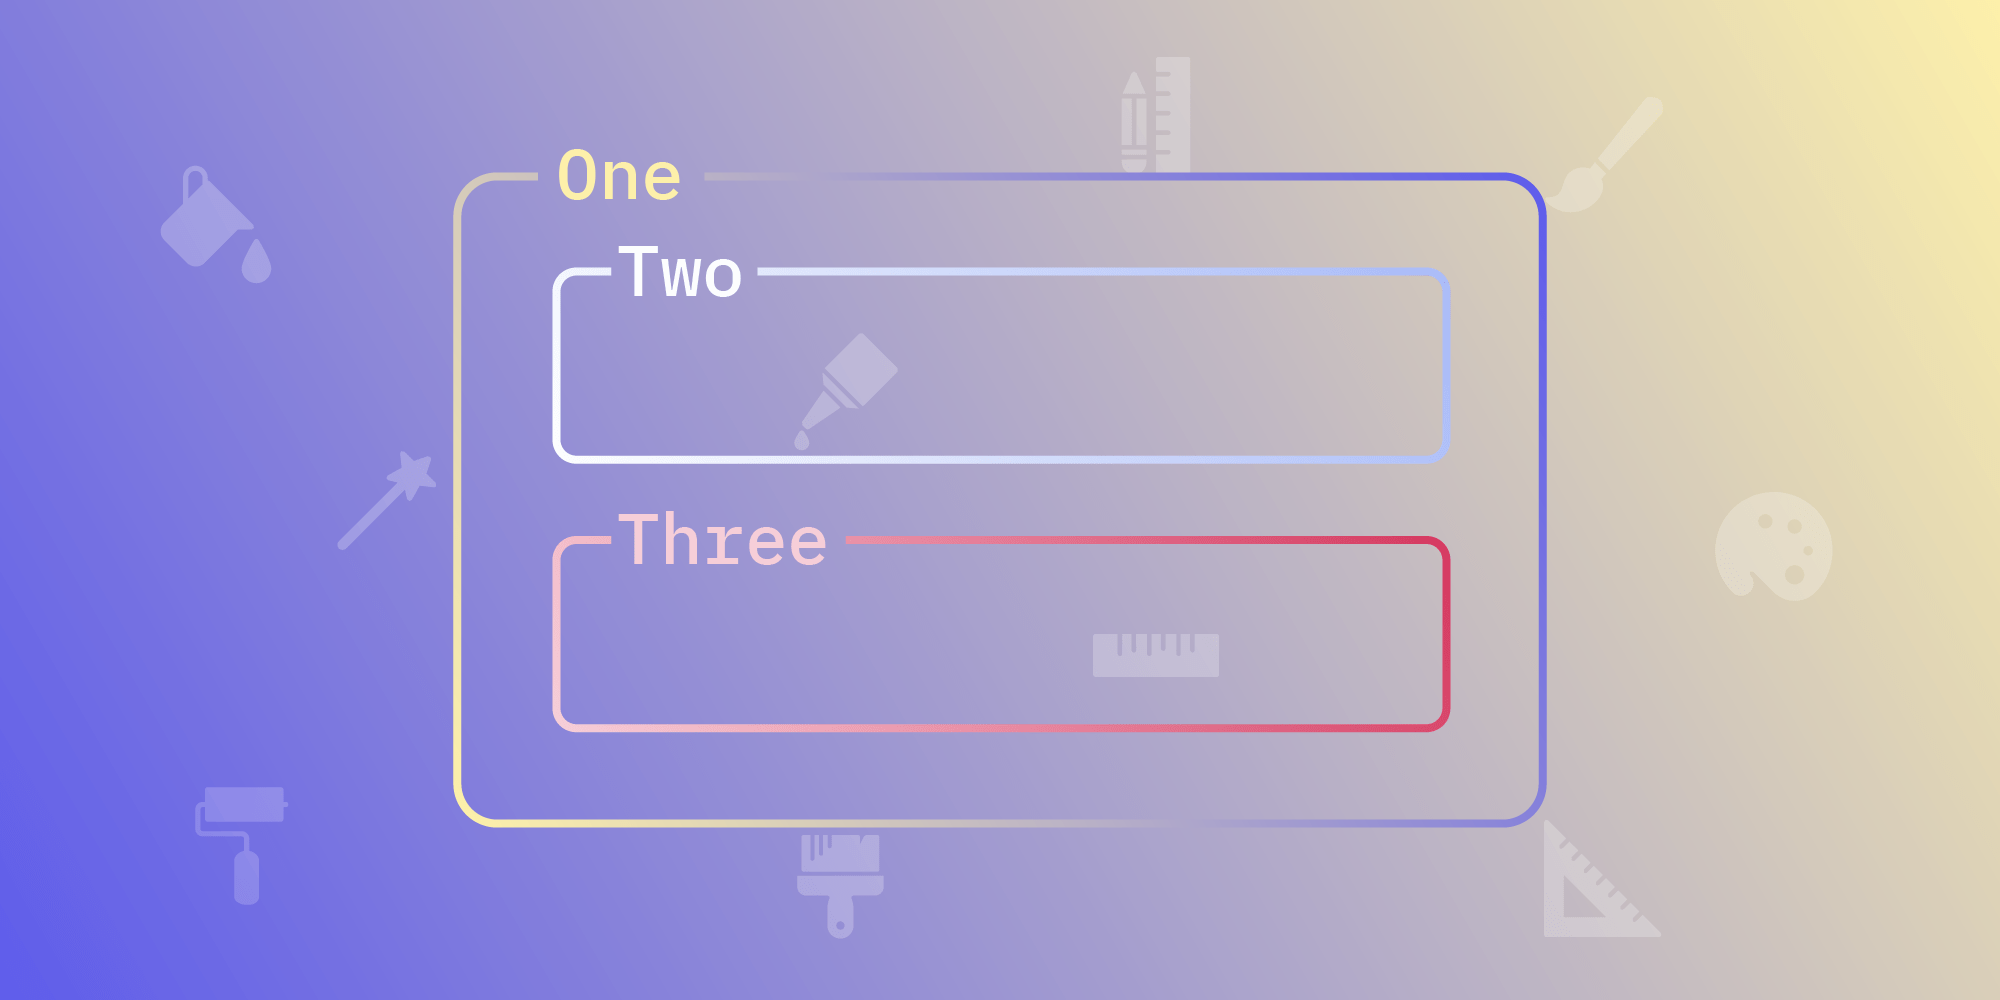
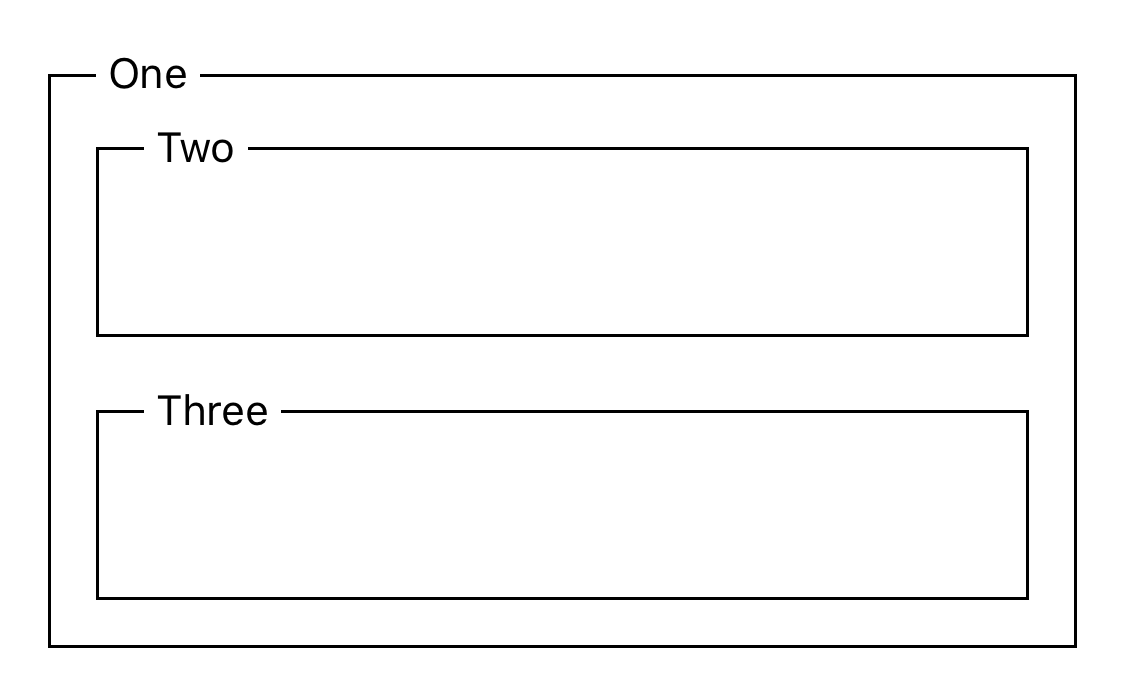
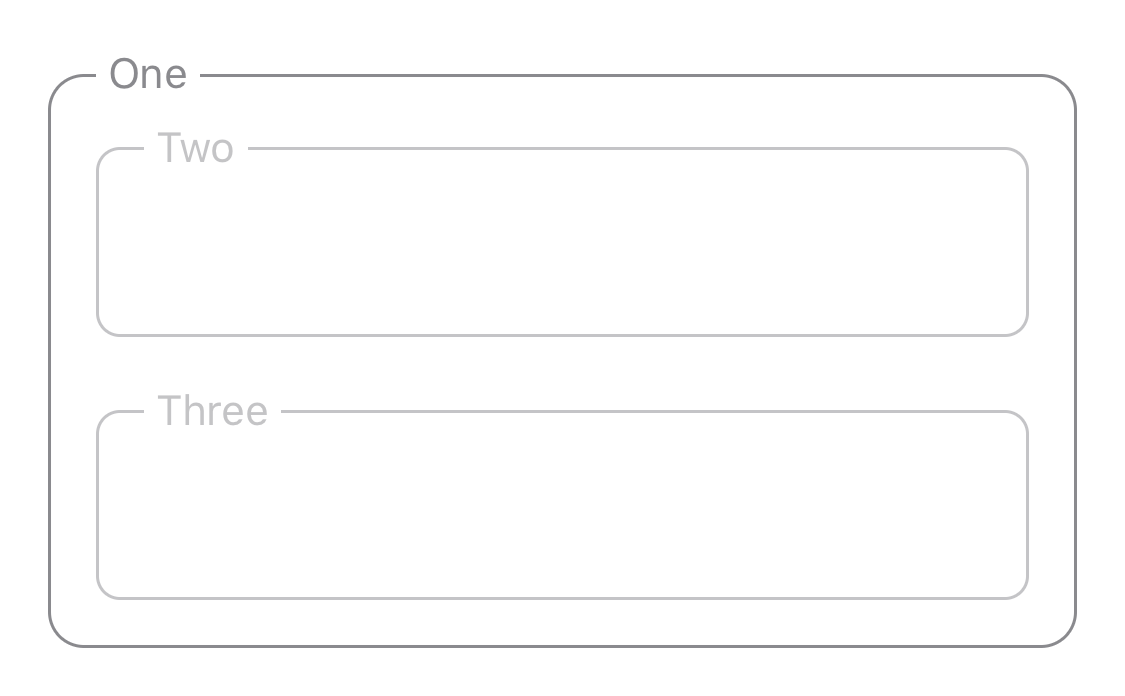
For the purpose of this article, let’s assume we’re adding Mac Catalyst support to our awesome iOS app. Since part of adding this includes making the app feel more Mac-like, we’ll create BoxView, a component that allows grouping controls in distinct boxes, similar to what native macOS apps might do using AppKit’s NSBox. Here it is in its default configuration:
Let’s also assume BoxView already supports customizing its look and feel using a set of properties. The actual implementation of these properties is not important for now, as long as we assume that setting them eventually updates the UI:
class BoxView: UIView {
    var borderColor: UIColor
    var borderRadius: CGFloat
    ...
}
@interface XYZBoxView : UIView
@property (nonatomic, strong) UIColor *borderColor;
@property (nonatomic, assign) CGFloat borderRadius;
...
@end
As the number of different use cases for BoxView grows, and as customizing these properties on every instance becomes infeasible, we can decide to add support for customizing them from one central place. To do this, we can use UIAppearance (just like we can with UIKit classes).
Annotating Properties and Methods
Our first step would be to make BoxView conform to both UIAppearance and UIAppearanceContainer protocols. Thankfully, UIView provides conformance to both of them out of the box.
After that, two different steps must be taken, depending on whether your class is written in Swift or in Objective-C. In Swift, you must mark your properties as @objc and dynamic. This ensures they’re visible to the Objective-C runtime and are always dispatched dynamically. As a result, they’re always picked up by the invocation recording mechanism described earlier:
@objc dynamic var borderColor: UIColor
In Objective-C, since everything is dynamically dispatched anyway, it’s sufficient to add the UI_APPEARANCE_SELECTOR attribute to any property that you want to participate in the mechanism:
@property (nonatomic) UIColor *borderColor UI_APPEARANCE_SELECTOR;If you have any methods that set a property depending on some other parameter (let’s call this parameter axis), they must follow a special convention so that the appearance proxy can pick up their invocations and handle them. In Swift, they also must be marked as @objc and dynamic:
@objc dynamic func property(forAxis axis: AxisType) -> PropertyType
@objc dynamic func setProperty(_ property: PropertyType forAxis axis: AxisType)
- (PropertyType)propertyForAxis:(AxisType)axis UI_APPEARANCE_SELECTOR;
- (void)setProperty:(PropertyType)property forAxis:(AxisType)axis UI_APPEARANCE_SELECTOR;
PropertyType can be any Objective-C class: Int, UInt, CGFloat, CGPoint, CGSize, CGRect, UIEdgeInsets, or UIOffset. AxisType must be Int, UInt, or any integer-backed Objective-C enum.
ℹ️ Tip: If you’re seeing crashes when trying to use UIAppearance with your custom view, chances are you forgot to fulfill some of the above requirements. Especially if your view is a Swift class, double-check that the properties and methods are not missing the dynamic keyword.
Setting the Default Style
There are two ways to set default appearance for our BoxView. The simplest approach is to just set the default style inside BoxView.init(frame:):
self.borderColor = .secondaryLabel
self.borderRadus = 12
...
_borderColor = UIColor.secondaryLabelColor;
_borderRadius = 12;
...
This will ensure that all instances of BoxView have UIColor.secondaryLabel as the borderColor and a borderRadius of 12 by default.

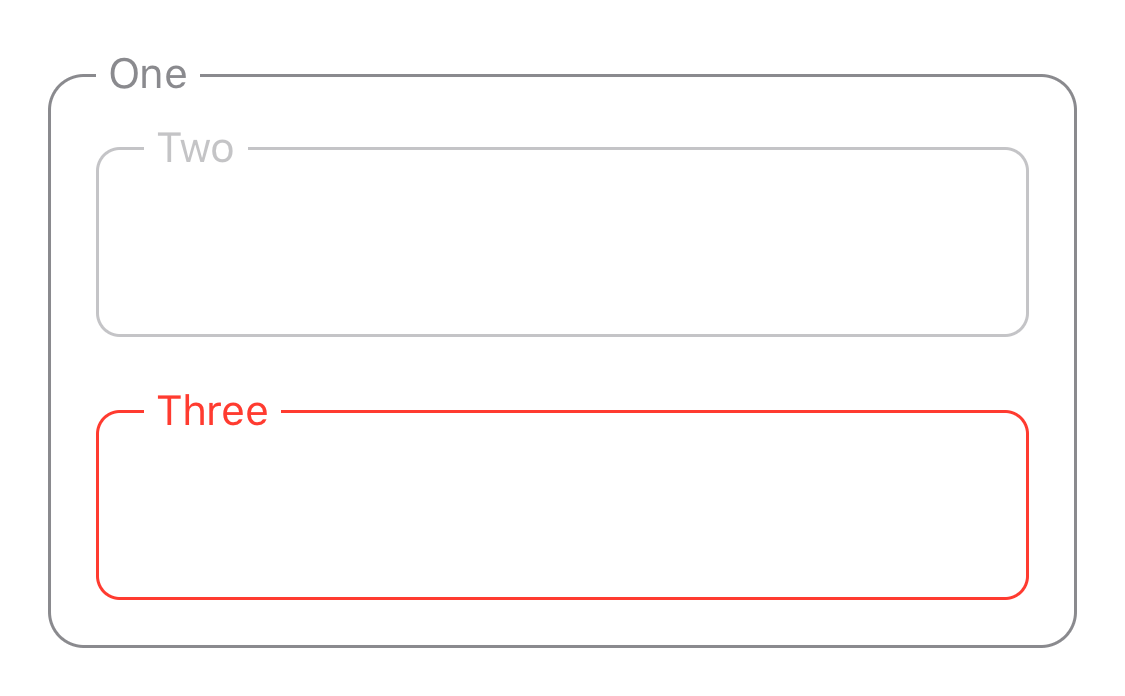
The drawback of the above approach is that it applies the same style to all instances, but some views might need to have a different style depending on where they’re placed. In our case, we want to make nested BoxViews slightly lighter than their parents so that the visual distinction of hierarchy is more prominent.
In order to set the default appearance based on where BoxView is placed, we need to make use of appearance(whenContainedInInstancesOf:) ourselves before any actual appearance customizations happen. While we can leverage NSObject.initialize() for this in Objective-C, it’s not that easy in Swift, as Swift has no notion of type initializers. Instead, we’ll have to expose and document a method that sets up a default appearance and needs to be called manually early on in the application lifecycle:
static func setupDefaultAppearance() {
    let topLevelAppearance = BoxView.appearance()
    topLevelAppearance.borderColor = .secondaryLabel
    topLevelAppearance.borderRadius = 12
    ...

    let nestedAppearance = BoxView.appearance(whenContainedInInstancesOf: [BoxView.self])
    nestedAppearance.borderColor = .tertiaryLabel
    nestedAppearance.borderRadius = 8
    ...
}

// Then call it e.g. in `application(_:willFinishLaunchingWithOptions:)`.
BoxView.setupDefaultAppearance()
+ (void)setupDefaultAppearance {
    XYZBoxView *topLevelAppearance = [XYZBoxView appearance];
    topLevelAppearance.borderColor = UIView.secondaryLabelColor;
    topLevelAppearance.borderRadius = 12;
    ...

    XYZBoxView *nestedAppearance = [XYZBoxView appearanceWhenContainedInInstancesOf: @[XYZBoxView.self]];
    nestedAppearance.borderColor = UIColor.tertiaryLabelColor;
    nestedAppearance.borderRadius = 8;
    ...
}

+ (void)initialize {
    [self setupDefaultAppearance];
}
With that, nested BoxViews will have a slightly lighter borderColor and smaller borderRadius than their parents — which is exactly what we wanted!
Setting the Style Using Objects
Now let’s imagine that the number of style properties grows so much that instead of having multiple properties on BoxView, we decide to use BoxViewStyle, a dedicated object that holds all of the properties in one place:
class BoxViewStyle: NSObject, NSCopying {
    var borderColor: UIColor
    var borderRadius: CGFloat
    ...
}

class BoxView: UIView {
    @objc @NSCopying dynamic var style: BoxViewStyle
    ...
}
@interface XYZBoxViewStyle : NSObject
@property (nonatomic, strong) UIColor *borderColor;
@property (nonatomic, assign) CGFloat borderRadius;
...
@end

@interface XYZBoxView : UIView
@property (nonatomic, copy) XYZBoxViewStyle *style UI_APPEARANCE_SELECTOR;
...
@end
The first thing we need to do is update the way we set the default style. Instead of setting borderColor and borderRadius on BoxView’s appearance proxy directly, we have to create an instance of BoxViewStyle:
static func setupDefaultAppearance() {
    let topLevelAppearance = BoxView.appearance()
    topLevelAppearance.style = BoxViewStyle(borderColor: .secondaryLabel, borderRadius: 12, ...)

    let nestedAppearance = BoxView.appearance(whenContainedInInstancesOf: [BoxView.self])
    nestedAppearance.style = BoxViewStyle(borderColor: .tertiaryLabel, borderRadius: 8, ...)
}
+ (void)setupDefaultAppearance {
    XYZBoxView *topLevelAppearance = [XYZBoxView appearance];
    topLevelAppearance.style = [[XYZBoxViewStyle alloc] initWithBorderColor:UIView.secondaryLabelColor borderRadius:12 ...];

    XYZBoxView *nestedAppearance = [XYZBoxView appearanceWhenContainedInInstancesOf: @[XYZBoxView.self]];
    nestedAppearance.style = [[XYZBoxViewStyle alloc] initWithBorderColor:UIView.tertiaryLabelColor borderRadius:8 ...];
}
Now let’s try to override one of the properties on an individual view:
let errorBox = BoxView()
errorBox.style.borderColor = .systemRed;
XYZBoxView *errorBox = [[XYZBoxView alloc] init];
errorBox.style.borderColor = UIColor.systemRedColor;
Unfortunately, this doesn’t work. BoxViewStyle is a mutable class, so the appearance proxy doesn’t pick up the style property setter, because it’s never called. As a result, it thinks we didn’t override anything and instead applies the default style.
This is a common pitfall when using objects with UIAppearance. The same problem exists even with system APIs, e.g. UINavigationBarAppearance. The solution is to override the entire object:
let errorBoxStyle = BoxViewStyle()
errorBoxStyle.borderColor = .systemRed

// The box will now have a red border.
errorBox.style = errorBoxStyle
XYZBoxViewStyle *errorBoxStyle = [[XYZBoxViewStyle alloc] init];
errorBoxStyle.borderColor = UIColor.systemRedColor;

// The box will now have a red border.
errorBox.style = errorBoxStyle;
The box will now have a red border, but it will lose all other default styles that we set in setupDefaultAppearance(). If you recall when the appearance proxy applies the invocations, the explanation is simple — our first approach was done too early, as we tried to modify the style before it was set by the appearance proxy.
If we move that code to a later stage in either the view’s lifecycle or the view controller’s lifecycle, e.g. to UIView.didMoveToWindow() or UIViewController.viewWillLayoutSubviews(), we can modify just a subset of styles on top of default ones:
// Place in `UIView.didMoveToWindow()` or `UIViewControoller.viewWillLayoutSubviews()`.
errorBox.style.borderColor = .systemRed
// Place in `-[UIView didMoveToWindow]` or `-[UIViewController viewWillLayoutSubviews]`.
errorBox.style.borderColor = UIColor.systemRedColor;The view will now have an overridden border color while still preserving the default radius — which is exactly what we expect:
Conclusion
Adopting UIAppearance is a process that’s straightforward at the beginning but has some gotchas down the road. However, if you follow all the requirements and keep in mind that the appearance proxy decides which style to set and when to set it, the result is worth the effort. If you want to learn more about UIAppearance, its official documentation is a good place to begin.
At PSPDFKit, we believe that utilizing standard and widely used platform patterns, such as UIAppearance, is crucial for delivering the best possible experience to our customers. Our SDK was designed to be very flexible in that regard, and it offers a wide variety of appearance-centric properties. Learn more about customizing PSPDFKit in our guides.