Creating an Efficient App Store Screenshot Workflow
 Christoph Mantler

App Store screenshots are probably one of the most important ways to show your app’s capabilities to the biggest possible audience. That’s why we took some time to think about how we could make the screenshots appealing to potential users and create a workflow that automates the process of creating them.
Why You Should Automate Your Screenshot Process
Well done and informative screenshots and videos are probably the best way to get a user’s attention (aside from having an awesome app to begin with). However, there are people from various countries with various iOS devices who either are very curious about how an app would look on their device with their language set, or who wouldn’t download an app unless it was offered in their language. This means that to get the attention of the biggest possible audience, you should create screenshots for the most common languages and devices used.
That said, doing this all by hand would no doubt be exhausting and time-consuming, as you’d have to go over the same task repeatedly. Additionally, it leaves the possibility for human errors being made in the process.
Here’s an example of how much work is involved if we were to create all our screenshots by hand: You can currently upload up to 10 screenshots in the App Store. Our app is translated into 29 languages and we have screenshots for 7 different screen sizes. If my math isn’t off, then that would be 2,030 screenshots we would need do by hand, which is a task that probably no one would want to do. So automating this process saves not only a lot of time, but it also likely saves at least one person from an incredibly mundane task.
Screenshot Generation with Fastlane
For our app, we needed a tool to automatically generate screenshots for devices with different screen sizes and in various languages, and we found this in fastlane’s screenshot tool called snapshot. It’s perfect for automating the screenshot process and making it as easy as possible to create the best-looking screenshots for the App Store. Below I’ll outline how it works.
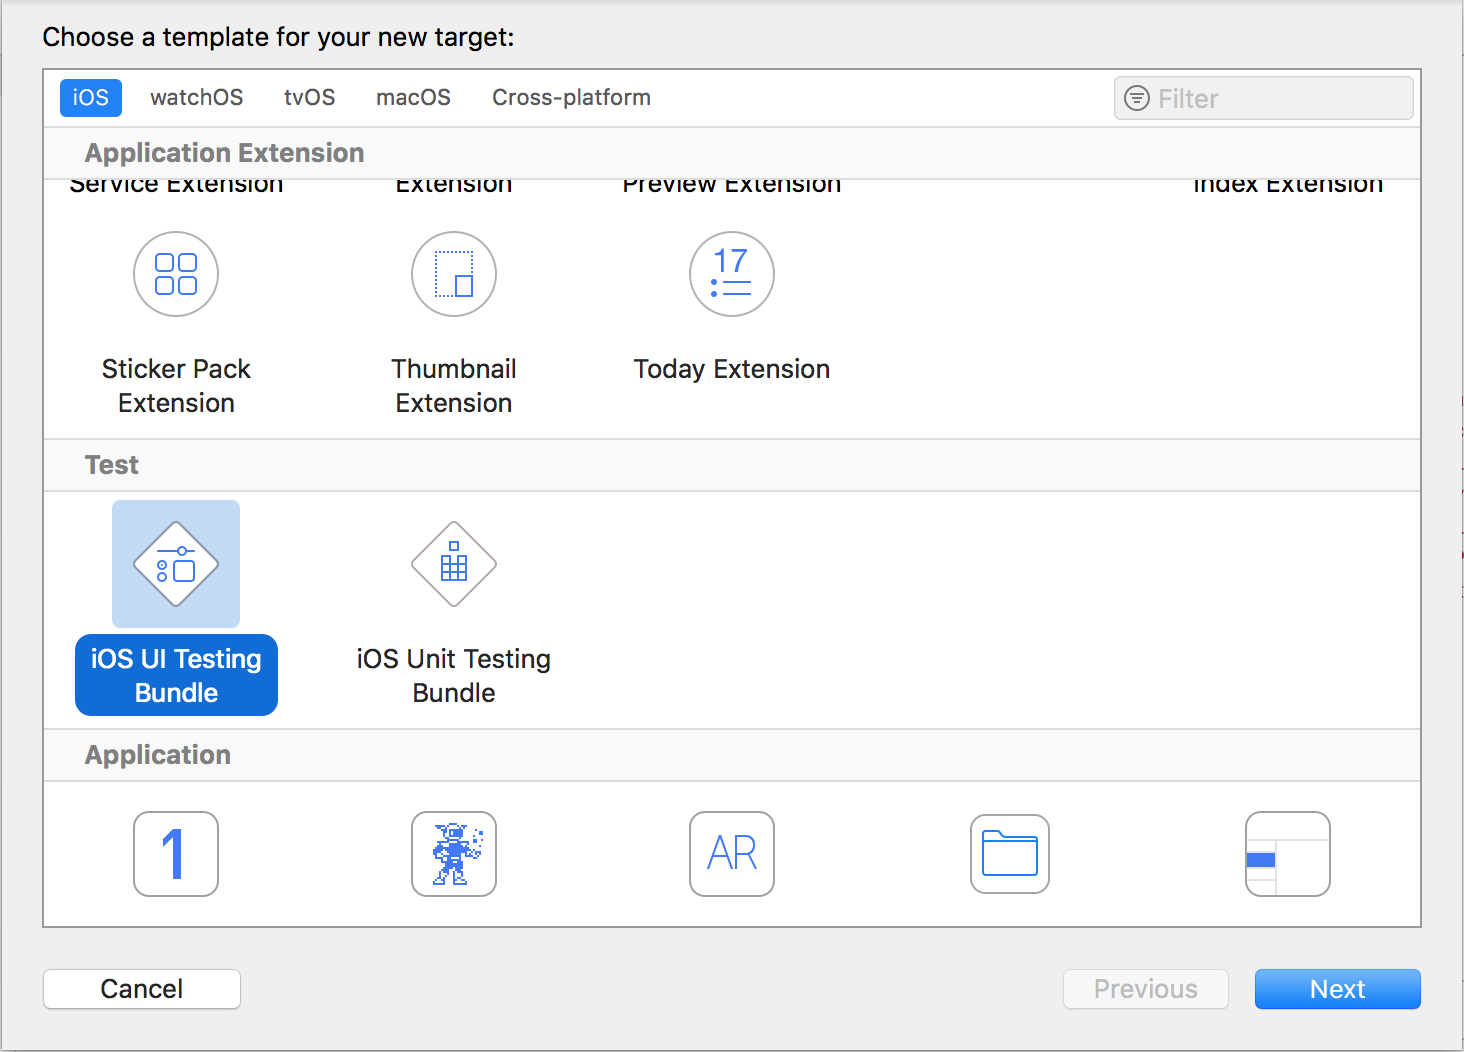
Create a new target for the UI tests
In Xcode, go to File > New > Target. This opens a window where you can select from a variety of templates.
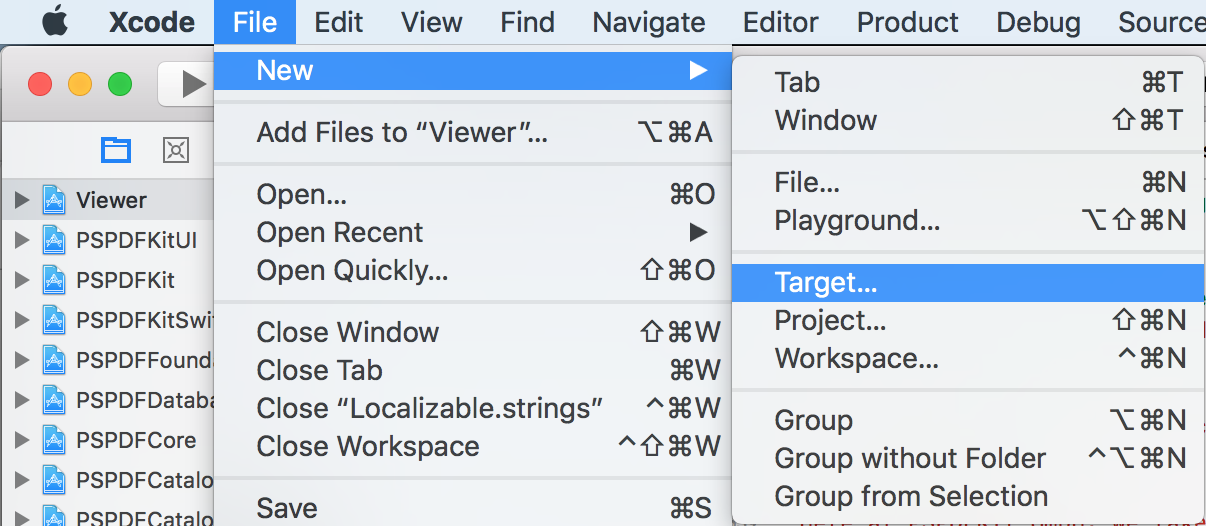
Now scroll down to the Tests section and select iOS UI Testing Bundle.
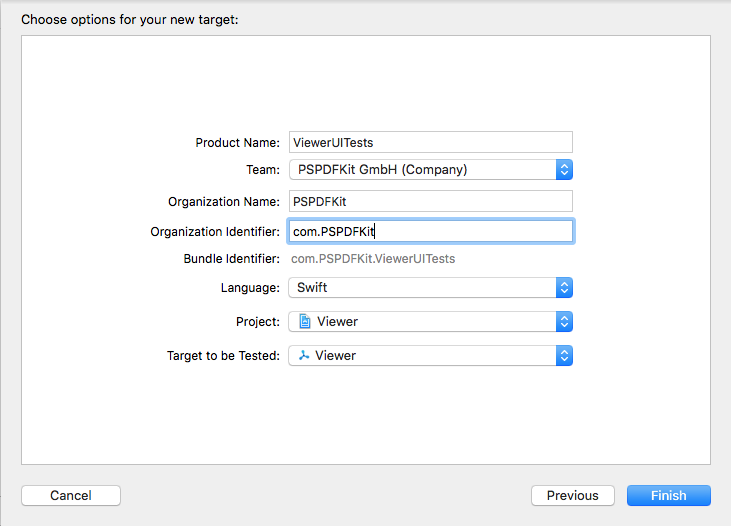
You can enter a name for the test file, choose which programming language it should be written in, and decide in which project it should be used and for which target it should run the tests.
Generate the code for UI testing
After you open your newly created file, you will see three methods: the first one for the setup of the tests, the second one for the teardown, and the last one for the actual testing. Focus your cursor on the last one and click on the red record button at the bottom left. This will launch your app on the currently selected device, and each tap or action will be recorded and converted to code in the test method.
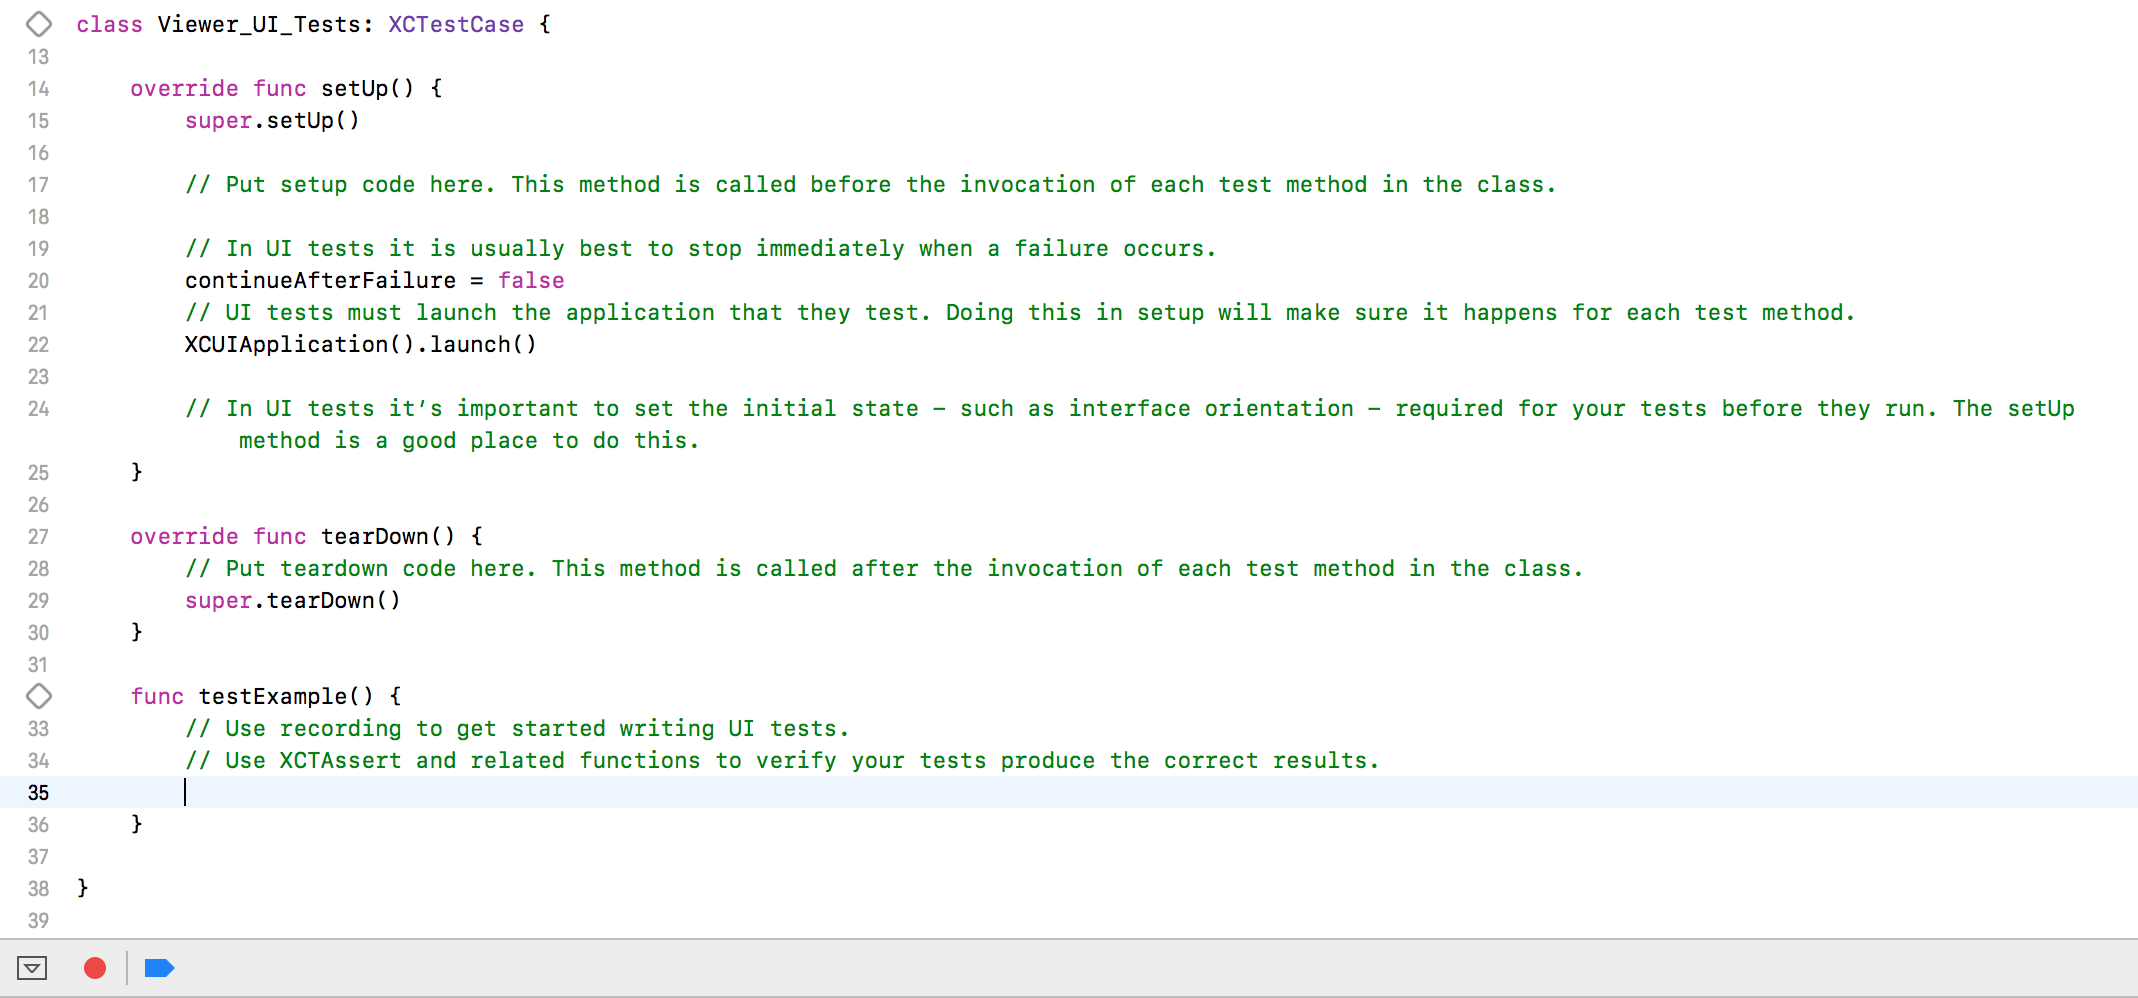
You can also define constants and variables, which are used a lot to make the test code clearer:
func testExample() {
    let app = XCUIApplication()

    // The Thumbnail View used for switching pages.
    let thumbnailCollection = app.collectionViews["Thumbnail Collection"]
    // The navigation bar used for tapping all the buttons.
    let navigationBar = app.navigationBars["Tabbed View Controller"]
    // Dismisses the modal views used on iPad.
    let dismissRegion = app.otherElements["PopoverDismissRegion"]

    // Go to page one.
    navigationBar.buttons["Thumbnails"].tap()
    thumbnailCollection.cells["Page 1"].tap()
    .
    .
    .
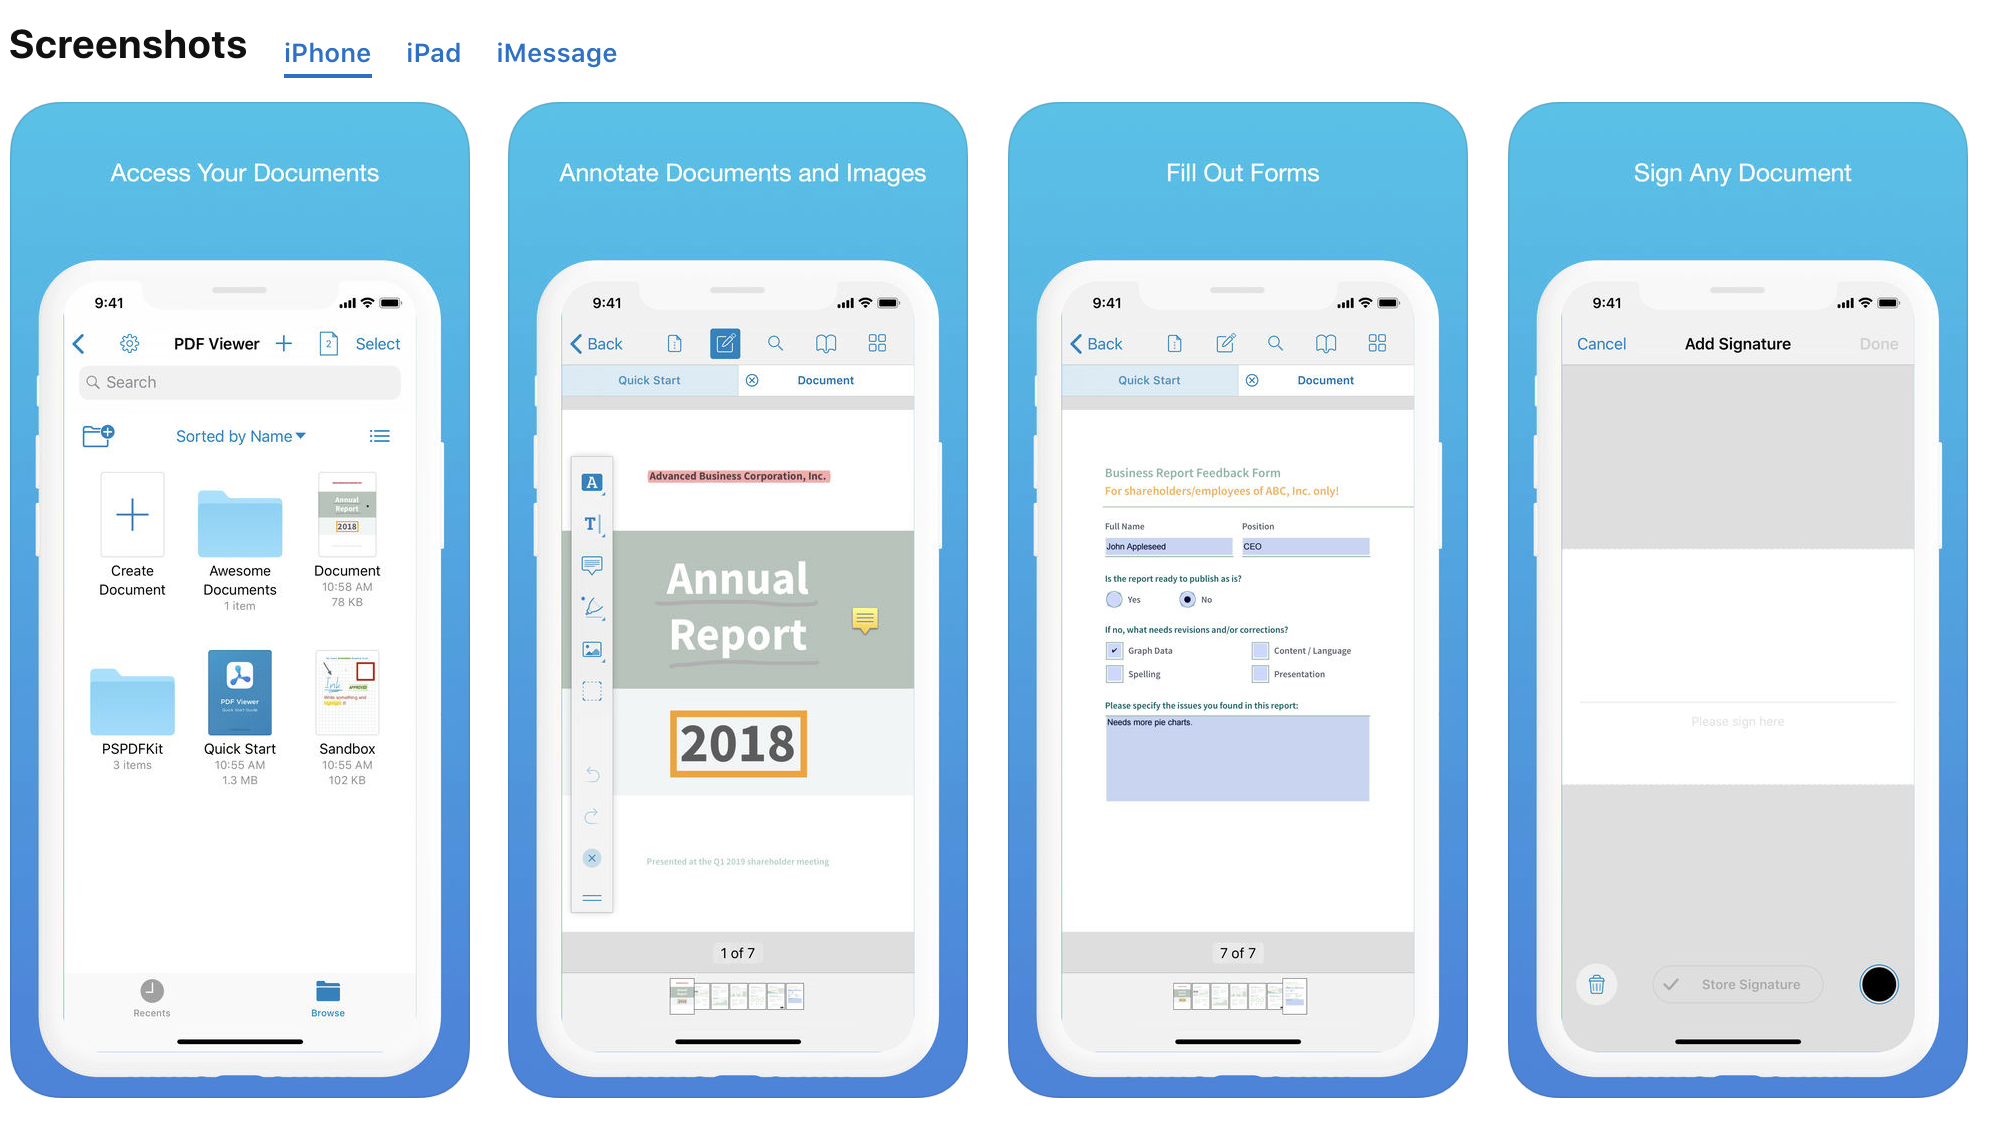
Be smart about what to show in the screenshots
It’s not entirely easy to show the full potential of your app with only 10 screenshots and a short video. Because of this, you should be very smart about what to show, so as to best catch the interest of the user. Ideally, you want to have a nice balance between features that most people use and expect and features that define your app and make it stand out from the competition.
Setting up snapshot and creating the screenshots
For setting up the snapshot tool, you need to follow the steps provided in the fastlane snapshot setup documentation. Below is an example of the buildup for the screenshot and the generation. This is one of the more complicated ones, as the UI in PDF Viewer changes depending upon a device’s screen size. As such, there are some special cases for specific devices:
// Prepare setup for Signature Screenshot.
// Only the case for iPad 12.9.
if app.buttons["Signature"].exists {
    cancelButton = app.navigationBars.element(boundBy: 1).buttons.element(boundBy: 0)
    app.buttons["Signature"].tap()
} else {
    // For all other devices.
    if app.buttons["FreeText"].exists {
        app.buttons["FreeText"].press(forDuration: 1.0)

        // Taps the Signature Button.
        app.menuItems.element(boundBy: 2).tap()
    // For iPhone 5s.
    } else {
        app.buttons["Text"].press(forDuration: 1.0)

        // Taps the Signature Button.
        app.menuItems.element(boundBy: 3).tap()
    }

    if UIDevice.current.userInterfaceIdiom == .phone {
        cancelButton = app.navigationBars.element(boundBy: 0).buttons.element(boundBy: 0)
    } else {
        cancelButton = app.navigationBars.element(boundBy: 1).buttons.element(boundBy: 0)
    }

    // Needed to get the Signature Controller in portrait mode.
    XCUIDevice.shared.orientation = .landscapeRight
    XCUIDevice.shared.orientation = .portrait
}

// Fourth Snapshot: Showing the Signature Controller.
snapshot("3")
After finishing your test file and setting snapshot up as described in the guide, you have to navigate into your project directory via the command line and run fastlane snapshot. This will generate the screenshots and save them to the output_directory, which can be set in the Snapfile.
Framing the Screenshots with Screenshot Framer
After generating the basic screenshots, we thought about how we could make them even better and more appealing to the eye of the potential user. Then we heard about a tool for framing screenshots developed by our old friends from MindNode, called Screenshot Framer.
Downloading Screenshot Framer
Screenshot Framer.app, which is needed for creating a project for each device model, can be downloaded from the GitHub repository as a .zip.
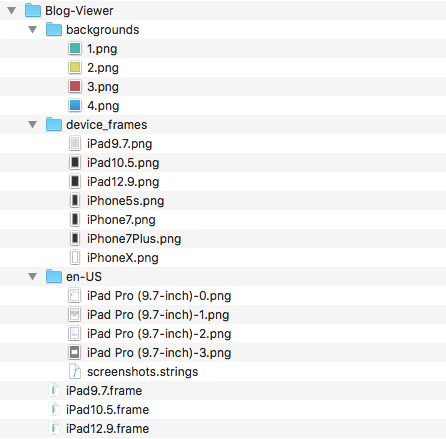
Folder structure
You will need a few specific folders and files, which will be used in the projects later.
-
backgrounds — This folder allows you to specify background images for your screenshots.
-
device_frames — If you want your screenshots framed in a device, then this is the folder where you can store those device frames.
-
Localized Image Folders (en-US, de-DE, …) — These are generated using fastlane’s snapshot tool, but you may also copy them into this folder. What’s important is that you have a strings file in this folder called
screenshots.strings. This will replace theImagevariable later on:
"0" = "Access Your Documents";
"1" = "Annotate Documents and Images";
"2" = "Fill Out Forms";
"3" = "Sign Any Document";
"4" = "Add, Move or Delete Pages";
"5" = "Beautiful Night Mode";
"6" = "Powerful Annotation Editor";
"7" = "Flexible Display Options";
"8" = "Always Accessible Bookmarks";
"9" = "Fast Document Search";
 |
This Number is later replaced with variable "Image"
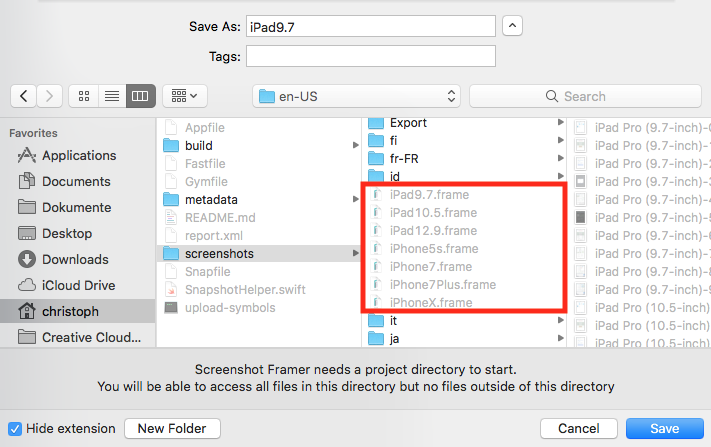
Creating your project
You need to open Screenshot Framer.app and create a new project in the folder for each device that you take screenshots of. In our case, we use PDFViewer/fastlane/screenshots, which allows us to organize the project files in Git while also keeping a tidy folder structure.
Now you can start by adding the components for the Screenshot Framer project, which are background, device, content, and text.
-
Background — This is the background of the entire image. It determines the final dimensions/resolution of the screenshot, which needs to fit perfectly for each device — otherwise, it won’t be accepted for the specific device on the App Store. All dimensions and resolutions can be found on this App Store Connect help page.
-
Content — These are the screenshots created with fastlane’s snapshot tool.
-
Device — This is the device frame for each device type used.
-
Text — This is the localized text presented above the device.
Then we have two variables called Image and Language. These are used to determine the content and language for each screenshot.
-
Image — You can currently upload up to 10 screenshots to the App Store, so the
Imagevariable allows you to use different backgrounds, content, and text for each one. For example, the file path for the background could look like this:backgrounds/background-$image.png. This sets a different background for each screenshot. -
Language — This determines the language in which the text and the content will be displayed. It’s also very important for the output location of all the framed screenshots, as each of them needs to be stored in the matching language folder. For example, the file path for the content could look like this:
$language/iPad Pro (10.5-inch)-$image.png.
There’s a file path to include all the files in the Screenshot Framer project.
-
File — This is the path to the files of the four parts mentioned above.
Now all the parts need to be aligned on the background.
-
Frame
-
X/Y — These coordinates determine the position of the object, starting from the bottom left.
-
Width/Height — These determine the size of the object.
-
The size of the text also needs to be adapted to the rest of the screenshot.
-
Font(Size) — This determines the size of the displayed text.
Last but not least, we need to export the finished, framed screenshots so they can be uploaded.
-
From — The starting point specifying from which image we should begin. This should be the first
Imagevariable. -
To — The ending point. This should be the last
Imagevariable. -
Output — This is the path where the finalized framed screenshots will be generated. It could look something like
Export/$language/iPad 9.7 - $image.png. -
Export — Tapping this button will only create a final screenshot for the currently selected language and image.
-
Export All — Tapping this button will create the final screenshots for all available languages and images, but just for the selected project. This will usually be used when creating the screenshots.
However, there’s also an easy way to generate all screenshots for all devices that doesn’t require running the Export All option for each project.
Generating the framed screenshots from the command line
First you need to locate your project directory (e.g. /YourApp/fastlane/screenshots) in your terminal.
To create all framed screenshots from all available projects, enter the following command into your terminal:
Screenshot-Framer-CLI -project .
You can also create framed screenshots of a single device by adding the project parameter at the end:
Screenshot-Framer-CLI -project ./iPhoneX.frame
Uploading Your Screenshots to the App Store
This can also be done using the fastlane snapshot tool. For a detailed guide on how to do this, please take a look at fastlane’s documentation. The two most important fastlane actions are probably the one for taking the screenshots and the one for uploading them. You can simply define a so-called lane for these actions in the fastlane/Fastfile, which makes the screenshot process very easy, even for non-tech-savvy people. Our defined lanes look like this:
desc "Creates screenshots locally"
lane :generate_screenshots do
  snapshot
end

desc "Updates the screenshots while preserving existing metadata from App Store Connect"
lane :update_screenshots do
  deliver(skip_metadata: true, skip_binary_upload: true, screenshots_path: "fastlane/screenshots/Export")
end
To execute these actions, you simply have to navigate to your project folder and enter the commands into the command line, like this:
fastlane ios generate_screenshots

fastlane ios update_screenshots
That’s it! Now you know how to properly set up Xcode UI tests and how to automatically generate screenshots from them. This alone will save a ton of time and work, not to mention the fact that you can also frame them and make them stand out from the crowd. What are you waiting for? Go ahead and upload them to the App Store! And trust me, they will surely attract a lot of users!